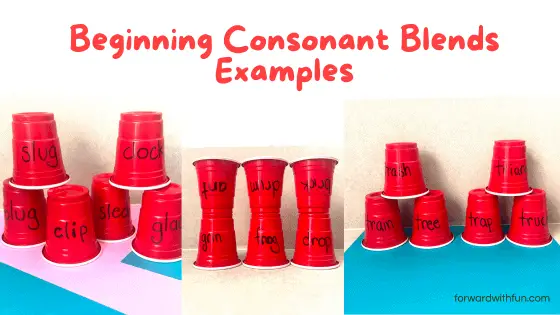
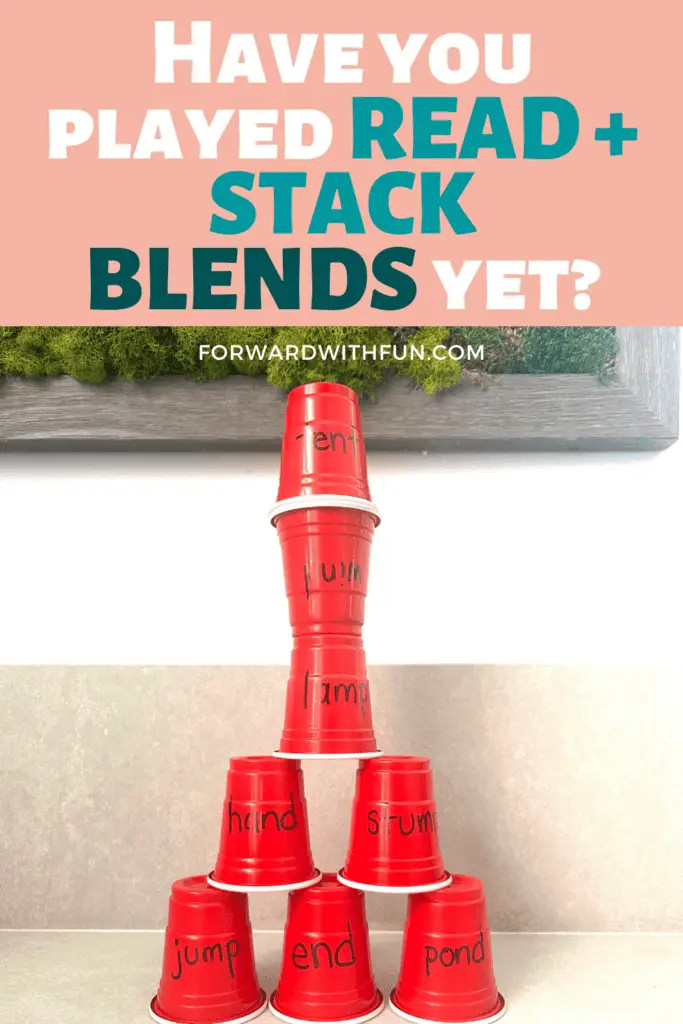
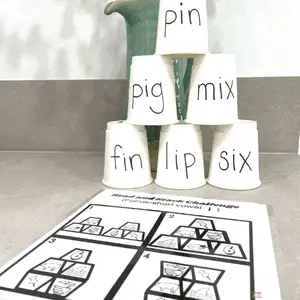
While teaching first grade intervention, I had a hard time finding engaging consonant blends activities that would capture my struggling readers' attention! So I took our wildly popular kindergarten cup stacking challenge and developed a version that incorporates all the blends my first graders needed to learn.
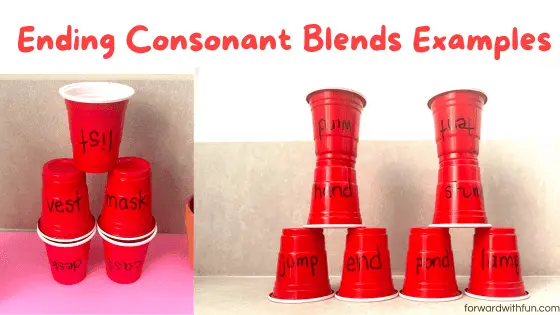
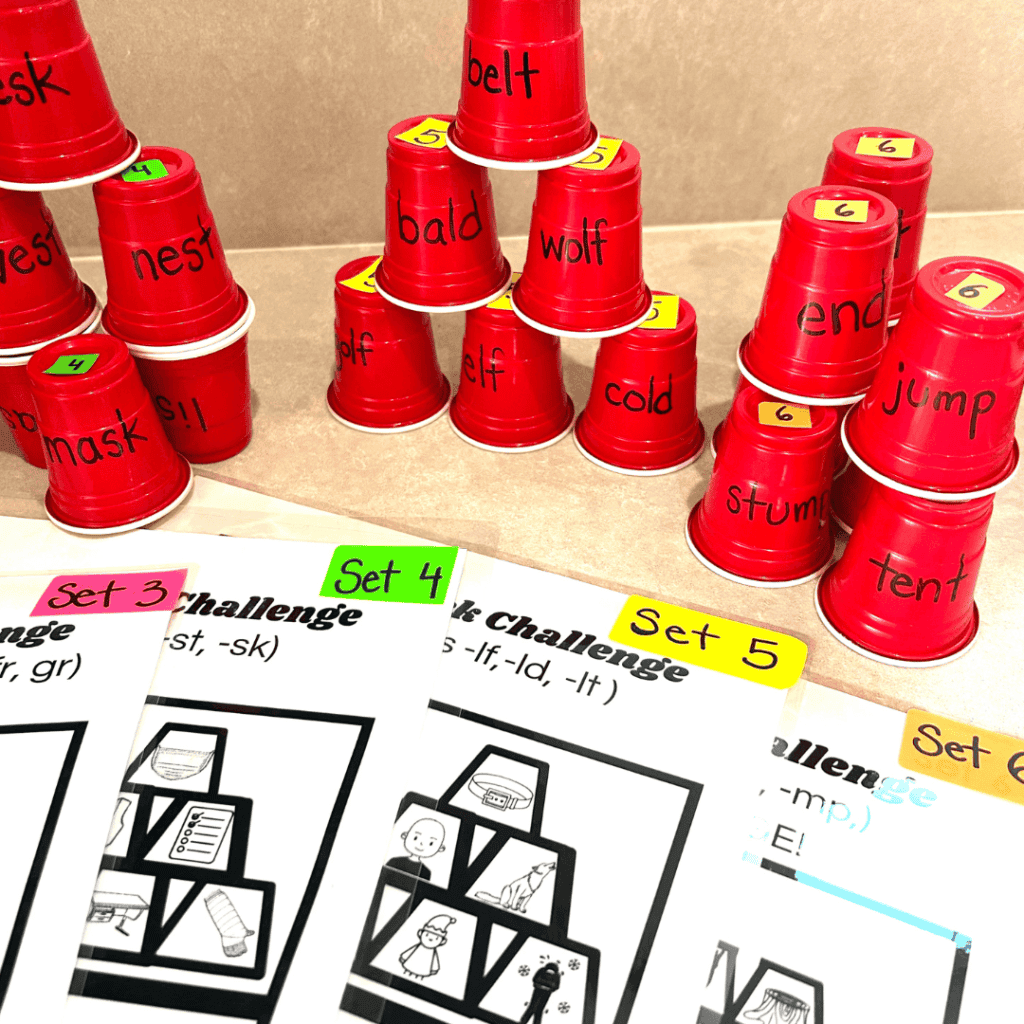
Print and begin stacking cups to match the pictures. Some challenges include 6 cups, some 8, and some 9! I had to pry these cute little cups from my soon-to-be first grade daughter's hands, who can't resist a hands-on approach that enhances learning through play.

*As an Amazon associate, I may get a teensy commission from any purchases made through my links. Thank you!
The six sets of consonant blends activities will be a comprehensive way to practice reading consonant blends with first graders. I would even suggest them to advanced kindergartners and second graders needing more practice.
What you need to play:
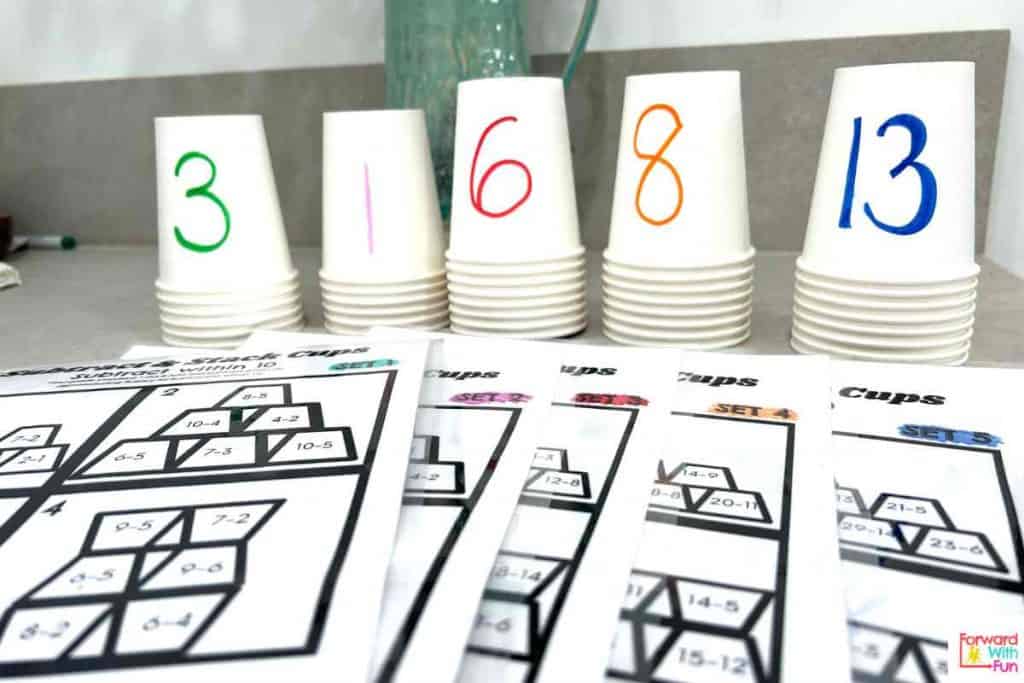
To organize, you can write the words in different colors, as shown with the subtraction cups, or use labeling stickers like I did for our consonant blends cups. Some challenges have 6 cups, some have 8, some have 9. So you have differentiation too! Win, win!
Teaching blends to first graders involves a few key things:
Before kids read and write blends, they need to be able to hear that the blend is made up of multiple consonant sounds. Orally segmenting works into their smaller parts and blending sounds into whole words is key!
Example of what I would say while teaching this skill: What word am I making? /s/ /k/ /i/ /m/. Blend the SOUNDs together to make the word "skim!" Now let's segment that word. Put up 4 fingers and touch a new finger for each sound: /s/ /k/ /i/ /m/.
I find that when I explicitly teach consonant blends, then follow up with a game, the information gets put to practice in a meaningful way. For direct instruction, I love the free resources provided by UFLI Toolbox! They have a great scope of sequence that helps me teach consonant blends in an order that make sense to new readers.
The key to teaching blends in a fun way is to incorporate games and activities that appeal to young learners. Activities like cup stacking with blend words provide a tactile experience that keeps children engaged while they learn. They'll be less flustered by the new and possibly difficult skill, because they'll be in a fun frenzy of cup stacking. It's almost like they don't know they're learning!
First graders typically begin with two letter beginning consonant blends such as "bl," "cr," "dr," in words like blip, cram, and drop. Kids are most likely to struggle with the "tr" confusing it for "chr" and the "dr" confusing it for "jr." I find that making an anchor chart for those specific sounds can help serve as a visual reminder.
The Cup Stacking Challenges for consonant blends not only include all the beginning blends listed but also the very important ending blends! You'll find ending blends with n, m, l, and s in these activities in words such as jump, desk, hand.
When teaching blends to first graders, it's beneficial to start with blends that appear frequently in simple, everyday words. I always begin with beginning consonant blends that include the letter L, then I move on to ones that have the letter R next. Focus on blends like "bl," "cl," and "fl" initially, as they are encountered early in basic vocabulary and are easier for young learners to grasp. As children become more confident, gradually introduce blends that are slightly more challenging but still commonly used.
Ready to try these engaging consonant blends activities with your first graders? Explore our printable resources designed to make learning blends a delightful adventure!
Download your First Grade Frenzy Consonant Blends Games Now: bring joyful learning into your classroom!
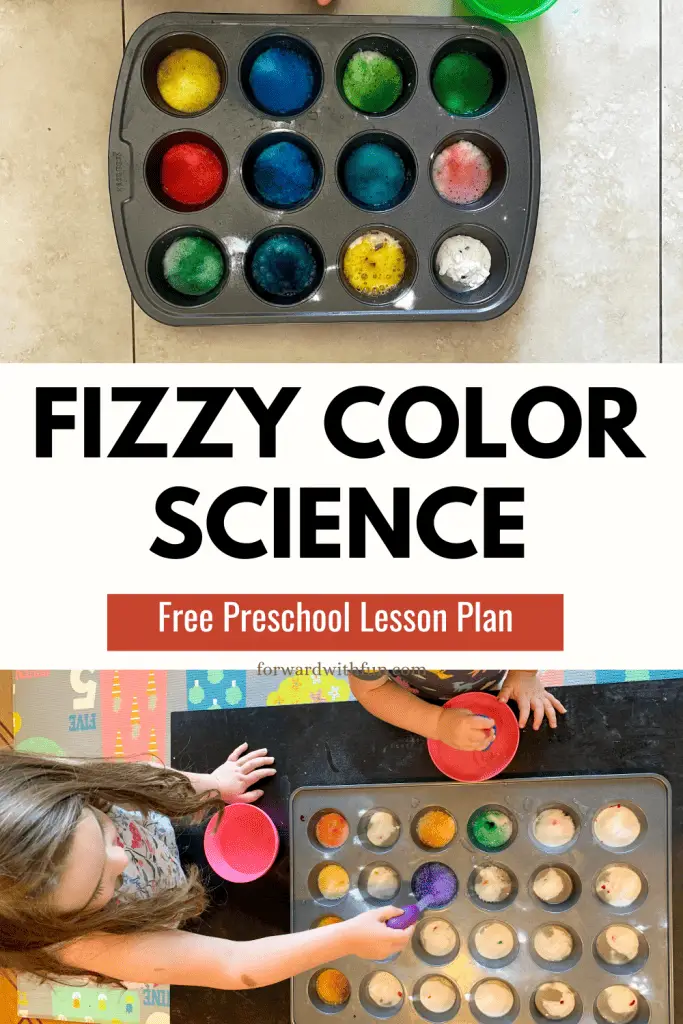
Today, we're going to dive into a squeal worthy preschool science experiment known as Fizzy Colors Surprise, and it comes with a FREE downloadable preschool science lesson plan at the end of this post.
With just a few household ingredients, you'll dazzle your preschoolers in the name of chemistry. Each time they add a dash of vinegar to a muffin pan, a new surprise color will be revealed as the baking soda and vinegar reacts and reveals the food coloring below. So, let's gather our materials and dive into the fascinating world of chemistry!
*As an Amazon Associate I may get a small commission if you decide to purchase from my links. Thank you.
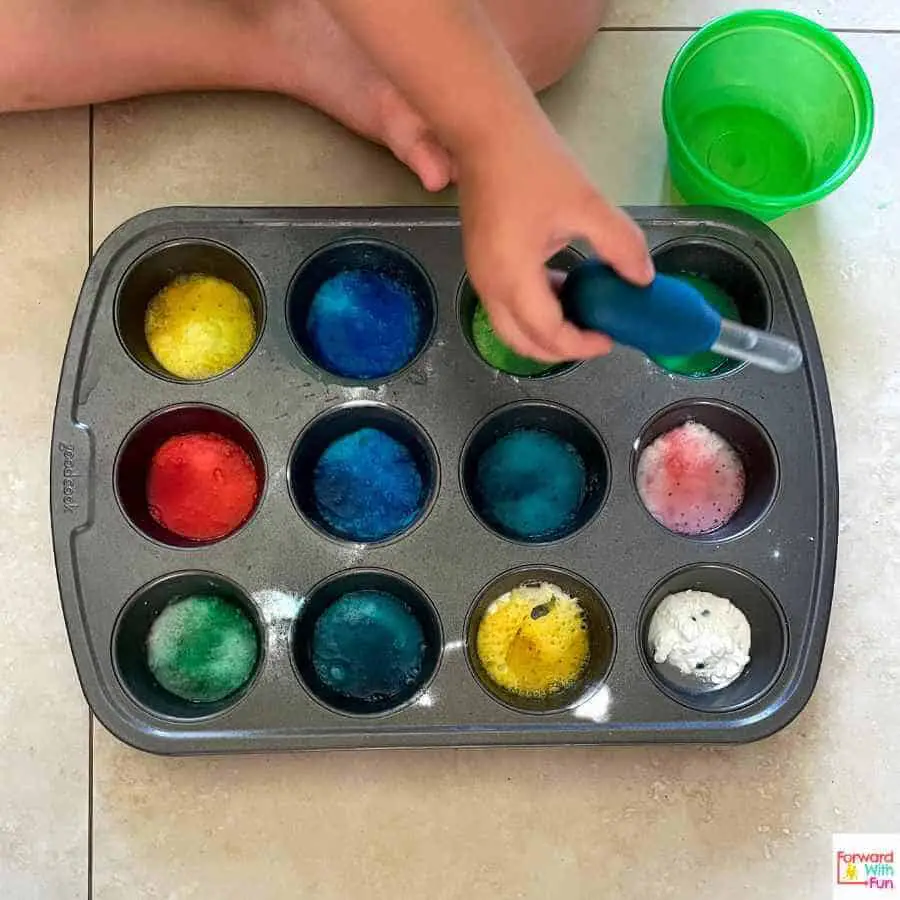
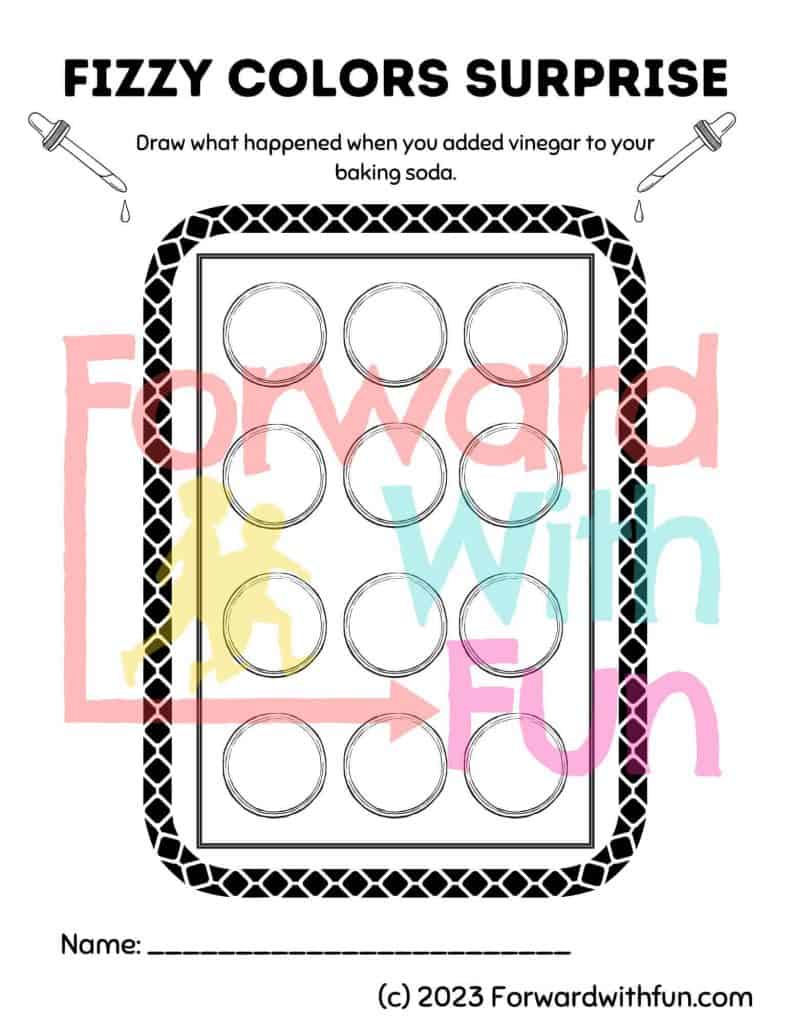
By doing this experiment, we will introduce preschoolers to basic chemical reactions using baking soda and vinegar. Children will make predictions and observations, record their findings, and describe the changes they notice happening during the chemical reaction.
Standards listed in the lesson plan are from the California Preschool Science Standards.
Materials:
Prepare for the experiment:
Watch this video to see how easy it all is!
The Fizzy Colors Surprise experiment is an excellent opportunity for preschoolers to engage in scientific inquiry while having a blast with colors and textures (much like our most popular free STEM lesson plan The Floor Is Lava!). Through this hands-on experience, children develop their observation skills, make predictions, and have fun.
Remember, the most important part is to foster a sense of wonder and curiosity, so be sure to have fun and encourage open-ended discussions throughout the experiment.
Safety Note: Although this experiment is safe when conducted with adult supervision, please remind children not to ingest any of the materials used. Also, wearing safety goggles can add an extra layer of protection for their eyes.
So, gather your materials, put on your scientist hats, and let the fizzy colors surprise unfold! Happy experimenting!
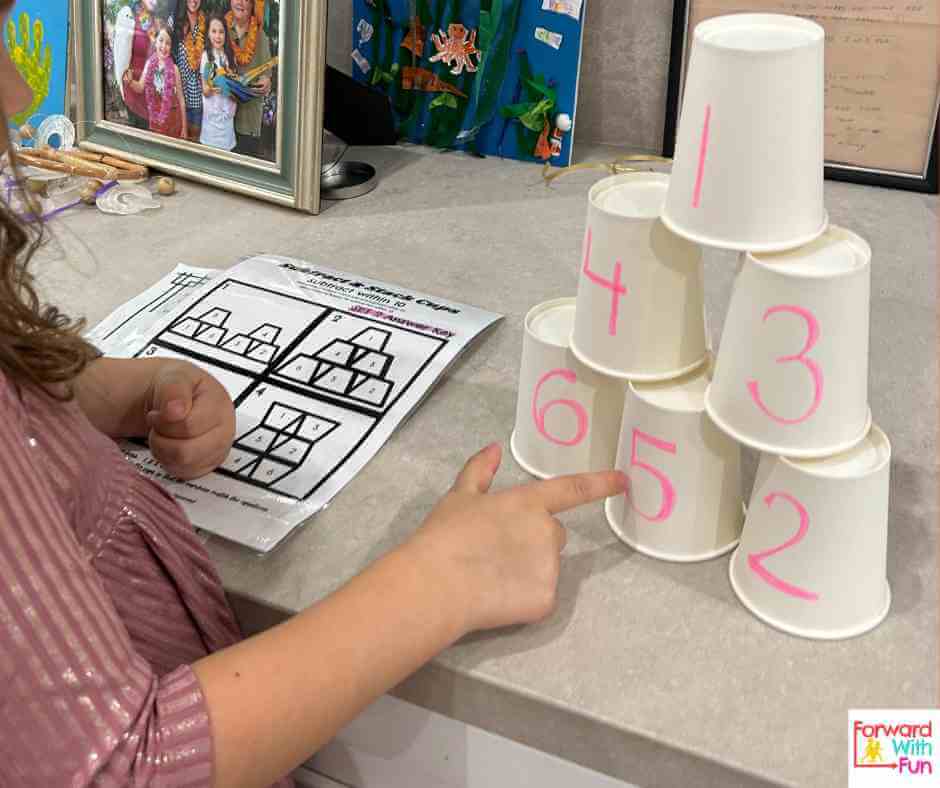
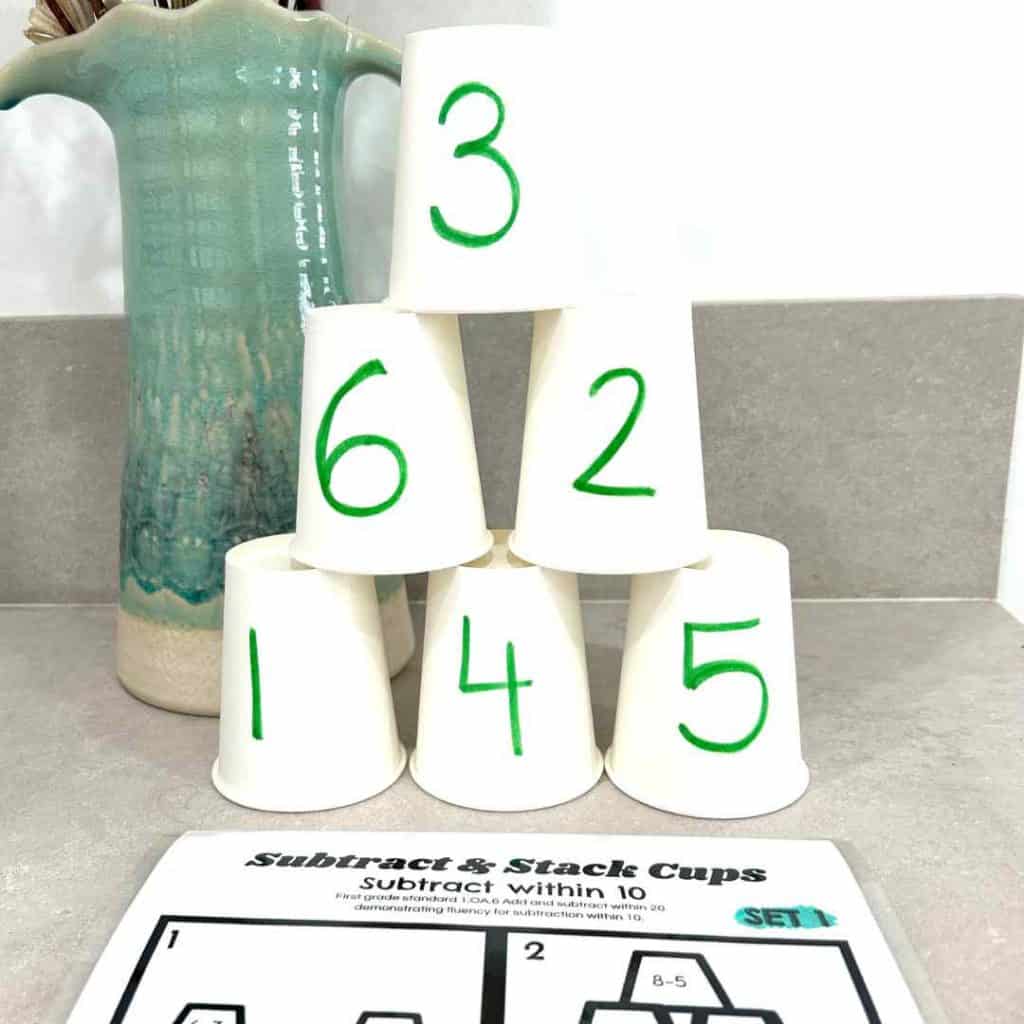
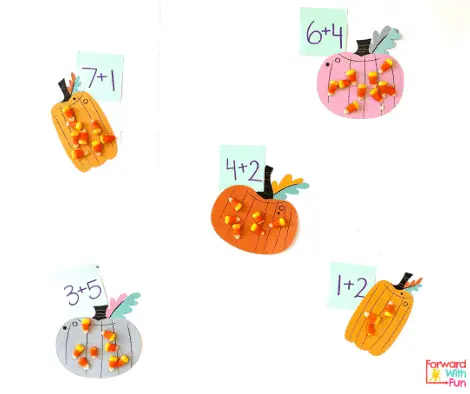
Children are building subtraction fact fluency in kindergarten and first grade. This means they need to know and practice their subtracts "facts" quickly. How can we motivate children to practice their subtraction facts? I can tell you, it's definitely not with a subtraction facts worksheet. Just the thought makes me cringe!
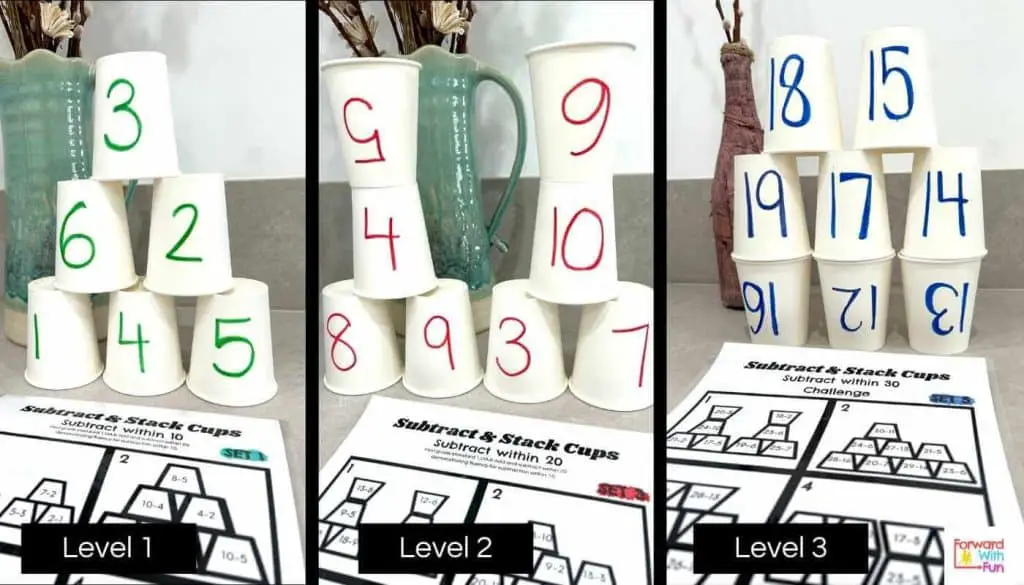
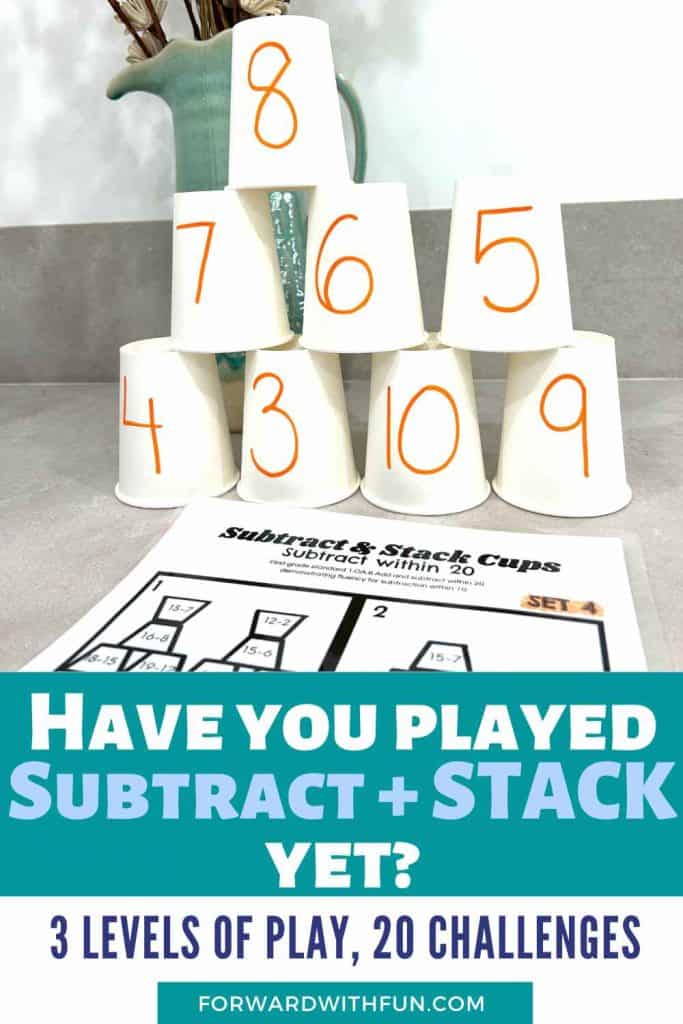
Success comes through playing games like these Subtract and Stack Challenges. I've made 5 different sets of challenges that cover subtractions facts in three ranges:
*As an amazon affiliate I may receive a teensy commission if you buy something from one of the links in this post, at no additional cost to you. Thank you.
To get to the nitty gritty, subtraction facts to 10 are any equation where something is subtracted from a number 10 or lower.
Subtraction facts to 20 are anytime a number is subtracted from 20 and the difference is a 1 digit number.
So technically, 20-5= 15 is not a subtraction fact, but 20-15=5 is a subtraction fact!
Fluency is the ability to perform an action quickly, almost to the point of automaticity. Subtraction fact fluency is another way to say the ability to do subtraction problems quickly.
The word fluency also shows up in the common core math standards such as in this first grade standard you'll see printed on the stacking challenges:
"1.OA.6 Add and subtract within 20 demonstrating fluency for subtraction within 10."
As children do more and more fun subtraction challenges, they build their fact fluency!
We all love a good print and play activity, and these subtraction stacking cups are the cream of the crop.
If you've already purchased my Addition Stacking cups activities, then you can use those EXACT same cups for both challenges. Want them? When you check out there is an option to bundle the addition and subtraction fact fluency challenges (40 total) for a discount. It's too good!
Then you'll have 10 sets of ready-to-go addition and subtraction activities for kindergarten and first grade, that you have prepped in a total of 5 minutes maximum. Did I mention they include answer keys so kids can self check?
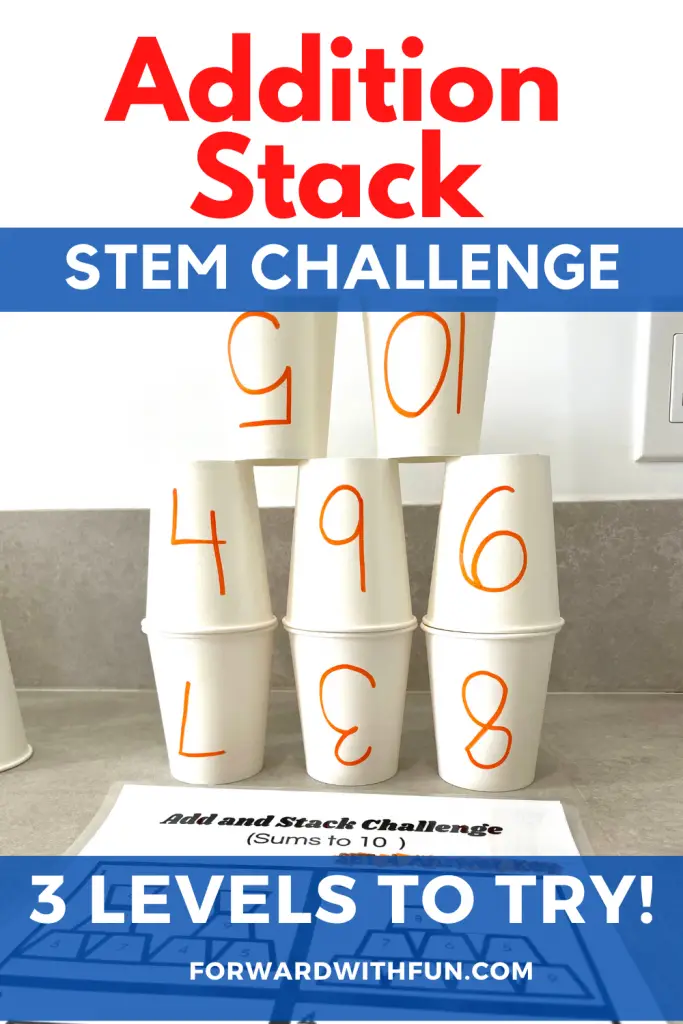
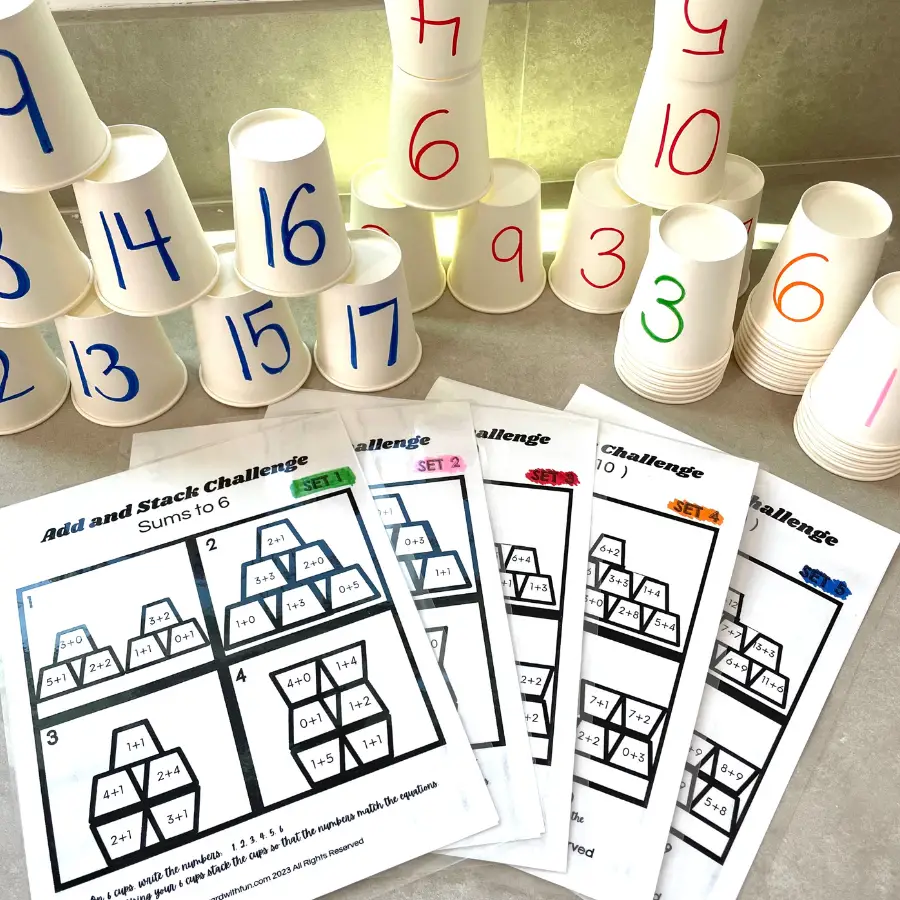
The Addition Cup Stack builds fact fluency to 6, 10, and 20 through hands-on fun that no child can resist. Just print the 20 differentiated addition challenges for students of all abilities and grab your cups.
*As an amazon affiliate I may receive a teensy commission if you buy something from one of the links in this post, at no additional cost to you. Thank you.
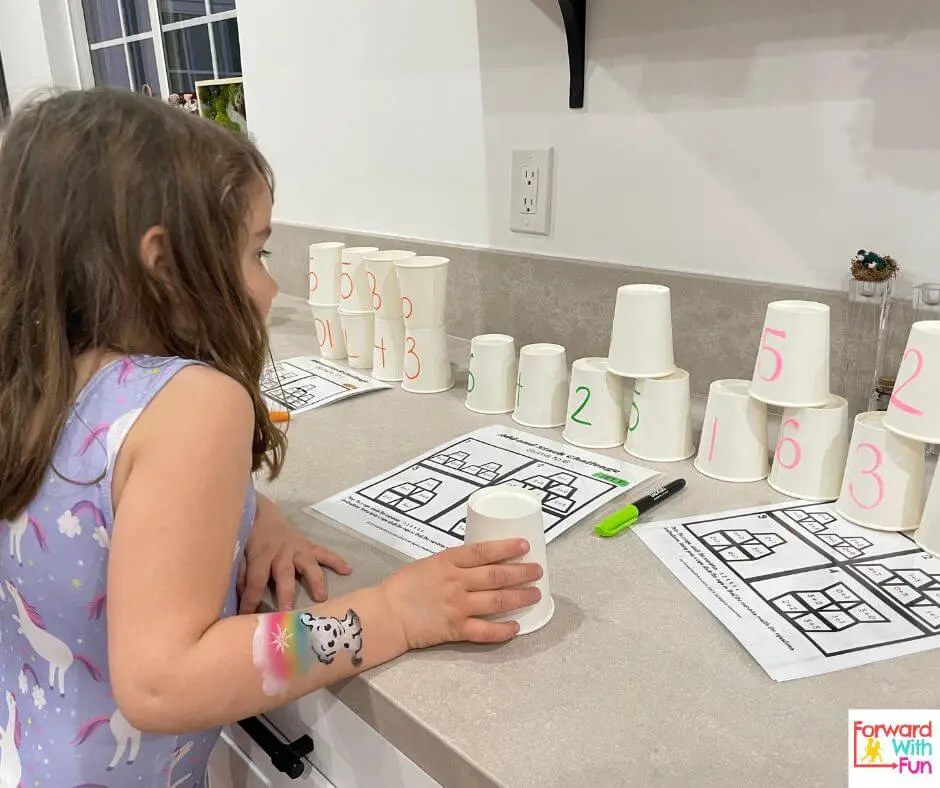
It's all in the name. Add the numbers on the sheet, and then stack the cup with the matching number.
Kids will build many cup towers while mastering addition, in a ridiculously fun activity that they'll beg to play. Believe me, I had to pry my children off these cups in order to take the pictures in this post.
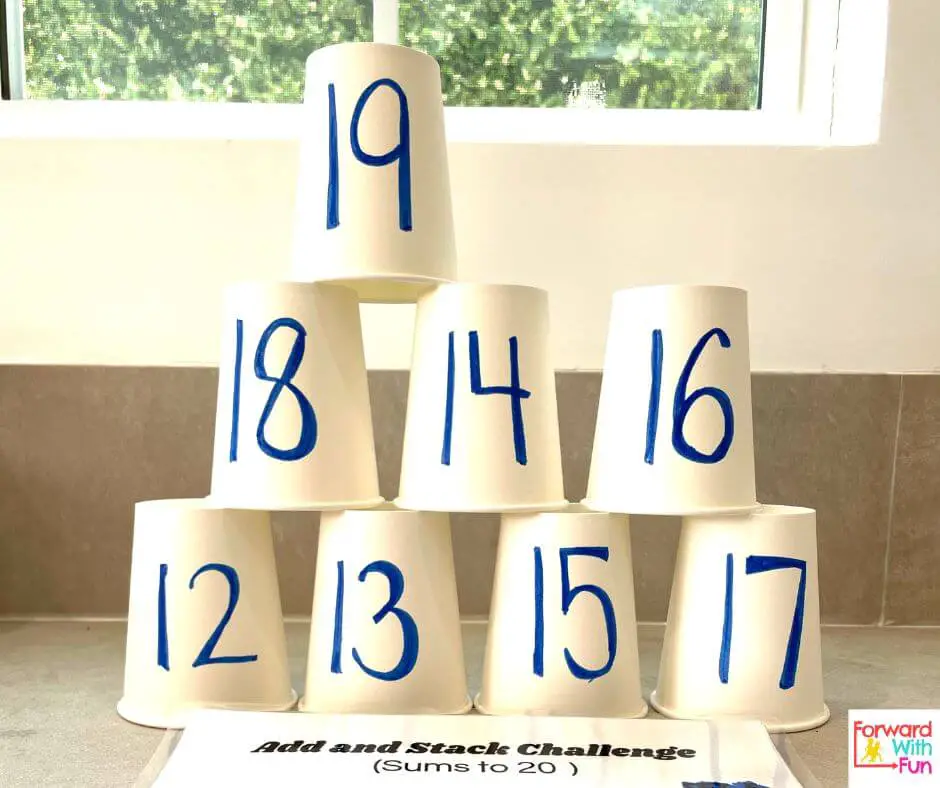
The 5 differentiated sets of stacking challenges are made to meet the needs of learners at varying levels. Choose from adding to 6, to 10, or to 20 for a super challenge.
As a very loose guideline, this is how I use the cups:
Print out the 5 sets of challenges. Each will come with an answer key, so that kids can self check as they build, making this activity perfect for an independent math center.
To make the activity as kid run as possible, I laminated each set with its Answer Key on the back. So children will be able to self-check when they have completed a challenge.
You know how sometimes you buy an activity and you just never use it because it's too complicated to do? This is the COMPLETE opposite. Easiest. Prep. Ever.
These cups will be used for sets 1 and 2. Both sets work on sums to 6. (So for one child, you could use the same cups for sets 1 and 2.)

These cups will be used for sets 3 and 4. Kids will make sums to 10 here. (Again, if you'd like to reduce waste, you can just use one set of cups for these.)
These cups are for the final set 5, for practicing sums to 20.
To avoid the cups from getting mixed up in my classroom, I have written the numbers in different colored markers that match the set number on the challenge sheet. This way kids with the same numbers on their cups won't fight over whose is whose. -Phew!-
You'll get:
Peep that bonus to add the subtraction stacking cups for a discount when you bundle!
Addition Cup Stack meets the common core standards for kindergarten and first grade.
Kindergarten Operations and Algebraic Thinking K.OA
Understand addition as putting together and adding to, and understand subtraction as taking apart and taking from.
First Grade Operations and Algebraic Thinking 1.OA
Represent and solve problems involving addition and subtraction
Besides the obvious, addition, kids are learning how to plan out how to move things in space otherwise called motor planning.
According to TheOTToolbox.com, motor planning is "the ability to plan out, organize, and carry out an action." In this case it is the ability to think about how to stack the cups to match each challenge. Will the cups need to be flipped? Right side up? How can we balance them on top of one another?
As adults this might seem really simple, but many young children benefit greatly from activities that involve fine motor planning, like this free printable STEM challenge.
Did you love this addition STEM challenge? I know I did!
I've finally finished the subtraction cups that use the SAME numbered cups we have already prepped. So you'll just need to print and be on your merry way. Does that count as a life hack?
The original cup stacking challenge that inspired addition cups is actually a reading activity that went viral this year (2023). So if you're working on sounding out CVC words (consonant vowel consonant words), then be sure to check out this activity as well. I even included cups for the digraphs sh and ch to keep your kiddos challenged.
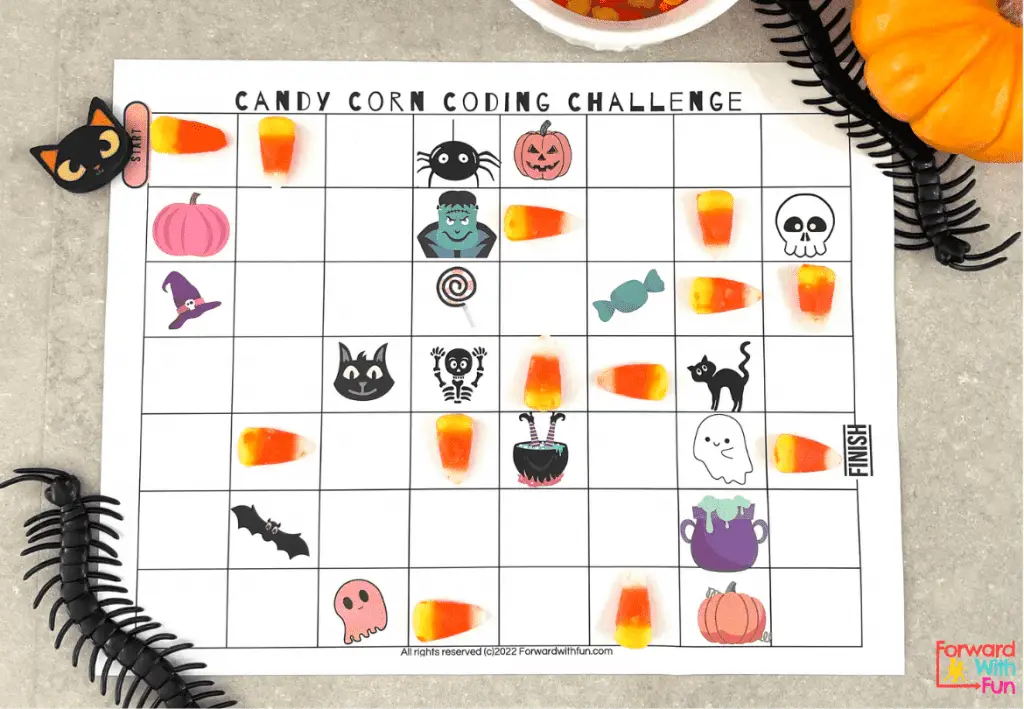
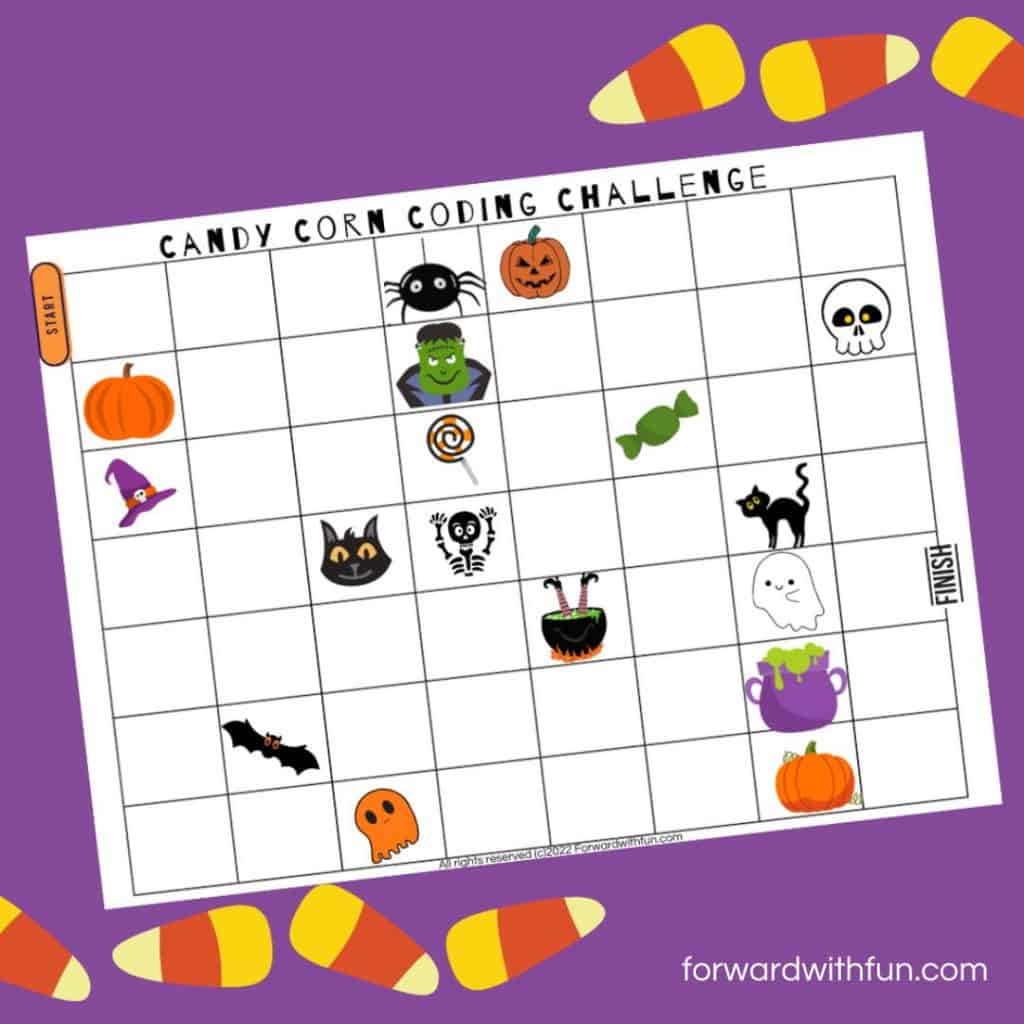
Teach coding in kindergarten with this free to print candy corn stem challenge. It’s so simple, you can do this with your whole class- all you need is a bag of candy corn! Let’s go.
Before you print, you’ll need to understand how to teach coding in kindergarten and why on earth we’re going to use candy corn to do it. So read on.
Can a 5 year old learn coding? Of course they can! Most of the coding we teach in kindergarten is called directional coding as opposed to block coding.
Directional coding is coding that is giving directions very simply, usually through a series of arrows. This can be done on the computer or in an unplugged coding activity, such as this one.
In this hands-on candy corn STEM challenge, kids will be using the candy corn as arrows as they practice directional coding to get from start to finish. Then they’ll test out their code, to see if it works!
Coding may not be part of the learning standards now, but I know it will be! The world is shifting to be more and more technologically centered, and many future jobs or even hobbies may rely on the ability to code.
When we start coding in kindergarten, we build these future skills that children will need. It's like learning a language; the earlier you begin, the more fluent you will be.
Unplugged coding activities are done without a computer, so many kids can participate at once, building skills they'll need on computers.
The most typical mistake I see when I am teaching directional coding to kindergartners is the addition of redundant codes. When you are coding, if your arrow points down, you will not need another arrow until you want to change directions.
You should never have two arrows in a row that are pointing the same way.

Directional coding is about using basic arrows to direct your token item where to go. Only use an arrow when you are changing directions.
The only directions for our candy corn to point are:
Remember: there is no diagonal pointing here!
Objective:
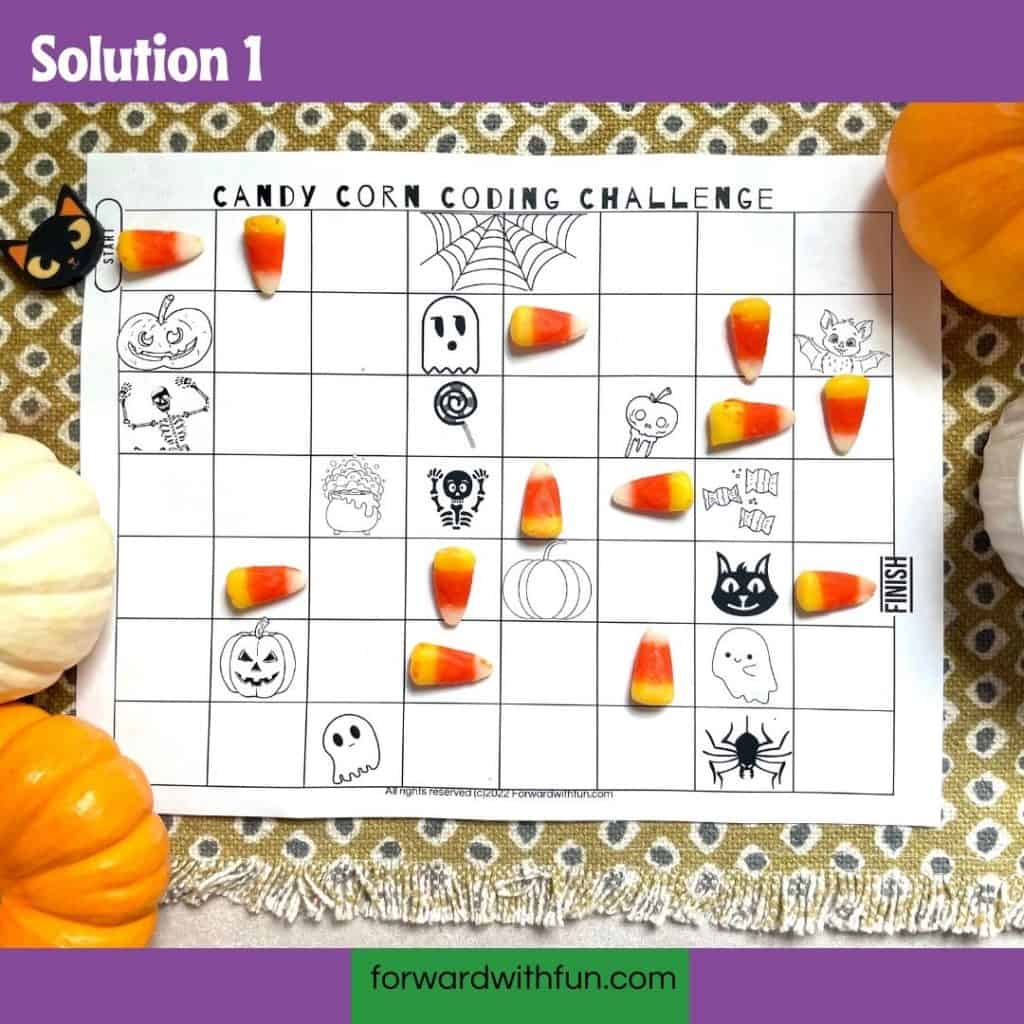
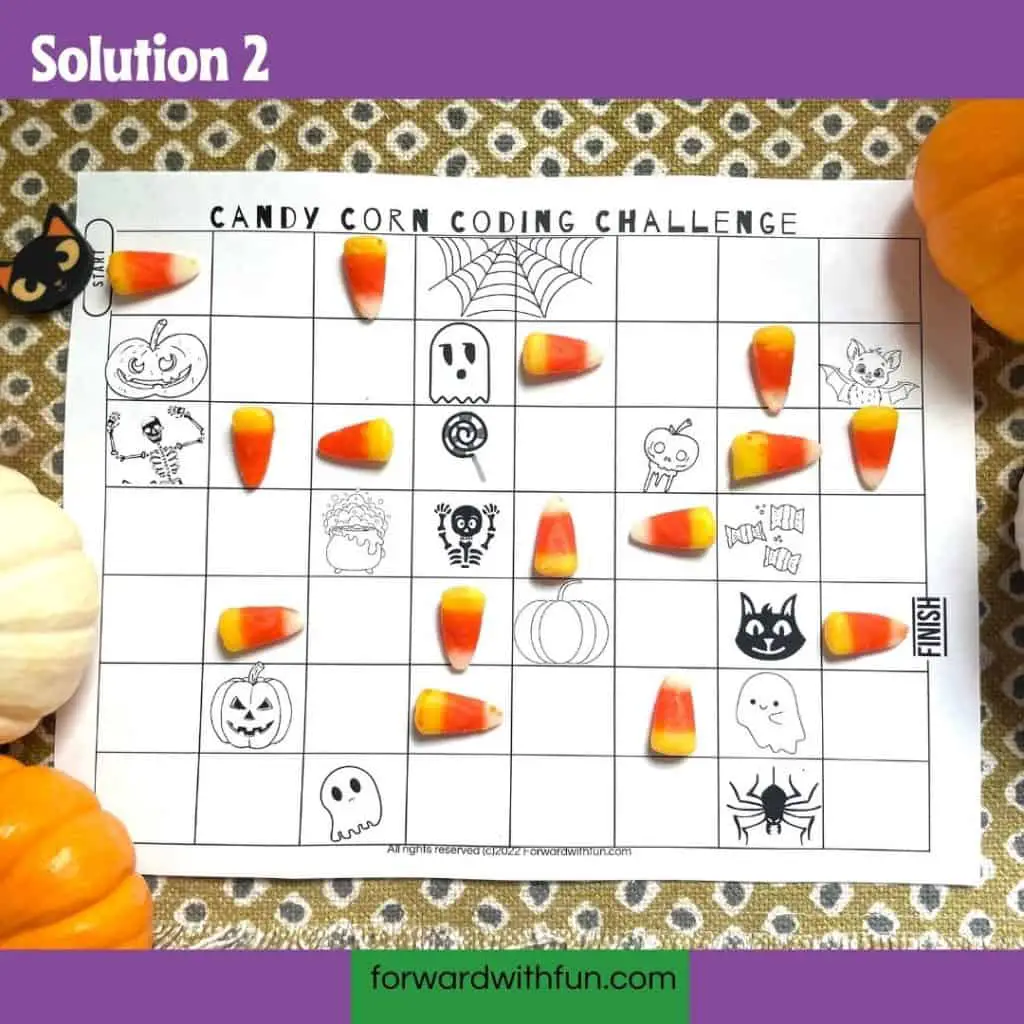
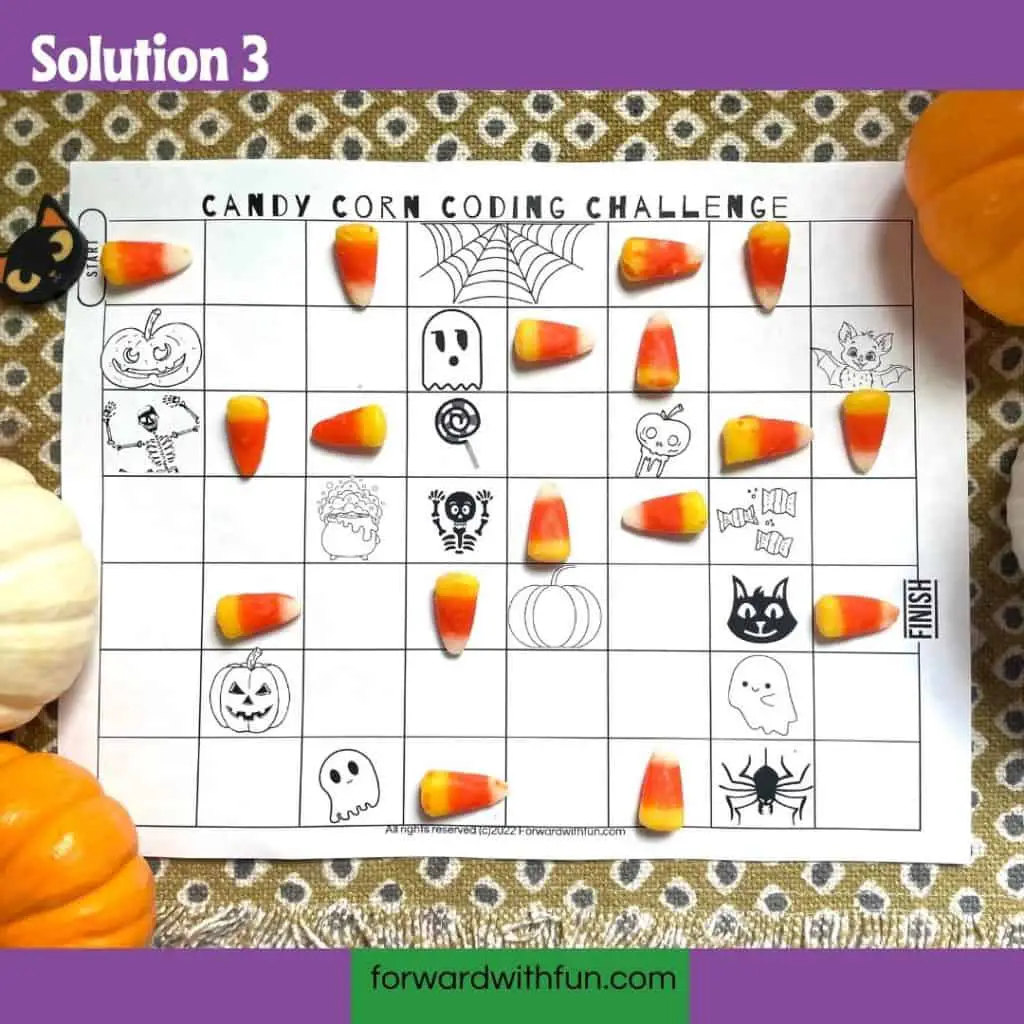
Code a path from start to finish, using candy corn. Test out the candy corn code by following it with a token of choice.
Directions:
Answer key/code:
There is more than one way to complete the coding challenge. Here are the photos of the possible correct answers. Remember to pin or bookmark this page so you can check the answers against your kiddos' or simply follow their path.
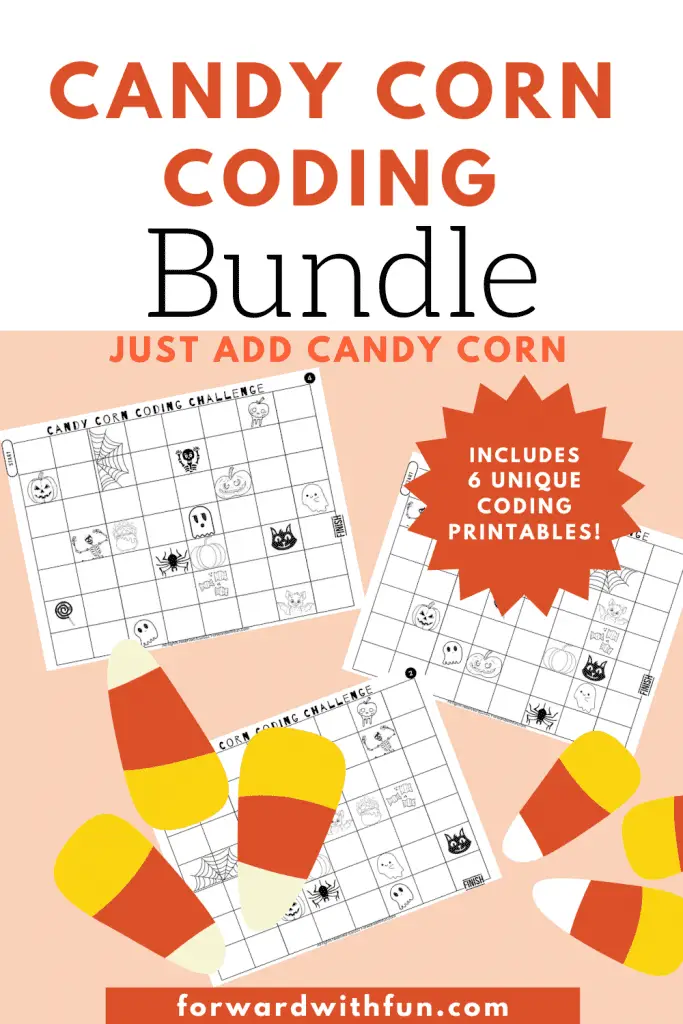
If you feel especially passionate about kids coding, or even just want to make an independent center out of this activity, I've made a bundle of 6 black and white coding printables for you.
Each printable has 2 or more solutions so you'll have 12 additional directional coding activities to do with your kindergartners, along with your freebie.
Grab the bundle of 6 kindergarten printable coding worksheets for only $1.50. If you're looking for just the FREEBIE, just keep scrolling! : )
Check out our post of simply delightful Halloween activities for your leftover candy corn. Please follow and tag @forwardwithfun on social media if you share this activity!
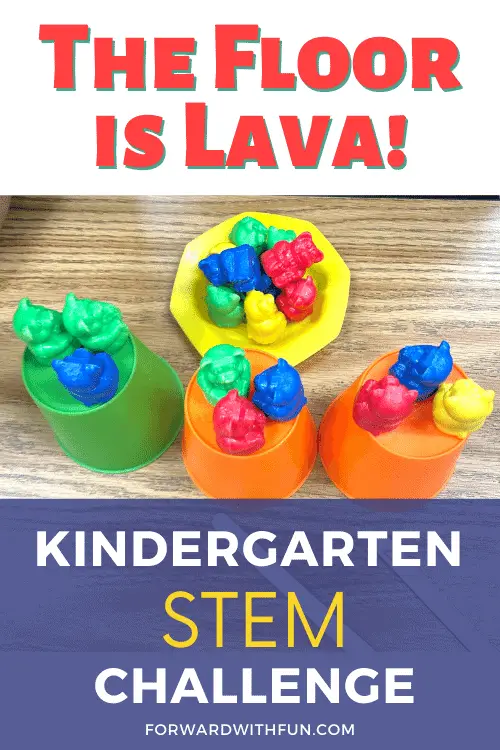
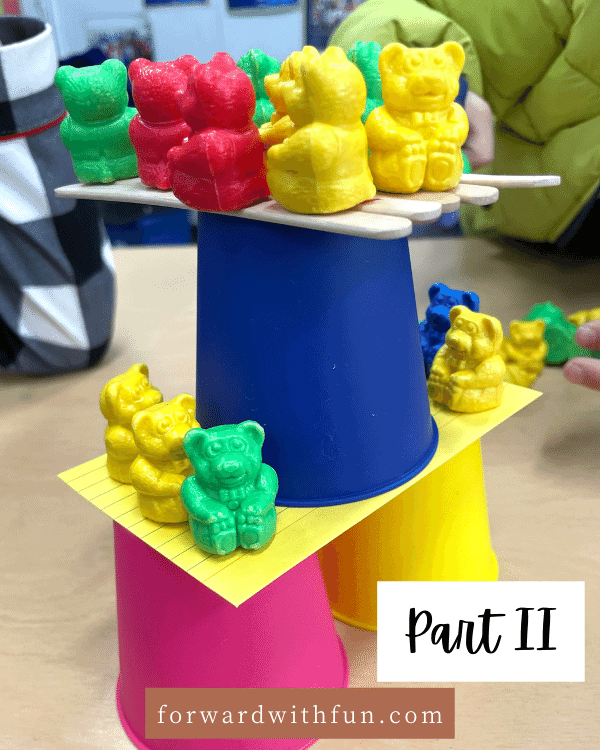
The best kind of kindergarten STEM challenge is one that has children working together to find a solution to a fun, engaging problem using simple supplies that don't take lots of prep time. Enter The Floor is Lava STEM activity for kindergarteners. It's so simple, you can do it with preschoolers too!
Don't forget to download your free lesson plan pdf too, for easy access to this action-packed kindergarten STEM challenge.
*As an Amazon Associate, I may make a small commission based on any purchases you make through links on this page. Thank you.
STEM stands for science, technology, engineering, and math. Sometimes you might see it as STEAM, in which the "a" stands for "Arts." In kindergarten, STEM challenges as kids to solve a problem in which there are multiple solutions and often children are required to build or make something with their hands. STEM challenges will require trial and error and combine elements of the 4 pillars: science, technology, engineering, math.
What's a better premise than The floor is lava? In this STEM challenge for kindergarteners, kids will work together to build a structure to save their bears (or any other small and numerous toy) from the lava.
Supplies you'll need:
My kids are already obsessed with this song, that could be used to really hook the kids into the premise.
Objective: kindergarten kids will work together to create a sturdy structure that holds as many bears as possible above the table top level using only the materials given to them.
Standards for math and science can be found below and are detailed in the free " target="_blank" rel="noreferrer noopener">downloadable lesson plan.
Download your STEM lesson plan now!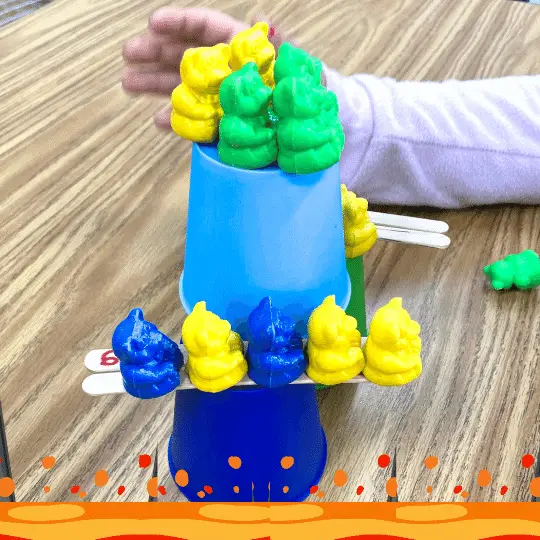
Many of us adults wonder why STEM education is now all the rage, and others have never even heard of a STEM challenge before! There are so many incredible benefits of STEM challenges for young kids including:
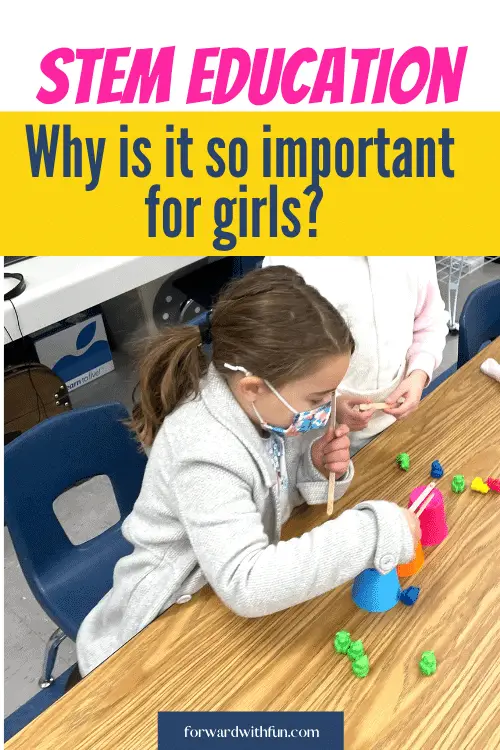
Another benefit that doesn't seem right to just include as a bullet point is the benefit doing kindergarten STEM challenges with girls! Many women today were often told they'd be good at subjects stereotypically more "suitable for girls," like history and literature.
Very few women I knew entered the fields of math, engineering, and science, and those that did, were often treated by many like they didn't belong.
When we introduce the STEM subjects at a young age, kids will have a sense of ownership and belonging in these fields. All the kids benefit from these skills, but it is vital that our little girls also view themselves as scientists, mathematicians, and engineers when these fields have been historically male-dominated. The future is in our hands!
So don't wait to begin your kids' STEM education. Start with this kindergarten STEM challenge, and watch how quickly kids begin to think of themselves as engineers.
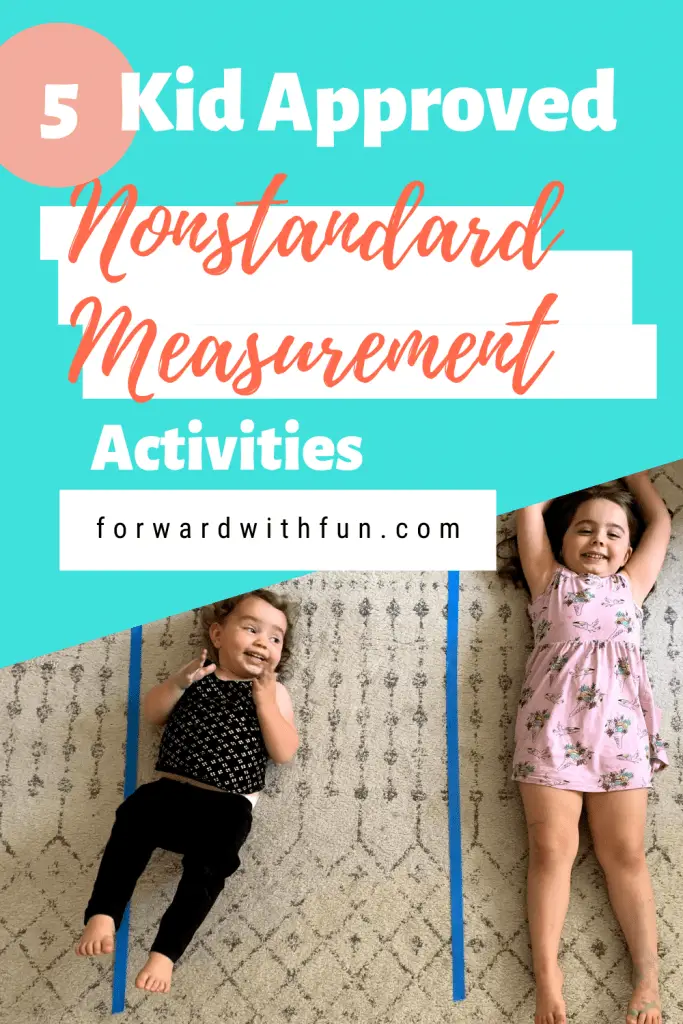
When introducing the concept of measurement to children, we always start with non standard measurement.
At the ages of 4-6, children understand the concept of short, long, taller, etc but they usually have no understanding of centimeters and inches, making those standard units of measurements too abstract for them.
So in preschool and kindergarten we introduce units of measurement that kids can really wrap their minds around. Usually those are regular household objects and toys.
Measuring is a practical skill that kids use when pouring water, comparing who had more cookies, determining who is taller, etc. In this activity kids delve in deeper to understand measurement of length and height with non standard units!
Though measuring length is usually the first thing that comes to mind when we think of measurement, there are actually multiple types of things we measure. Here are some of the standard units we use for these measurements:
Adults are used to pulling out a ruler, measuring cup, or using a scale to measure things. Usually we can visualize something close to a foot or a cup, if we needed to estimate. But children do not have that awareness yet, so instead teach them to measure with non-standard measurement unit.
These non-standard units can be anything but are best when the child selects them and are of high interest: shoes, lego pieces, stickers, race cars, etc. The one thing that they MUST be is uniform in size.
A child cannot measure their height in legos and markers! Instead one unit needs to be used at a time and lined up end to end, just as we would do when measuring with a ruler.
In the United States, the common core standards introduce standard measurement in second grade.
Before then, kids are expected to understand the concepts of measuring objects without using standard measurement tools, like in this first grade standard:
CCSS.MATH.CONTENT.1.MD.A.2
Express the length of an object as a whole number of length units, by laying multiple copies of a shorter object (the length unit) end to end.
In each of these activities, kids use objects instead of rulers to measure length. There are a few rules for measuring precisely that kids should follow when lining up their nonstandard units:
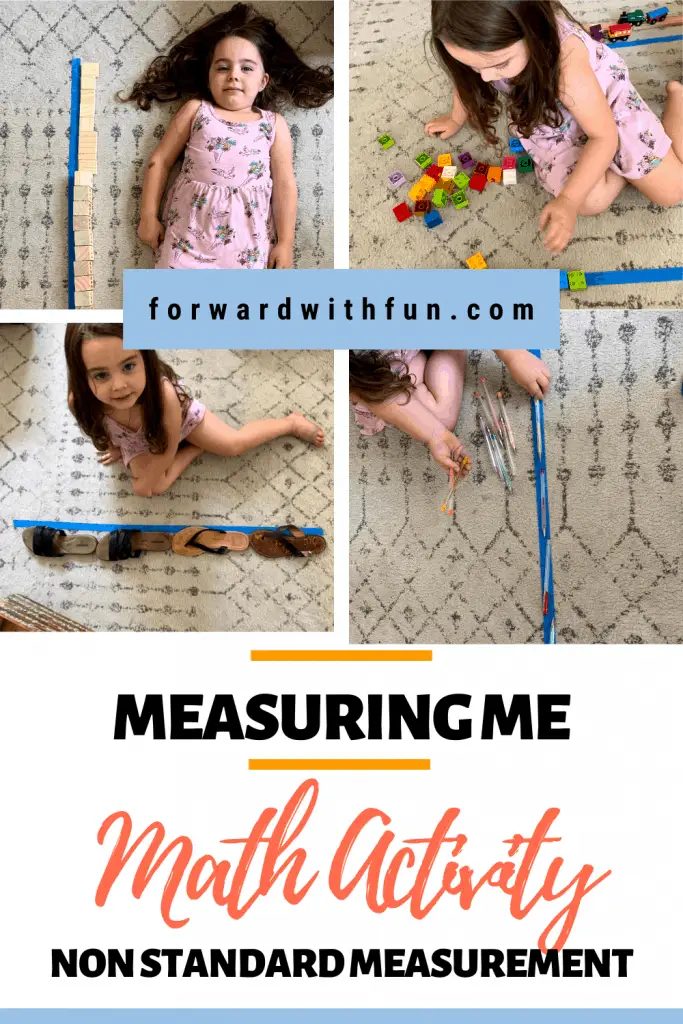
To play "Measuring Me," you'll need blue tape and access to items around the home that are (mostly) uniform in length. Some ideas are shoes, blocks, markers, crayons, envelopes, etc.
While you have the blue tape out, check out TAPE SHAPES!
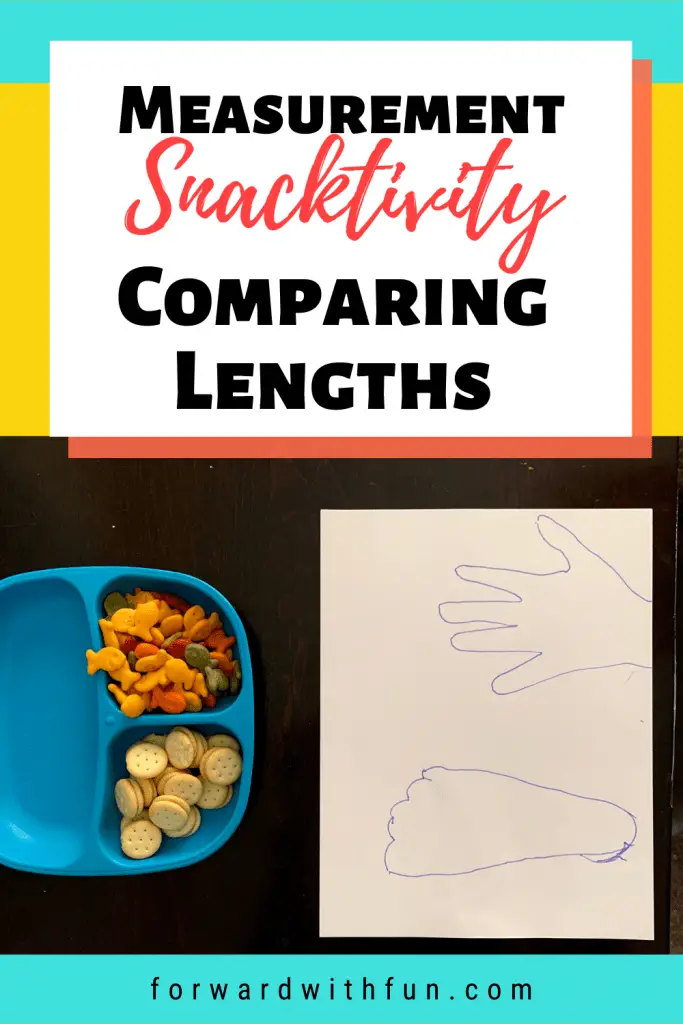
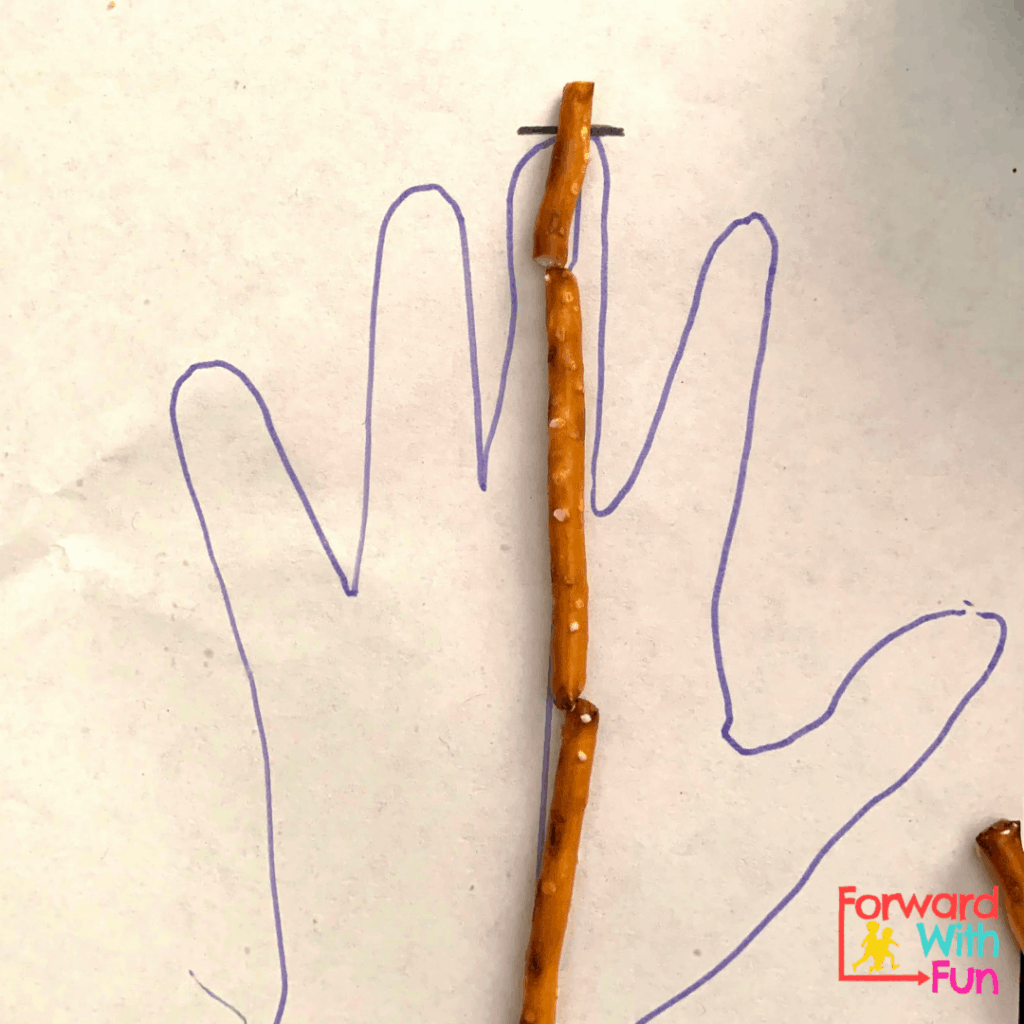
The non standard measurement unit for this activity is my favorite... snacks!
You can choose anything that is uniform in size, and I recommend items that are easy to line up end to end like pretzel sticks. Of course, a classic and fun snack to use is goldfish.
There may be opportunities to talk about halves or beginnings of fractions in case snacks don't line up exactly. You could also round up or round down...
Want another fun math snacktivity? You'll love PUNCH MATH!
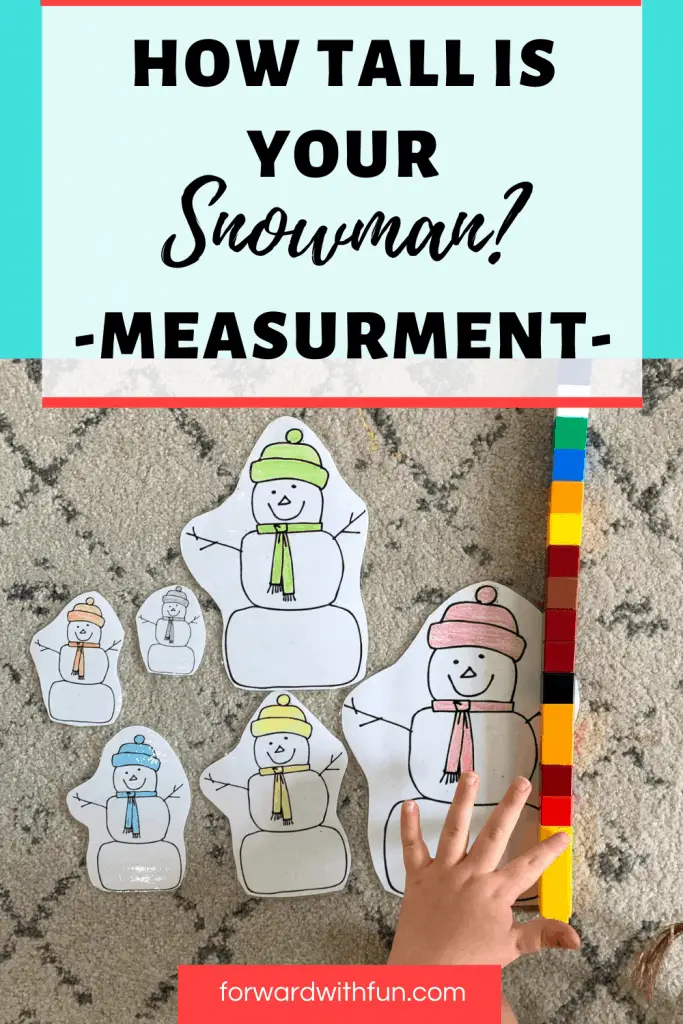
This is one of my favorite math centers for the winter. Kids love to see the family of snowmen and compare their heights from shortest to tallest before measuring them in unifix cubes.
Student in this teacher's classroom measured and compared the lengths of different vegetables during a farming unit. Their teacher made them non standard bean rulers to practice measurement in a developmentally appropriate and fun fashion!
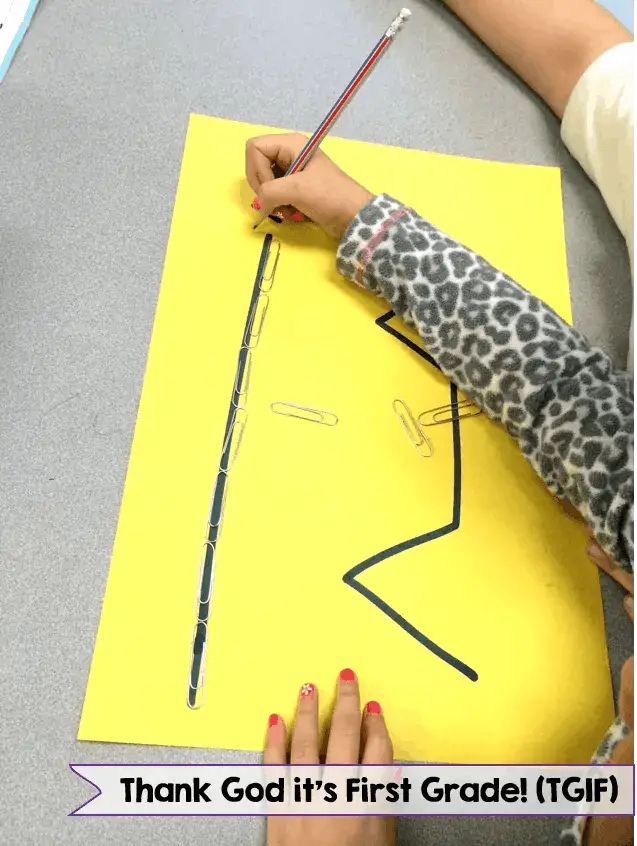
I love this simple yet genius measurement activity. Draw one straight line on a piece of paper and one crooked, anyway you choose. Have kids guess which is longer and then use paper clips to measure which one is longer.
Want a free week of hands-on learning activities that will wow your child? I'll send it right to you!
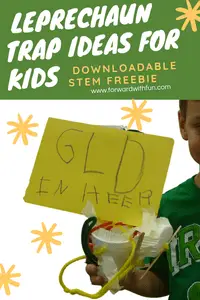
I think I traumatized one of my kindergarteners with my lesson plan on how to make a leprechaun trap.
Even 10 years later, his mother and I recount how she had to convince him leprechauns were not real, but he swore that they came to school and messed up our classroom. I'm so sorry, Dude! Just trying to do some engaging hands-on learning with the kiddos.
So be warned, that it might be a good idea to tell your child that maybe after all, it was you who tripped the trap after all.
*As an Amazon Affiliate I may make a small commission based on any items you purchase from links in this post, at no additional cost to you.
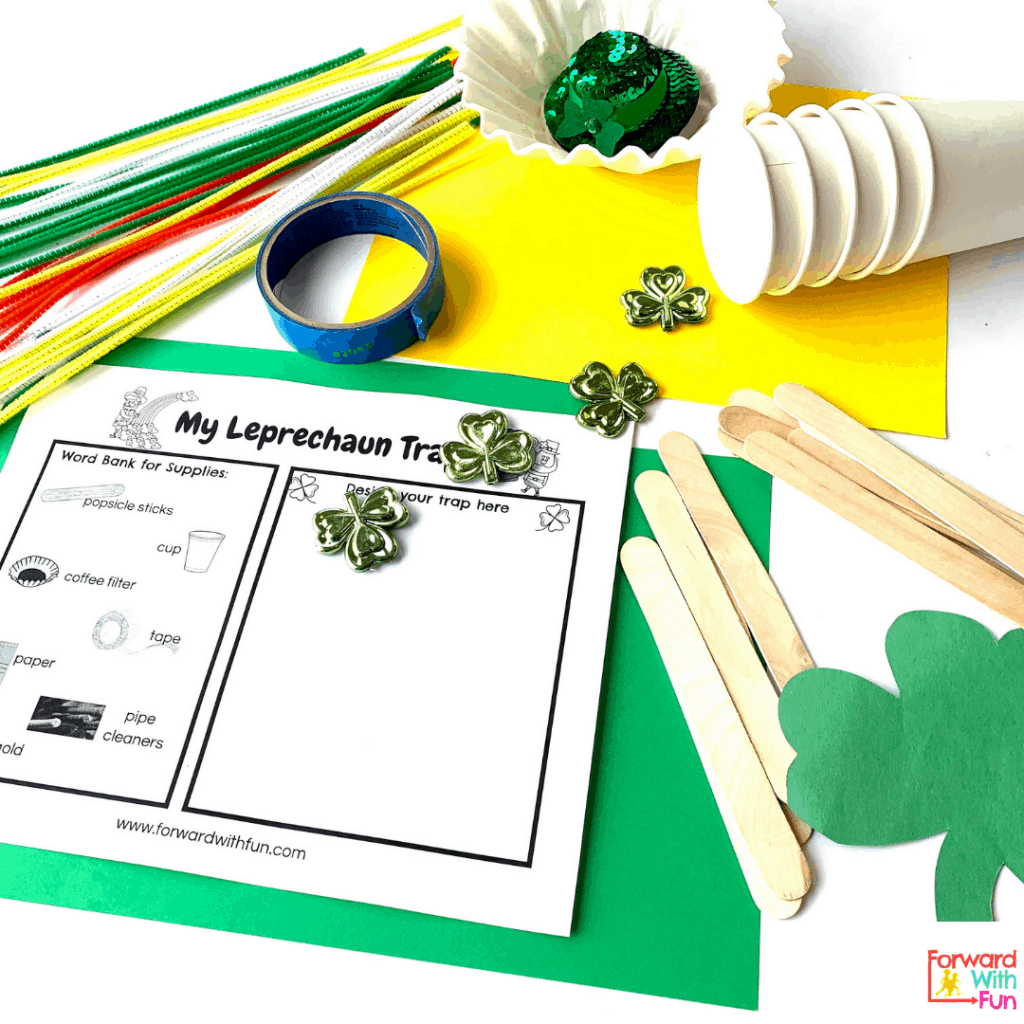
Before making the trap, you'll going to want to have a plan. What materials will you want to use? What object might lure a leprechaun into your trap?
This project involves so much learning from science to STEM to writing. In the first steps, kids will plan and prepare to build their leprechaun trap using my FREE How I'll Make My Leprechaun Trap printable.
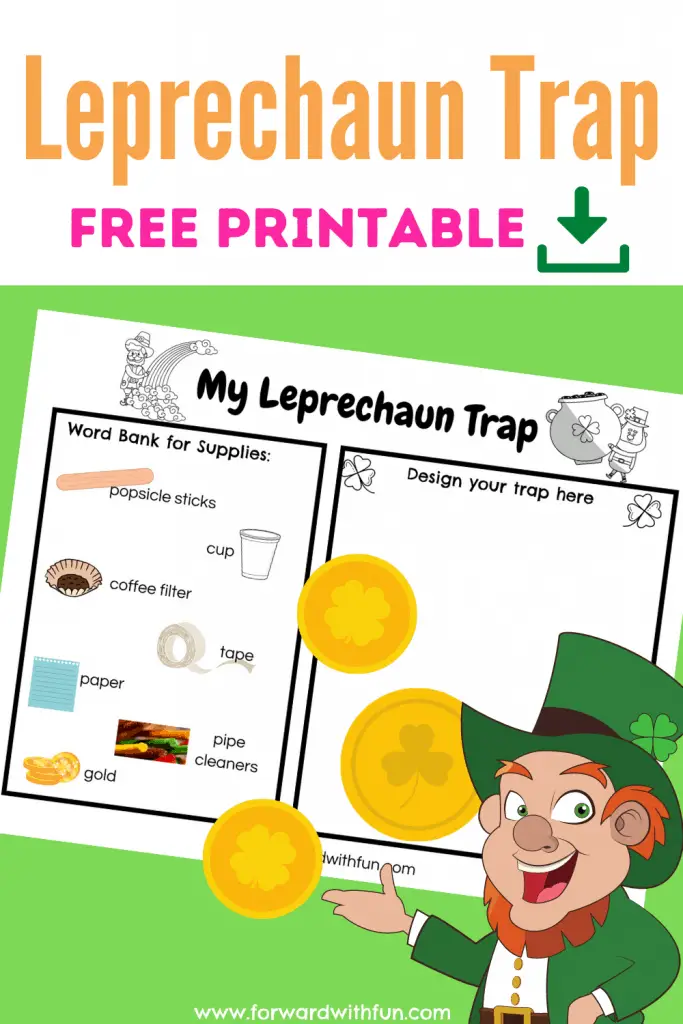
Download the printable and you're ready to make an easy leprechaun trap in minutes. If you don't have all the supplies listed on the left hand side, tell your child/students what you do have. You might want to show them the materials but not let them use them just yet.
Using the printable, have them draw a plan of what their trap will look like. What will they use to lure the leprechaun into the trap? Hopefully, something shiny!
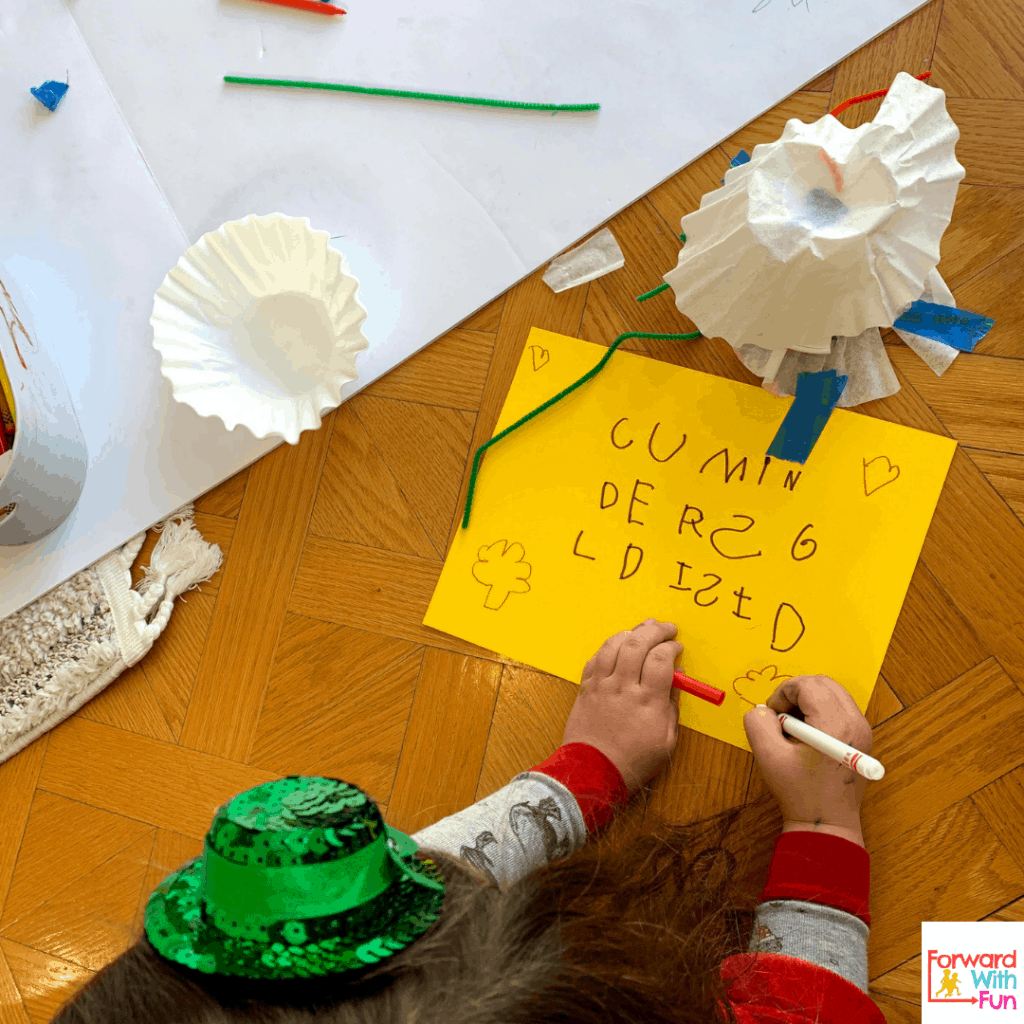
For older kids who can already write, have them label their leprechaun trap plans so that the reader will know what materials they plan to use for which parts.
Ask your child/students, how will the leprechaun know to come to the trap. Will there be any signage to entice them to come inside?
Now let's build it!
While watching the kids build their leprechaun traps you might feel inclined to jump in and say, "Oh what about this? It would be cool if we..." but I encourage you to stop yourself and let this experiment be completely child led.
In the planning stages, we have provided the questions to provoke problem solving and the materials to inspire. This is the kids' part to be the engineers! Giving our children full creative freedom is hard, but it means that what they create is 100% their own.
Whenever I feel the urge to place value on my children's creation or make suggestions, I try to use the technique called "Say what you see." I just narrate what is happening. So instead of saying, "I love that little door you made," I might say, "You made a door out of paper." Sometimes I just try to step away and see what they'll come up with completely on their own!
These easy to make leprechaun traps will surely bring some excitement to your home or classroom. So now what do you do with them on St. Patrick's day?
The day before St. Patrick's day, I have the kids lay their traps wherever they think the leprechauns will be searching for gold and shiny goods. I make sure that they have their lure inside the trap.
Once I'm alone, I go and snag the gold coins/lures out of each trap.
This is the kicker, the piece de resistance, that probably really made my little student frightened: the footprints. Are you unsure of how to make little leprechaun footprints around your trap?
Easy! Get some green paint. Make a fist and paint the bottom side of your fist before gently stamping it across the surface of your choosing. Then dip your pointing finger in the green paint and create little toes over the foot print. Tada, adorable leprechaun footprints, and they couldn't have been made by an adults large feet!
So yeah, it's a good prank, but if your child or students are iffy on the subject, show them how you did it!!!
The kids will flip when they see the leprechauns have sprung their traps without being caught. This is usually when I leave a little note from the leprechauns saying something like, "You almost got me!" or "Try again next year!" If you're looking for some more St. Patricks Day STEM activities, especially for the classroom, check out The Stem Laboratory!
