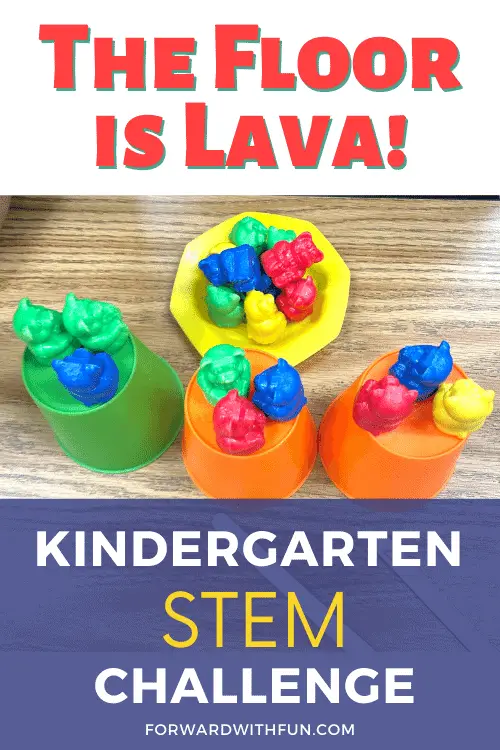
The best kind of kindergarten STEM challenge is one that has children working together to find a solution to a fun, engaging problem using simple supplies that don't take lots of prep time. Enter The Floor is Lava STEM activity for kindergarteners. It's so simple, you can do it with preschoolers too!
Don't forget to download your free lesson plan pdf too, for easy access to this action-packed kindergarten STEM challenge.
*As an Amazon Associate, I may make a small commission based on any purchases you make through links on this page. Thank you.
STEM stands for science, technology, engineering, and math. Sometimes you might see it as STEAM, in which the "a" stands for "Arts." In kindergarten, STEM challenges as kids to solve a problem in which there are multiple solutions and often children are required to build or make something with their hands. STEM challenges will require trial and error and combine elements of the 4 pillars: science, technology, engineering, math.
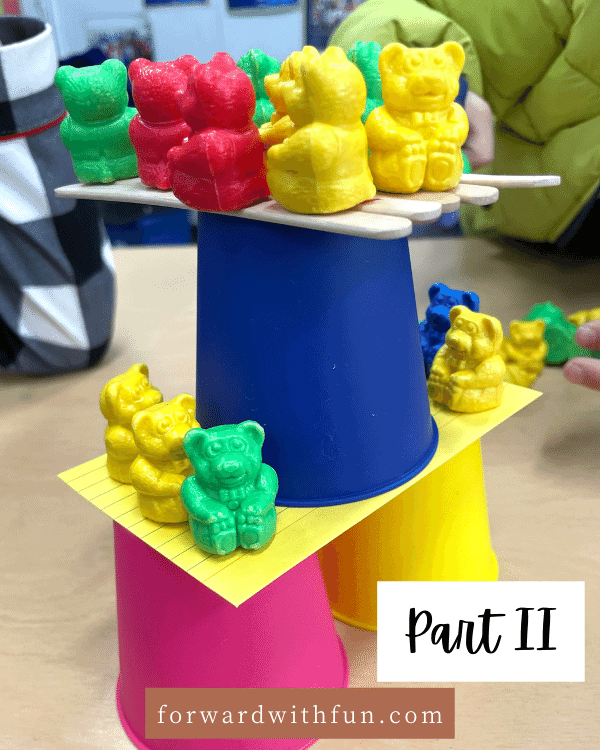
What's a better premise than The floor is lava? In this STEM challenge for kindergarteners, kids will work together to build a structure to save their bears (or any other small and numerous toy) from the lava.
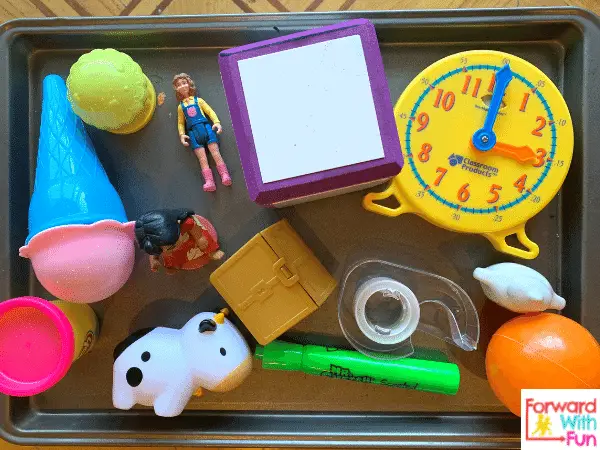
Supplies you'll need:
My kids are already obsessed with this song, that could be used to really hook the kids into the premise.
Objective: kindergarten kids will work together to create a sturdy structure that holds as many bears as possible above the table top level using only the materials given to them.
Standards for math and science can be found below and are detailed in the free downloadable lesson plan.
Download your STEM lesson plan now!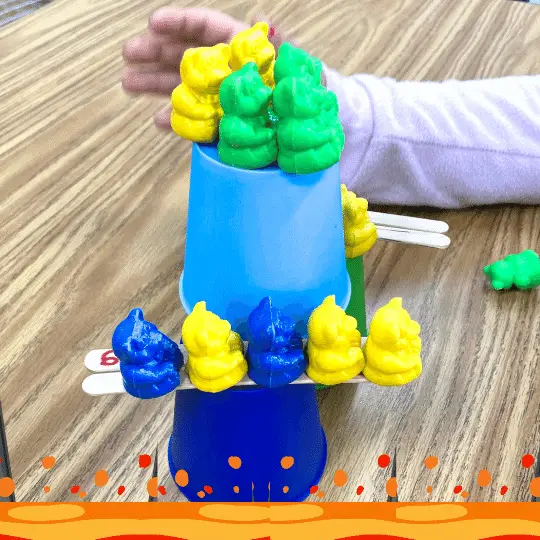
Many of us adults wonder why STEM education is now all the rage, and others have never even heard of a STEM challenge before! There are so many incredible benefits of STEM challenges for young kids including:
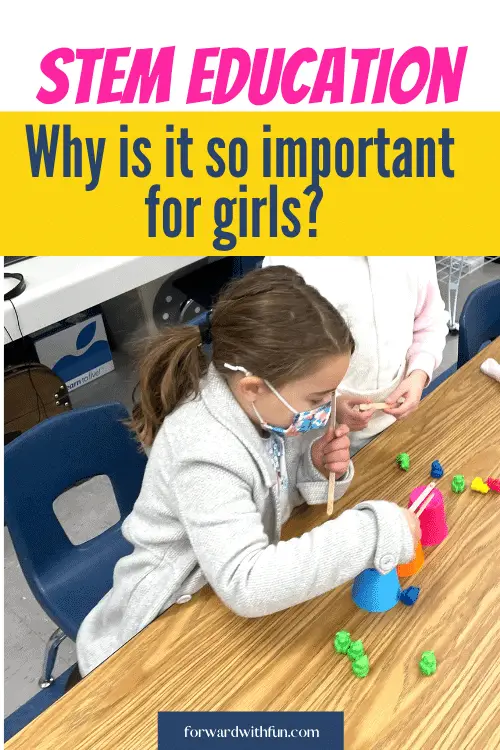
Another benefit that doesn't seem right to just include as a bullet point is the benefit doing kindergarten STEM challenges with girls! Many women today were often told they'd be good at subjects stereotypically more "suitable for girls," like history and literature.
Very few women I knew entered the fields of math, engineering, and science, and those that did, were often treated by many like they didn't belong.
When we introduce the STEM subjects at a young age, kids will have a sense of ownership and belonging in these fields. All the kids benefit from these skills, but it is vital that our little girls also view themselves as scientists, mathematicians, and engineers when these fields have been historically male-dominated. The future is in our hands!
So don't wait to begin your kids' STEM education. Start with this kindergarten STEM challenge, and watch how quickly kids begin to think of themselves as engineers.
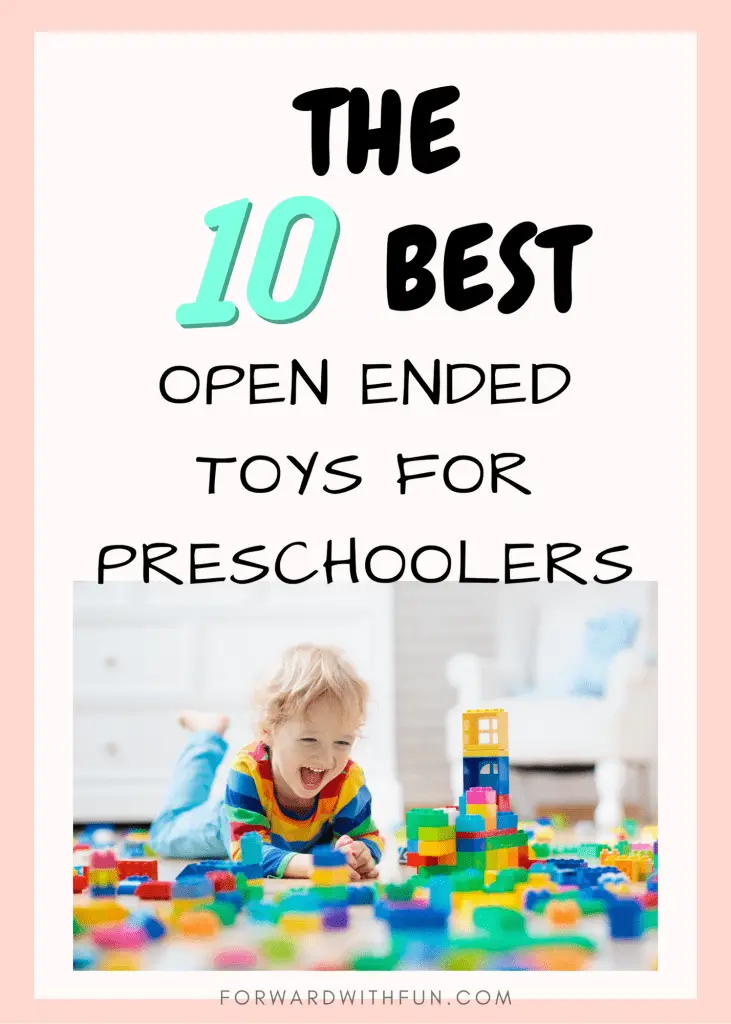
Whether it's a birthday party or the holidays that are coming up, here is a guide to the 10 best open ended toys for your little one.
These are the items that my children continue to love over the years.
No, they are not all wooden or bougie Montessori toys that cost a fortune. They're just good toys that have stood the test of time and entertained my own children from the ages of 18 months to almost 6. I'm sure there are lots of children who love their wooden peg dolls and alphabet boards, but for my kids, those toys end up in a corner, crying to be played with.
*As an Amazon Affiliate, I may make a small commission based on your purchase at no extra cost to you. Thank you.
Magnatiles - These magnetic, colorful, geometric tiles are my favorite toy. Yes, I’ve seen the cheaper versions and no, they don’t work as well. What makes Magnatiles so incredible is how easily even the youngest children can create impressive structures.

FAO Schwartz Wooden Castle Building Blocks- these magical wooden blocks have invited so much play. Just the tiniest of details on each block make kids feel like they’re true royal architects.

Melissa & Doug Easel With Chalkboard, Dry-Erase Board - It’s not just for painting! Playing school has never been so easy with dry erase and chalkboard sides, plus it comes with alphabet magnets. You know Melissa and Doug always deliver quality too.

KidKraft Vintage Wooden Kitchen- We have loved this for 5+ years now and got it preloved from a family of 3. These babies last and, kids just love to play chef and cook. Why? It’s because they see YOU doing it ; )

Lakeshore Kid-safe appliances- Um, much to my surprise, you can actually put real water in the coffee maker! The blender and the mixer are “so real, Mom!” In fact, these appliances are so fun, we ordered some for the grandparent’s house too! Use code 3645 for 25% off!!!!! Heck to the yes!
Kinetic Sand, Construction Site Folding Sandbox- you can buy just the kinetic sand itself but this play-set is super fun and a great container for the sand. Plus it comes with 2 whole pounds of kinetic sand! If you haven’t tried kinetic sand, you need to! The sand doesn’t dry so you can fold the box and be on your way. Also, it feels so cool it's like sensory play heaven.

Wikki Stix- I don’t always have these but when I do, it’s like a mute button on my children. These are the perfect entertainment to bring along to a restaurant or airplane, kids can build and create without mess or lots of pieces. Plus it’s easy to plop one of these in your purse...a great stocking stuffer!

Crayola Inspiration Art Case- A friend got this for my 3 year old on her birthday. Before that she hadn’t really shown interest in drawing, but since she got this art set, she has become an artist. I also trust that when Crayola says washable, they really mean it, so this has been a favorite of mine as well. It’s also great to bring on a trip, since it folds flat and weighs very little.

Play-Doh- Nothing beats the convenience and bright colors of Play-doh. This is a big stocking stuffer for us, and I feel great about all the play that it brings about because it’s all fantastic fine motor practice!

Straws and Connectors- Kids will build so many unimaginable things with these bendy straws and connectors. Seriously, I've seen kids build boats, whales, flowers, and even spiderwebs with this unendingly imaginative toy. It's so easy to use that little fingers will accomplish creations beyond their wildest dreams.

An open ended toy can be played with in multiple ways. This means that kids must use their imagination and creativity to play with it.
The best open ended toys can be reimagined many times and played with for years as children go through different life stages.
A toy might be played with by a toddler, then preschooler, and finally a grade school aged child in different ways. I did question myself a little putting the kitchen related items like the kid appliances on the list, but from my observations as a parent, they are open ended because each time the play is different and surprisingly not all food related. Goodness, the appliances have even been used with sensory bins and science experiments.
An example of a toy that is not open ended would be a board game, a basketball hoop, or a child's laptop game. There is value in all kinds of toys, however I have found that the best toys are open ended and/or spark creativity. Those are the toys that my kids always come back to and I can rely on!
I hope you've found this list to be helpful! It doubles as a preschooler's holiday gift guide, so don't be shy about sharing it not so subtly to grandparents.
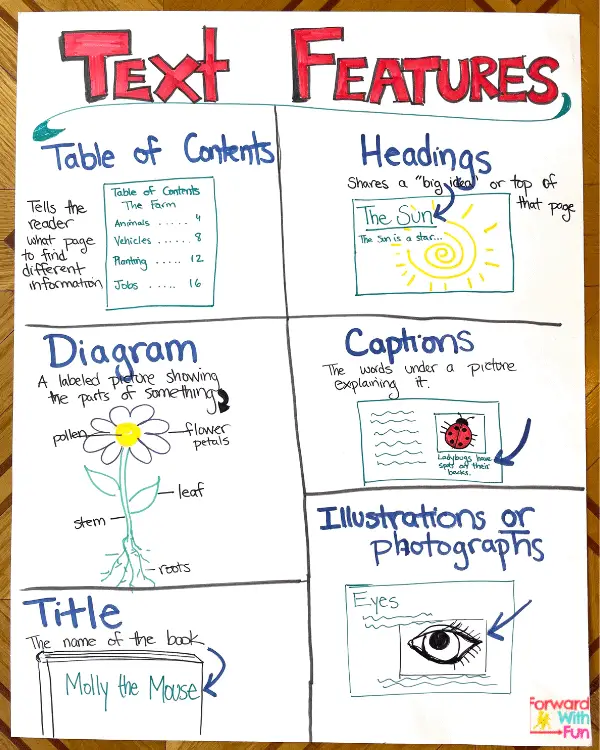
Text features are all the parts of a text that are not the main text itself. They include title, headings, captions, pictures, diagrams, table of contents, glossary, and more.
You can find text features in both fiction and nonfiction texts but are more common in nonfiction text.
On the cover of each book is our first text feature, the title. The title of a text can be found in both fiction and nonfiction texts. The title tells you what the text will be about before even opening it. Titles are sometimes called headers or headings as well. Don't let those terms confuse you!
Knowing the parts of a book including the where we can find the front and back cover along with the title is part of a set of early reading skills called concepts of print.
In kindergarten teachers teach that the title page shares the title of the book, but instead of being on the cover, it has it's own page.
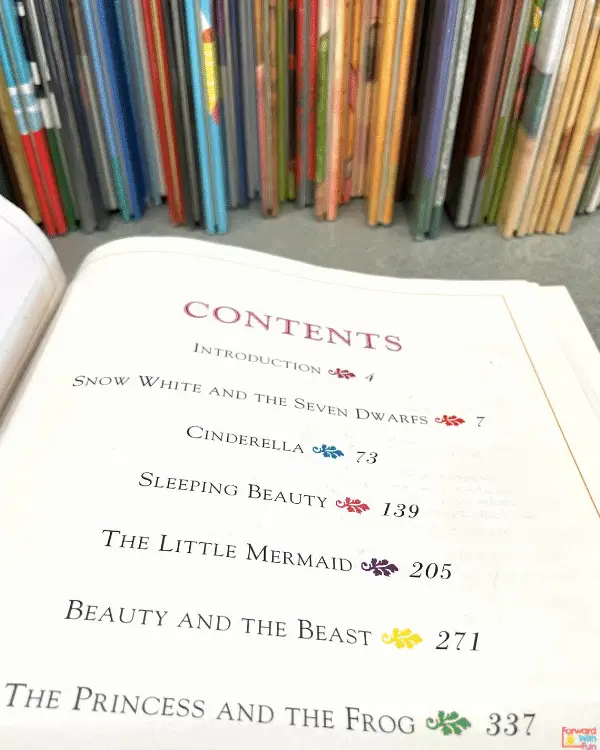
A table of contents precedes the story or main content of a book and can be found in nonfiction as well as fictional texts. We use the table of contents to view a list of what is included in that book/magazine and what page we can find it on!
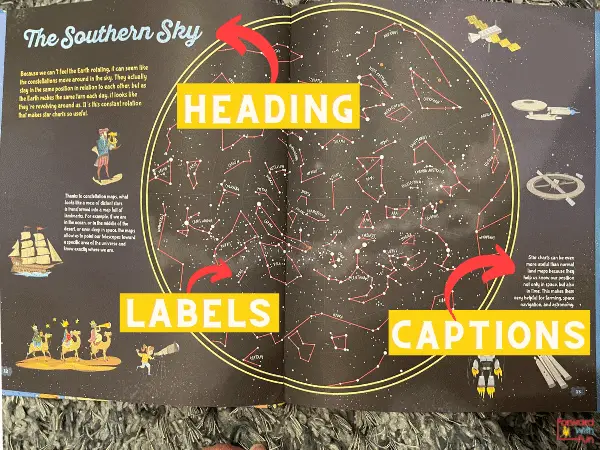
A diagram is a picture with labels and can be found in both fiction and nonfiction books as well as textbooks. It serves to give the reader more detail about the picture.
In kindergarten, children often learn to write by first labeling pictures that they draw with one or two words. Seeing diagrams in mentor texts helps kids with their own labeling. Creating diagrams also gives children a way to practice writing without having to write full sentences. Kids are often excited to create diagrams of their favorite things, to demonstrate their expert knowledge about preferred things such as princesses, construction vehicles, flowers, etc.
Photographs are found in nonfiction texts and are taken with a camera to show what something actually looks like. They're often accompanied by captions or sometimes labels like a diagram.
A caption explains or describes an image found on the page. Captions are most often seen with pictures, charts or graphs. In many children's nonfiction texts the caption can be a "Did you know?" fact or just gives a bit more detail about the picture. See the next graphic for an example.
These can be chapter names in fictional stories but are more commonly used in nonfiction text. Much like the title, a heading will tell you what the next page(s) will be about.
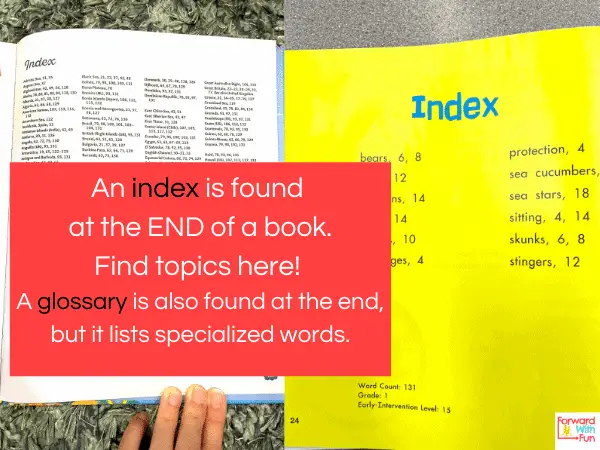
Some texts may include other text features like glossary, sidebars, timelines, maps, index charts etc., while others do not have any. Though we might see some of these in kindergarten, they're more a focus for older grades.
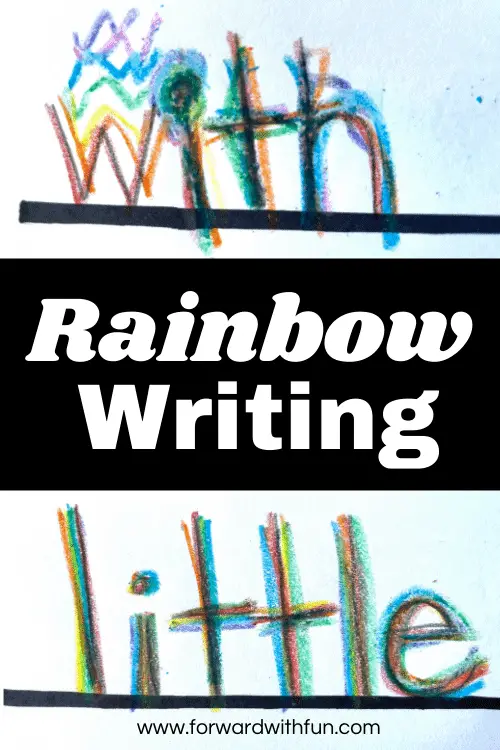
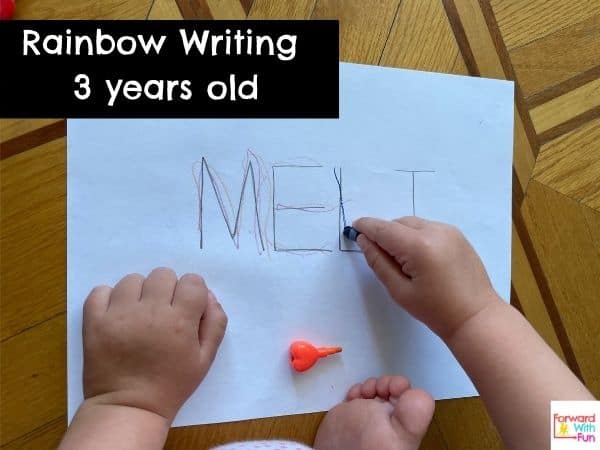
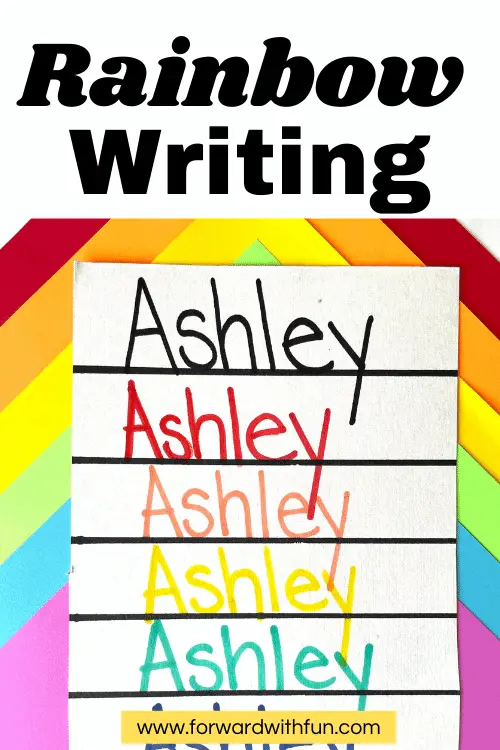
Rainbow writing is a fun way to make spelling practice more engaging for children.
The idea of rainbows has always been a source of fascination and joy for kids, which makes it a great way to get them excited about practicing their words. They will be eager to color their word over and over again until they have formed their own rainbow!
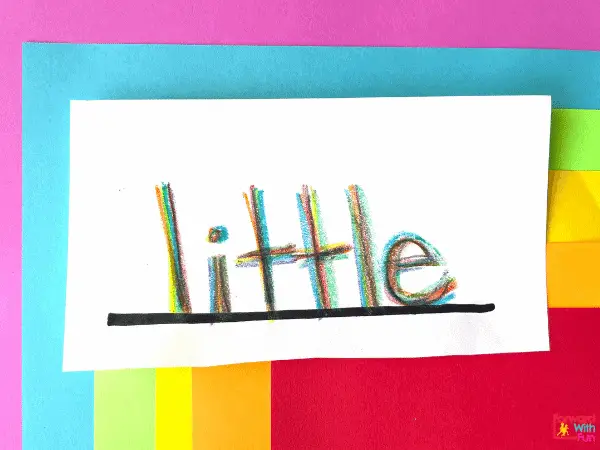
Rainbow writing is a simple, do anywhere, writing practice strategy where children either trace or write the words in rainbow colors. You can use colored pencils and crayons to create your rainbow words or try markers when doing the more independent version below.
These differentiated versions are both wonderful ways to use rainbow writing with your kids or students. And of course, it doesn't have to be just so.
You can give rainbow writing your own flair by choosing other colors, using different materials, or writing the words in different styles and shapes.
This is the simpler version of rainbow writing, since the children are not writing words on their own unlike the next version.
On a piece of paper, write the words you want your child to trace. Make sure to write them big enough so your child can easily trace them. The smaller the words, the more difficult they are to trace.
Next have your students or your child pick out their favorite colors to trace the word with. I know my daughter will always do things in rainbow order: ROYGBIG (red, orange, yellow, green, blue, indigo, violet) but there is no one way to rainbow write.
Have your child or students trace the word 3 or more times. For younger children, especially preschoolers, I would say 3 times is plenty of practice.
For this version, I recommend using the rainbow colors in order. Children will copy the word instead of trace it, writing it multiple times until they've created a rainbow of that word. Use markers, colored pencils, crayons, or even paint, if you're feeling it!
My favorite handwriting curriculum is called Learning Without Tears. They have an emphasis on learning to write in ways that are fun and developmentally appropriate.
They have a wonderful handwriting chart that shows proper letter formation, which is actually really helpful as an adult. I never knew I was doing my lowercase f's backwards.
Download the Learning Without Tears letter and number formation charts HERE! -Thanks to Learning Without Tears for making these available for FREE!
I wouldn't put too much emphasis on the exact formation if they letter looks correct when your child is writing, but when YOU write out the words, check to make sure your letters are looking like these so children learn the proper way to write!
What are your favorite resources for handwriting and spelling? Leave me a comment below!
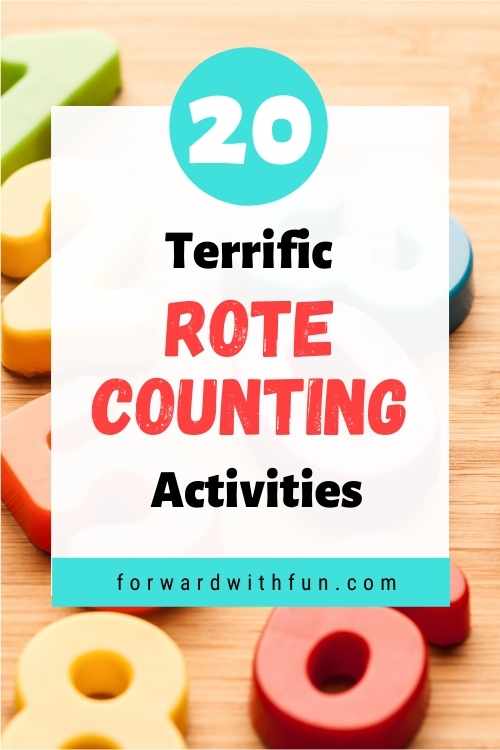
You have probably been rote counting with your child since they were an infant! By practicing this important skill, you have already helped even the tiniest baby be prepared to learn math! But what is Rote counting? Why do we need this skill? How can you teach it in a fun way?
In this article you'll find:
*As an Amazon Associate I may get a small commission if you decide to purchase from my links. Thank you.
Rote counting is saying number names in the correct sequence. What it's not: counting any quantities or objects.
Before learning to count quantities, otherwise known as rational counting or counting with one to one correspondence, children must memorize the order of numbers and be able to say them correctly in sequence: 1, 2, 3, 4, 5, and so on. That is called rote counting!
There are so many engaging ways to learn the numbers in sequence, some through music and games and others through the actual counting of objects in everyday life.
Knowing the order of numbers is essential before you are to count objects accurately or do any type of arithmetic. Think about it, in order to add 3 to 2, you need to know what numbers comes next when you first count to 3, then add the 2, and then finally count the sum.
Rote counting is a skill that develops in older grades as we ask children to count from numbers other than 1, find the the numbers that come after, or add by counting on.
Skip counting is also a form of rote counting where children memorize the sequence of numbers based on a pattern like multiples of 2's or 10's.
Children as young as 2 begin rote counting numbers to around 5. In preschool, children learn to rote count to 10 and often 20. In kindergarten children must learn how to rote count to 100, according to USA common core standards.
Yes, modeling rote counting helps children memorize the numbers. Much like a new song, it takes our minds time to remember the lyrics. Soon rote counting will be so automatic for them, they'll need to slow down!
Most activities are strictly about rote counting. A few at the end incorporate the next step in counting which is beginning to count objects and number recognition.
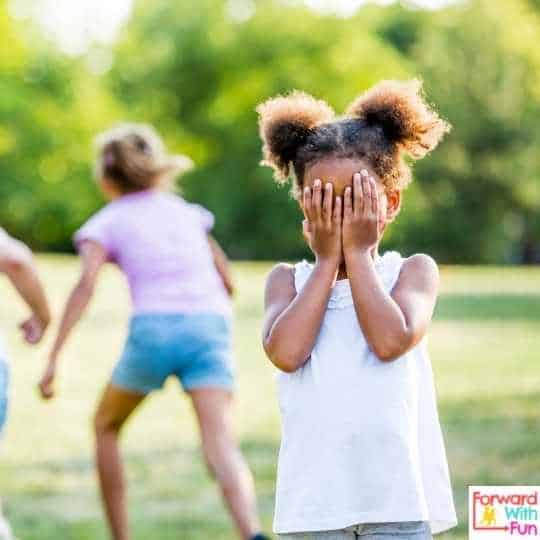
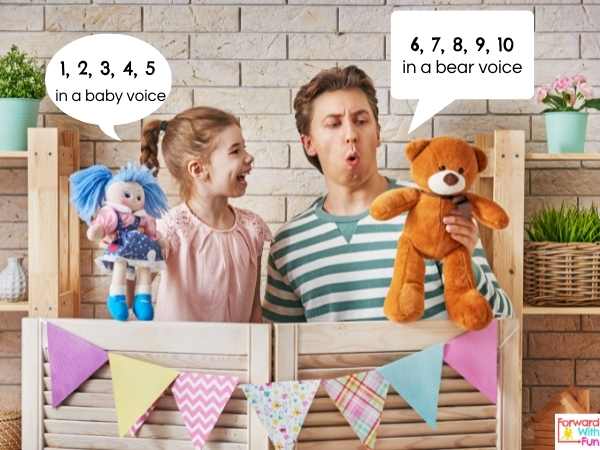
This classic game involves rote counting. Whomever is chosen as the seeker counts to a certain number before shouting, "Ready or not?! Here I come!" Is your child learning how to rote count to 10? 15? 20? Play "Hide and Seek" and make that the number the seeker counts to each time.
There are so many children's songs that include rote counting. Here are a few with links to their Youtube videos if you're not familiar:
The Ants Go Marching
1, 2, 3, 4, 5 Once I caught a fish alive!
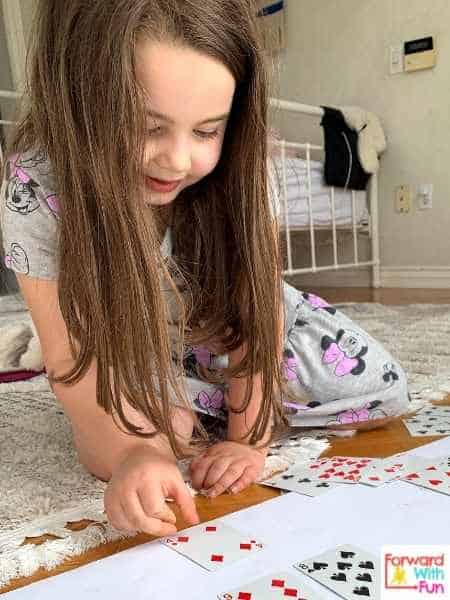
Using a deck of cards, remove all the face cards. Have your child flip over a card and count up to that number. This is great for preschoolers counting to 10, but you can play it by including higher number flashcards. Not only will this improve rote counting skills but it'll also help kids with number recognition too!
Is it just me, or do my kids listen better to Alexa than when I give a direction? Use that to your advantage, and ask them to have Alexa (or any other house robot item) count up to a certain number. They can listen as she models the rote counting or join in on the count. It's too easy!
When my fitness instructor says, "We are going to be doing planks for a whole minute," you know I'm counting every last second. Whether it's jogging to the end of the block or holding a tricky yoga pose- rote count to 20 or higher with your child as you're working out!
There are so many rote counting books out there. While you're reading the pages, your child will get to become familiar with the order of the numbers but also see the numbers many times, helping with number recognition. You can even count the objects on each page, which is not rote counting, but the next step in math skills.
Some of my favorites include:
Hippos Go Berserk by Sandra Boynton
Ten Apples Up on Top! by Dr. Seuss
Chicka Chicka 1,2,3 by Bill Martin Jr.
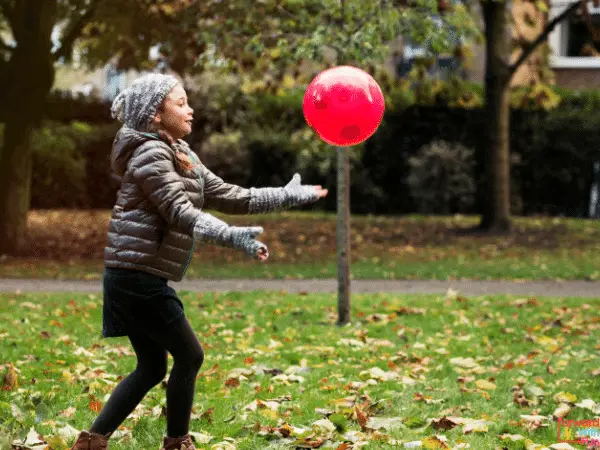
Using a large ball that your littles find easy to catch, try to pass it back and forth without dropping it to the ground. Count while you're passing the ball. If you count one number for each successful ball you're practicing rote counting and counting with one to one correspondence at the same time.
A way to do this as a rote counting activity would be to have your child repeat the number you say back to you, to help cement the order of new numbers: 1, 1, 2, 2, 3, 3, and so forth.
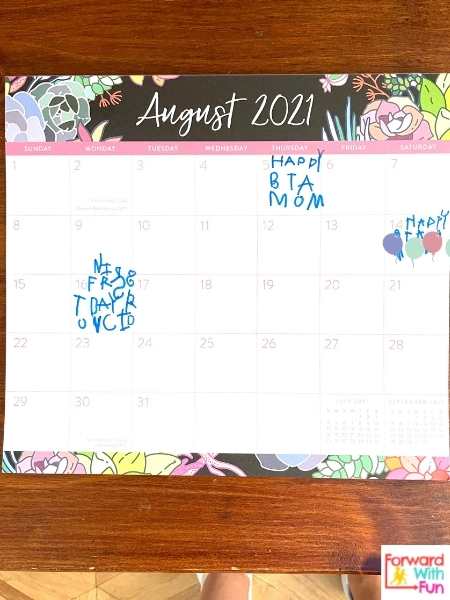
Do you have a calendar in your home? For us it's where I write all the special events (usually with a picture)so that my kids get excited and know how to "read" it. Each day we take a second to look at the calendar, usually during a meal.
If you have a calendar, notice the date with your child and practice rote counting up to that number. Even if you're the only one counting, hearing the sequence of numbers daily is powerful learning!
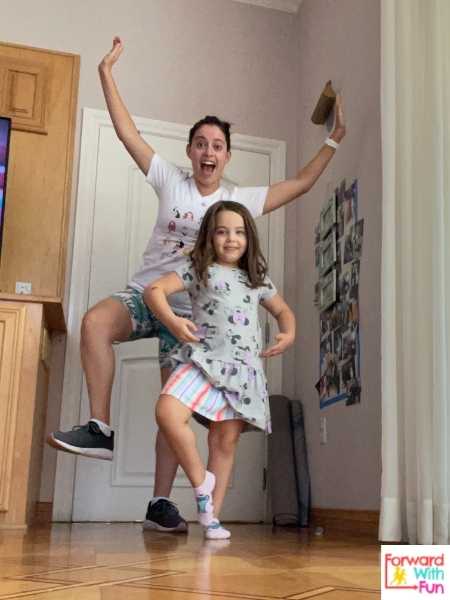
This is a great boredom buster for times when you have a few minutes to spare. Pick a target number to count up to. Take turns creating a movement pattern to do to the beat of the counting. For example, stomp, stomp, clap, clap. As you do each movement count one number more until you rote count to the target number. Take turns choosing the pattern; kids love to be the leader!
You don't need to wait until Halloween to play this rote counting game. Use a new voice to count to 20 and have the other person guess who you are pretending to be. Are you a baby, Dracula, a fancy lady, a mouse, Peppa Pig?
How long can you balance on one foot? Rote count as you challenge each other not to topple over while balancing on one foot!
My kids have loved bubbles for always. In this bubbly rote counting activity, blow some bubbles. Pick one to follow and count how long until it pops! You can focus on the same bubble or make it competitive by choosing different bubbles. Remember to count together. How long did it take for your bubble to pop?
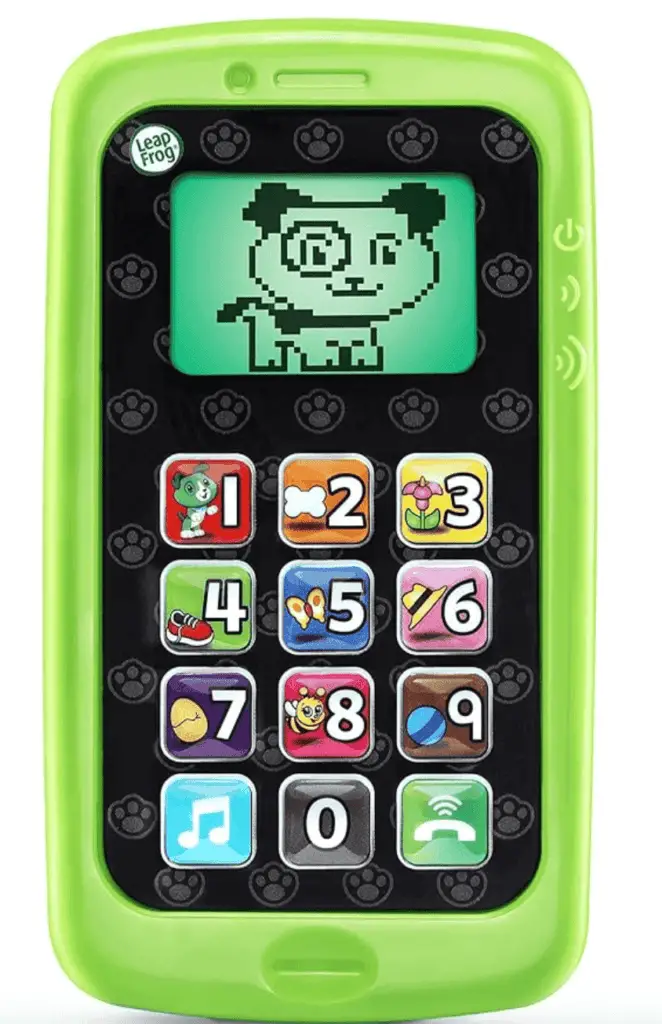
Usually I don't include screen activities, but I picked this toy up at a clothing and toy swap years ago, and I'm so glad I did. The phone has multiple rote counting songs as well as little animations for the numbers 1-9. I definitely need to give it some credit for my kids' love of numbers and counting.
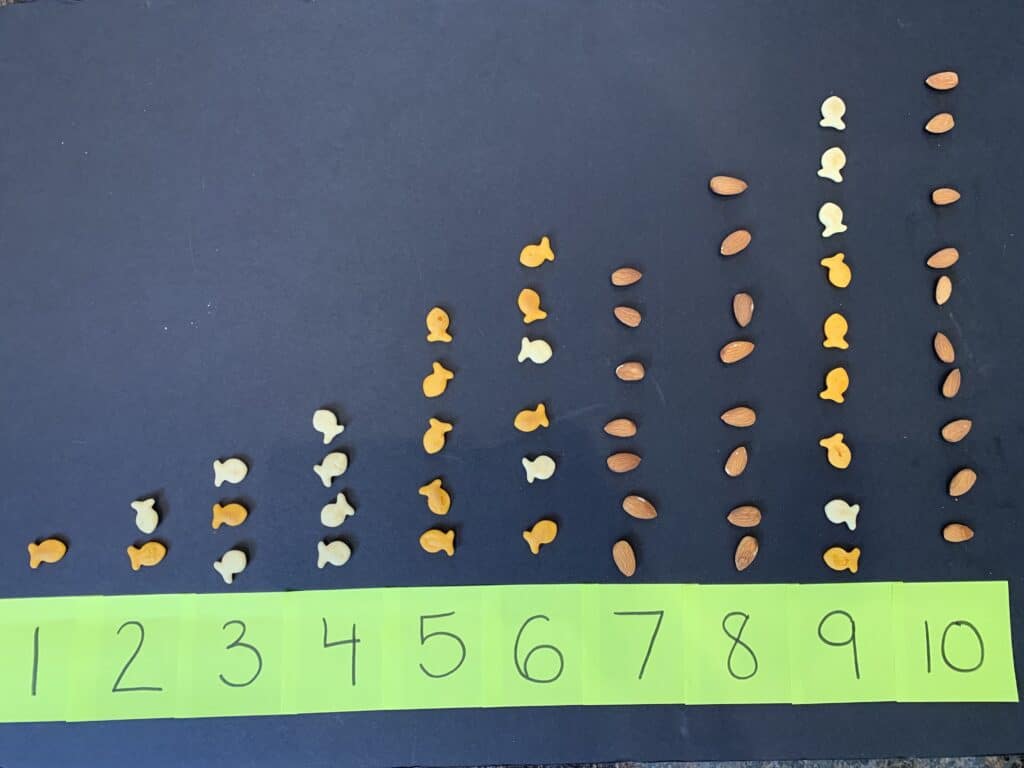
Parents, snack is almost always a preferred activity for kids, so let's make it work for us. Have them count their snacks! With this simple set-up my kids were practicing rote counting, counting with one to one correspondence, and number recognition. It's one of the most favorite activities from our Fun Club activities
General rule: kids love stickers. Peeling stickers is also a great fine motor activity. On a piece of paper (or really anything) write a few numbers your child is working on recognizing. Divide up the spaces and have them put that number of stickers in each section. This activity will build rote counting skills as well as number sense and help kids count accurately.
How do we get kids excited about numbers and counting? Let them choose what they count. Counting collections are a great way to help kids learn to count up to very high numbers, like in this activity where we counted to 100. But you can count smaller quantities too.
Let's get all their favorites: race cars, stuffed animals, dinosaurs, construction trucks, fairies, etc. Count your collection to practice SO many math skills.
This is a fun rote counting activity for any time of day if you've got stairs in your home. I've found my children naturally count the steps as they go up and down them. You can walk up the stairs, crawl up the stairs, or march, just make sure to hold the railing!
I'm really big into doing sensory bins with my children (3-5 years old). Our favorite kinds of tools are scoopers and bottles. Have your children scoop and transfer whatever your bin is filled with and count how many scoops were needed to fill the container. Counting scoops of any kind is lots of fun, plus it's soothing!
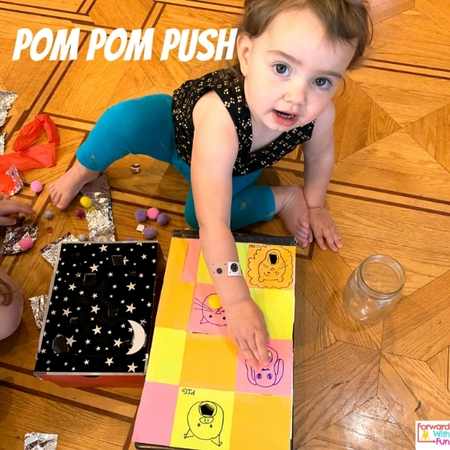
Have you ever seen one of these? I made it with a shoe box, cutting out a holes for anima mouths. I haven't thrown it away after years because my kids still love to play "Feed the animals" with pom poms. They gather their colorful pom poms and count as they stuff them through the little hole. Again this activity involves saying the numbers in order but also involves counting objects too, so it's not solely a rote counting activity.
Play anywhere and any time, it's super easy. Pick two spots in your home (or wherever). How many steps will it take to get you from one spot to the other? How many will it take your partner? Now how many will it take if you do giants leaps? Baby steps? You can even challenge each other to only get from point A to point B in a certain number of steps. This activity is counting but is a little more advanced because children must be able to count accurately!
Rote counting is the most basic math skills that is essential for children to be able to do before most other math skills. Try any of these rote activities to help your child learn the basics while also having fun!
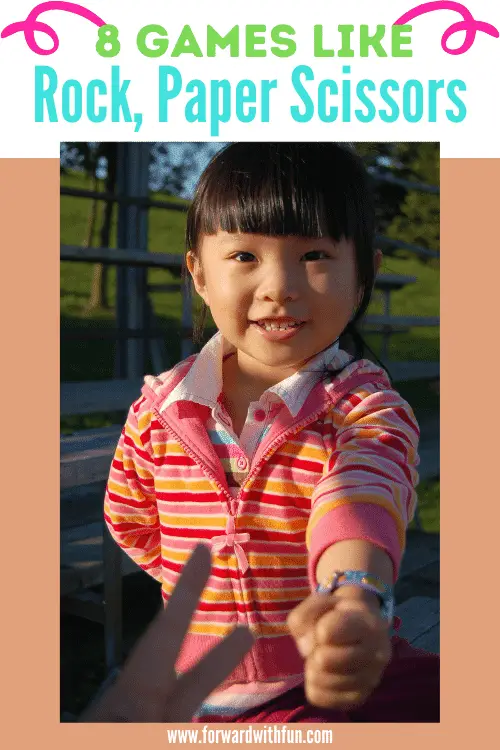
If you're looking for screen-free games like Rock, Paper, Scissors (and other variations) then you've come to the right place! Games like these are simple and cooperative. Some of them work well with two people while others can be played by groups.
These rock, paper, scissor alternatives are a great way to spend time with friends or family while having some high-quality fun together! Also, kids can play them on their own with friends, once they know the rules.
Best of all, they give everyone a chance to win, while also learning that you can't win every time.
Two players start in spots a few feet away from each other, and a designated "safe spot" is chosen. The players play Rock Paper Scissors and whomever is the winner chases the other player, attempting to tag them before getting to the safe spot!
This is a great way to practice addition with kids in kindergarten and first grade as they're building fluency for math facts (which means they need to add small numbers fast). Instead of rock, paper, or scissors, children put up a number of fingers between 0-5. Whomever can yell out the sum of the two numbers first is the winner of that round! You can even make the sum their points and add up round after round.
My friend Erin of Erintriesparenting.com shows us how to play and build addition and one to one correspondence skills while waiting in the car.
Yes, that's a real game! It's a bit more complicated than rock paper scissors, but it works the same way. Players either choose one of the five hand signals: rock, paper, scissors, Spock, lizard.
Each signal kills/eliminates 2 other hand signals. For the full rules and hand signals you can check out this explanation.
This version was popularized by The Big Bang Theory but was developed by Sam Kass and Karen Bryla. There are also dice versions to make it easier to play.
This game had me feeling all the feelings when I first watched a PE lesson where children were playing. What a great group, team building activity.
Kids are divided into teams that need to navigate a hula hoop path, jumping from hoop to hoop. Whenever you encounter a person (coming the opposite way) you stop and play Rock, Paper, Scissors. Whomever wins continues on the path while the other team's player exits the path and a new team member starts again. It's easier to watch it, so check out this Youtube video!
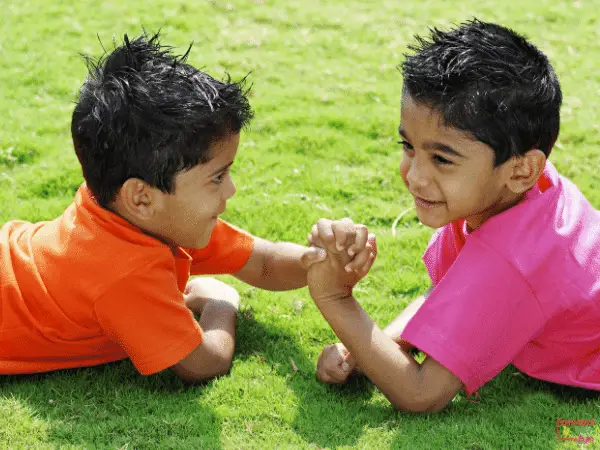
Another common way to decide a quick "winner" is through arm or finger wars. You know the common adage, "1, 2, 3, 4, I declare a thumb war!" As two players grasp hands, whomever can keep the other player's thumb down for 5 seconds in the winner!
This one is similar to the eye contact game. Stare at the person in front of you and be as silly as you can but DO NOT, under any circumstances, laugh. The first one to laugh is the loser, but are they really? Laughing is the great medicine to many a bad mood.
Siblings have played this game since the dawn of time. Whomever can go the longest without blinking while staring at the other person is the winner. Get ready for red eyes, because IT'S ON!
This one has a bit more thinking as part of it, but is a great two or more person game. First start with the rhythm "clap, clap, snap, snap" that everyone goes along with.
Think of a category and take turns saying things that are part of the category. For example: The category is articles of clothing. Go around in a circle (or if it's just two people, take turns) saying an article clothing to the rhythm of the clap, clap, snap, snap. If a player cannot say a new item that fits the category by the end of the two snaps, they're out!
- Games like these are cooperative so all the players need to follow the rules for them to work. This is great for children who are learning to follow multistep directions.
-They give kids multiple chances to win or lose and to deal with the emotions that come with that. We all know someone who can be a sore loser (ahem, my oldest), but losing more often can actually help us realize it's not a reflection of anything negative. There are so many chances to win too.
-They teach perseverance. Just because you didn't get it this time, doesn't mean you won't the next!
-Many of them require motor planning- which is the ability to plan and execute a sequence of actions in order to succeed at something. These types of games give kids practice with this important skill!
- Games like these require communication, so they build social skills too!
-They're fun ways to pass the time and connect with another person.
What is phoneme isolation and why is it SO important for early readers?
Phonemes are sounds. Phoneme isolation is the act of picking out sounds at the beginning, middle, and end of words. This set of skills most commonly refers to picking out sounds in CVC words, aka consonant vowel consonant words and is taught in the following order:
What is an example of phoneme isolation?
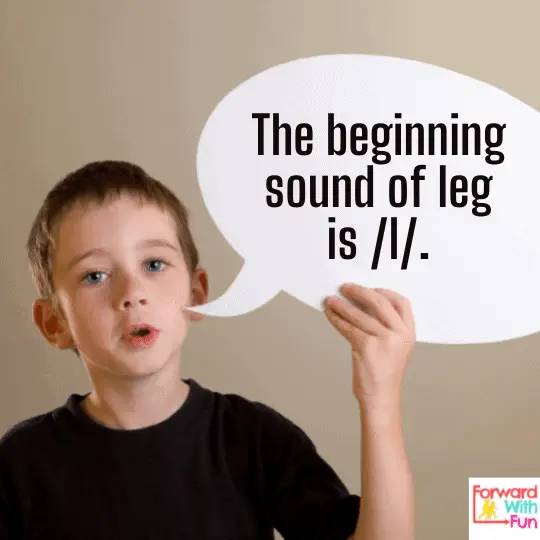
A child who can do all three phoneme isolations will know that the beginning sound of log is /l/, the middle sound is /o/, and the ending sound is /g/.
If a child is unable to isolate sounds they will have a really hard time reading and will not be able to write independently.
What sound does rabbit start with? If you said R, you're wrong! The letter R is not a sound, it's a letter.
If you said /r/ (the sound that R makes), you would be spot on! Beginning sound isolation comes before ending and middle sounds so try these activities before moving on:
You can play any of the beginning sound isolation games but switch the phoneme you're focusing on to ending sounds.

2. Play "Which one?" We play this in the car. I ask my child, "Which one ends in /m/?" Then I give three choices like "sat, bam, or fin?" You can even play with two choices to make the game simpler.
3. Stand up, Sit Down is a great game from Pride Reading Program where you give your child two words. They stand if they have the same ending sound and they sit if they have different ending sounds! That's a game you can play for just one minute and get a ton of practice with ending phoneme isolation!
For more incredible ending sounds games check out my post on the top 7 ending sounds activities for kids.
When I talk about middle sounds, I mean the middle sounds of CVC words aka 3 letter words. Hearing the middle vowel sound is difficult!
Here are the two ways to help kids listen for the sound:
Once a child is able to break up a word into all the sounds, they will be able to do the next phonemic awareness skills called phoneme segmentation. This means they can segment a word into all the phonemes or sounds it has.
An example of phoneme segmentation with the word lit: /l/ /i/ /t/
To practice phoneme segmentation, I use two strategies most commonly:
Phoneme isolation and segmentation go hand in hand as children develop the ability to spell on their own and understand the structure of words as they become readers!
My co-teacher Mr. B has created so many hands-on ways to practice phoneme segmentation in this silly Youtube video.
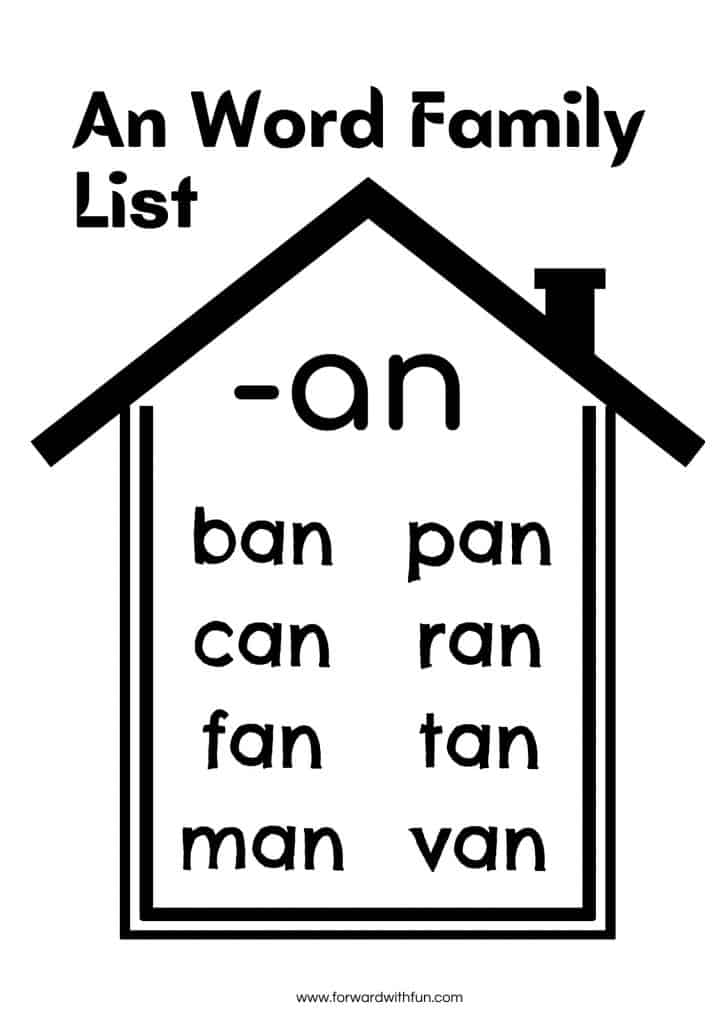
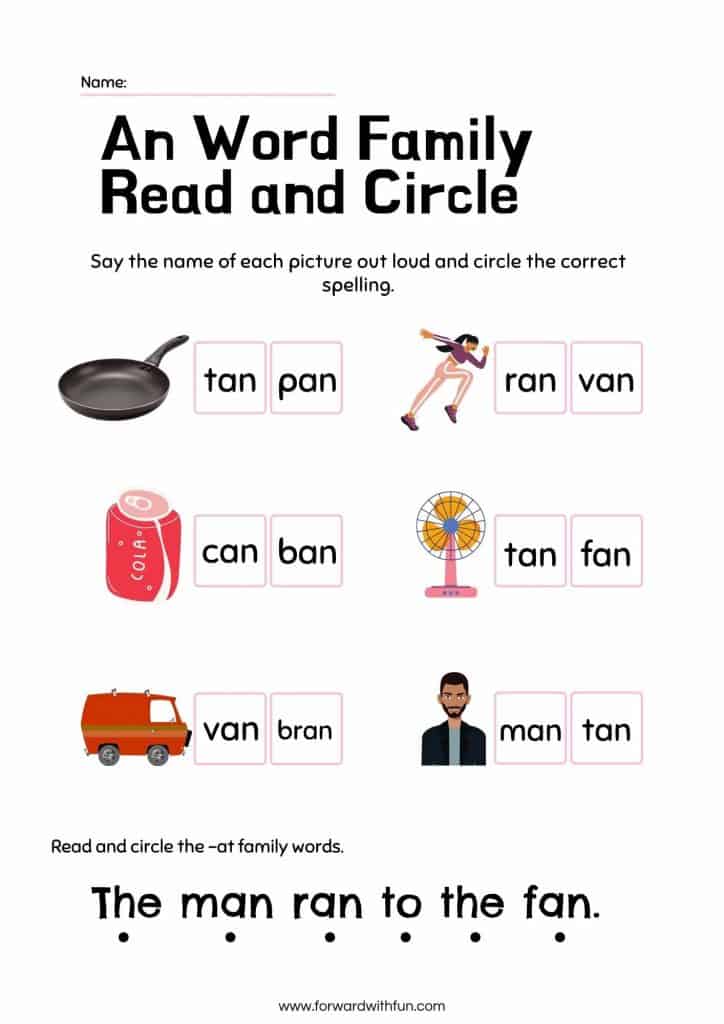
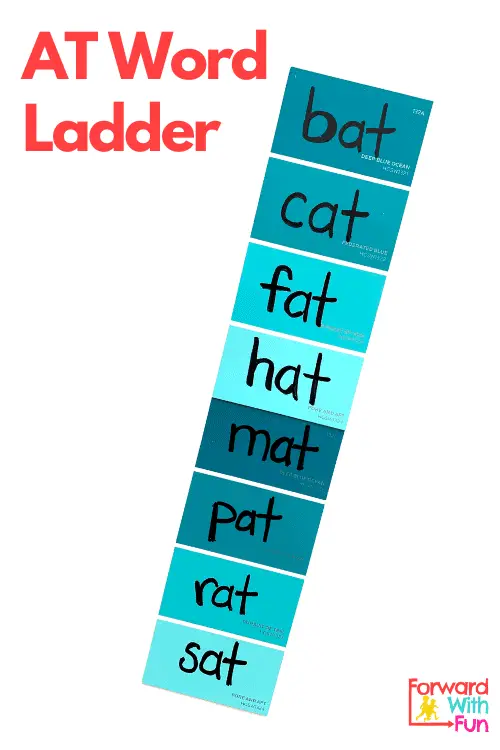
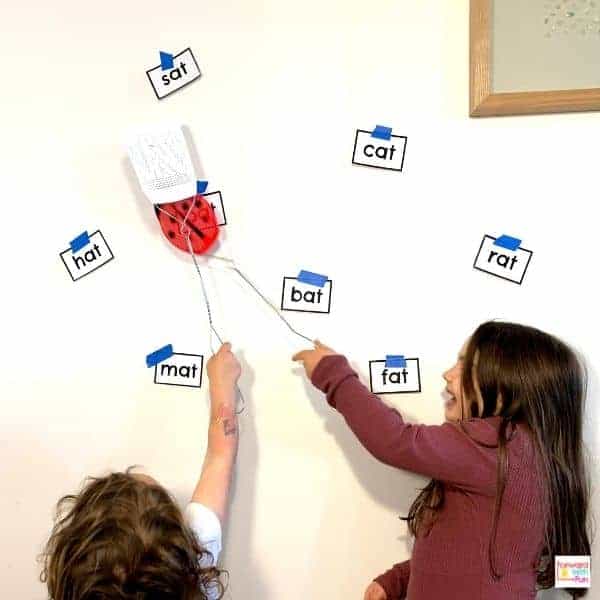
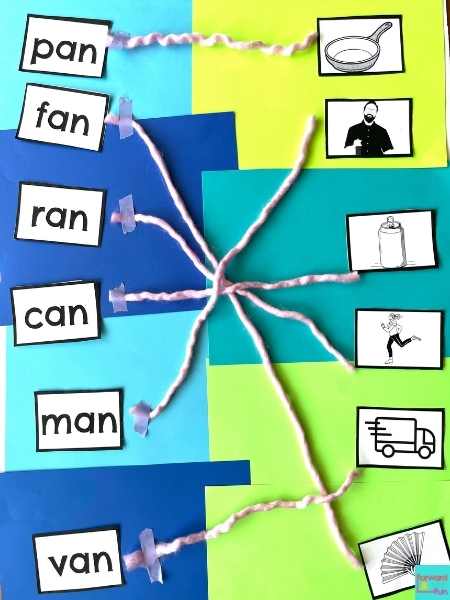
The AN word family words are perfect for practicing with your kindergartner as they begin to sound out words.
Word Families are sets of words that have the same ending and rhyme. The ending of words in a word family is commonly referred to as the "root."
Children have more success when reading words that are familiar, so by having kids reads words that have the same end, they can decode the sounds with increased speed. Studies have shown that learning to read word families develops vocabulary, as well as children's ability to recognize patterns in words, ultimately leading them to read with greater understanding and speed.
To grab your list of AN words, click the list below or continue reading for more AN words printable worksheets.
It's no secret that I'm not a fan of worksheets, but I also know that teachers often use worksheets as homework to reinforce skills learned in the classroom. Here are some printable worksheets that would help strengthen reading skills, followed by some hands-on ways to teach the AN family words.

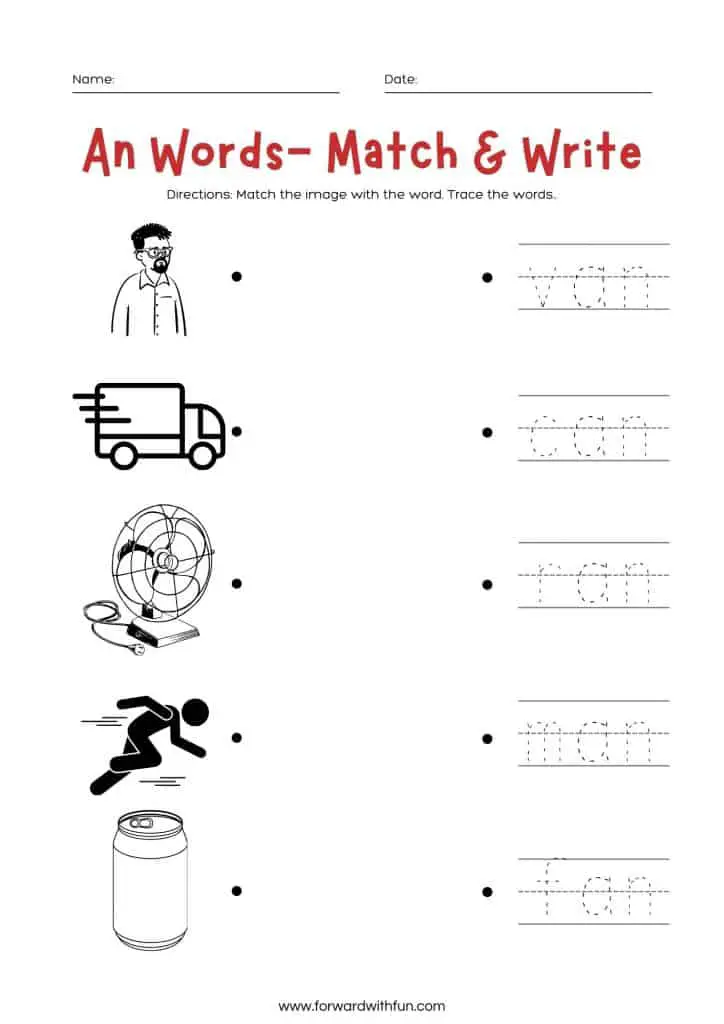
If you've read my blog before, you know that I would never share worksheets without sharing ACTIVITIES that make learning these words even more fun.
Got a child who cringes when you show them a worksheet? That's okay! Try any of these activities to make practicing reading AN words more hands-on and exciting for young learners. You can use these games with any word families!
Would you like a free week of our signature program, The Fun Club? Teacher crafted, mom and kid approved for ages 4-5.
Subscribe and get your first week right now!
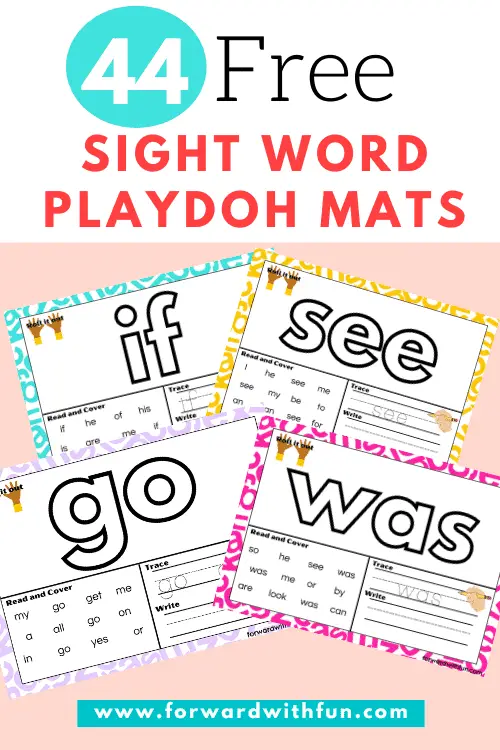
I made these 44 FREE sight word playdough mats for YOU, because I'm so tired of seeing kids being sent home with sight word flashcards. BORING!
I get that things need to be simple, or we won't do them as parents, so I've create completely free hands-on playdough mats for your young reader to use. They're not individual pdfs either, just one big, easy packet to start using instantly.
Included in the packet are 44 words from Fry's first 100 sight words list.
When I taught kindergarten would introduce 1-2 sight words a week and these are the words that I taught first! Teachers choose sight words at their own discretion, and there is no one "right" list for kindergarten. These are also the words I am teaching my daughter first.
Why are these playdough mats so effective at teaching sight words? Well, the key to learning sight words is exposure. Since many sight words don't sound how they're spelled, kids must recognize them by sight.
Yes, that's why they're called sight words. Some teachers call them different things: tricky words, rainbow words, rule breakers, etc. In order to memorize these strange yet vital words, kids need to interact with them many times.
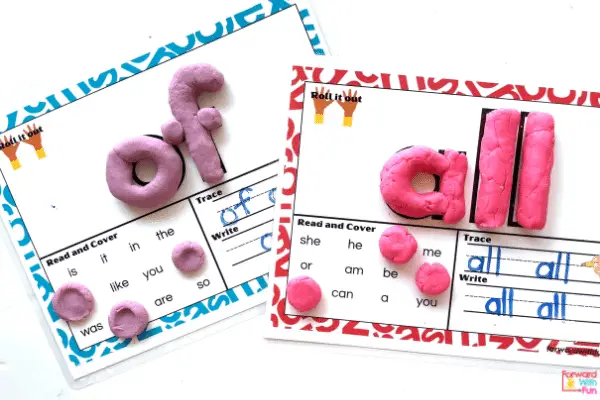
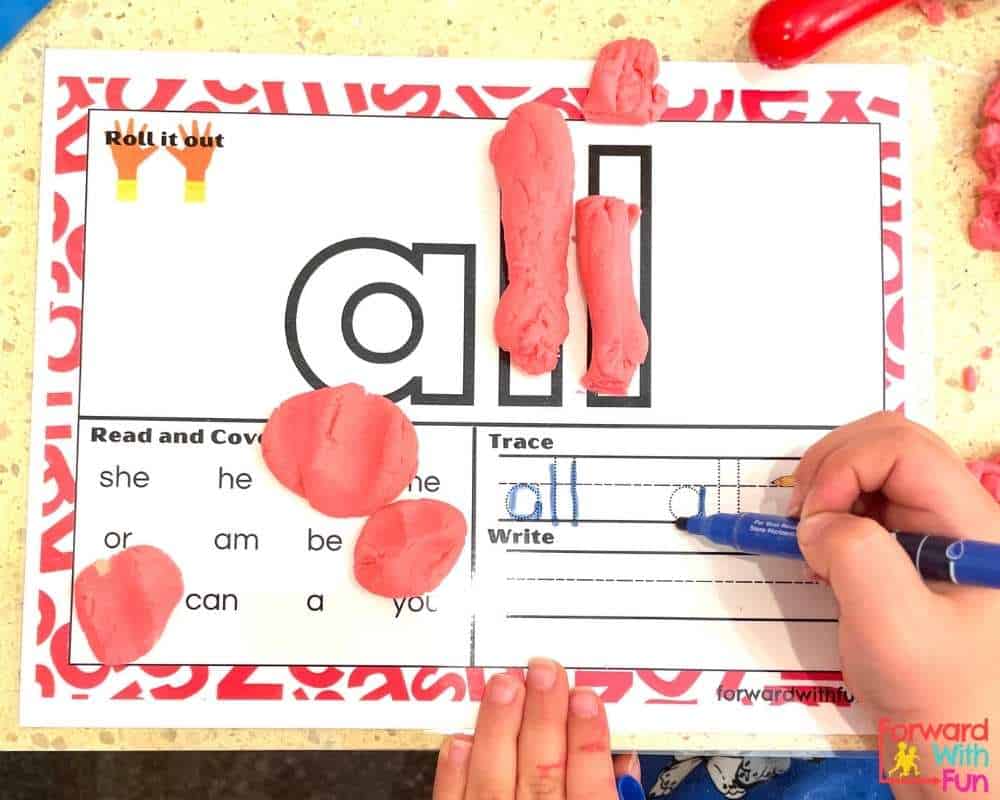
Each sight word playdough mat has 4 ways to interact with the word, and kids will see the sight word they're working on 6+ times during the activity.
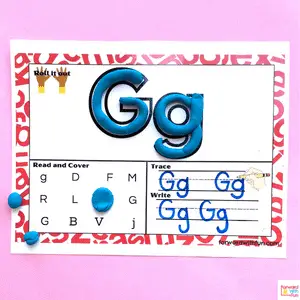
First, kids will roll out their playdough into long "snake" pieces, then twist and shape them into the letters that form the sight words. This sensory way to learn, really benefits all kids, especially young children who are often tactile learners (those who learn by touching).
Besides being a great sensory invitation to play, did you know that playing with playdough majorly builds up the small muscles in the hands needed for fine motor skills. I tell you all about why those are so important in this post about fine motor development!
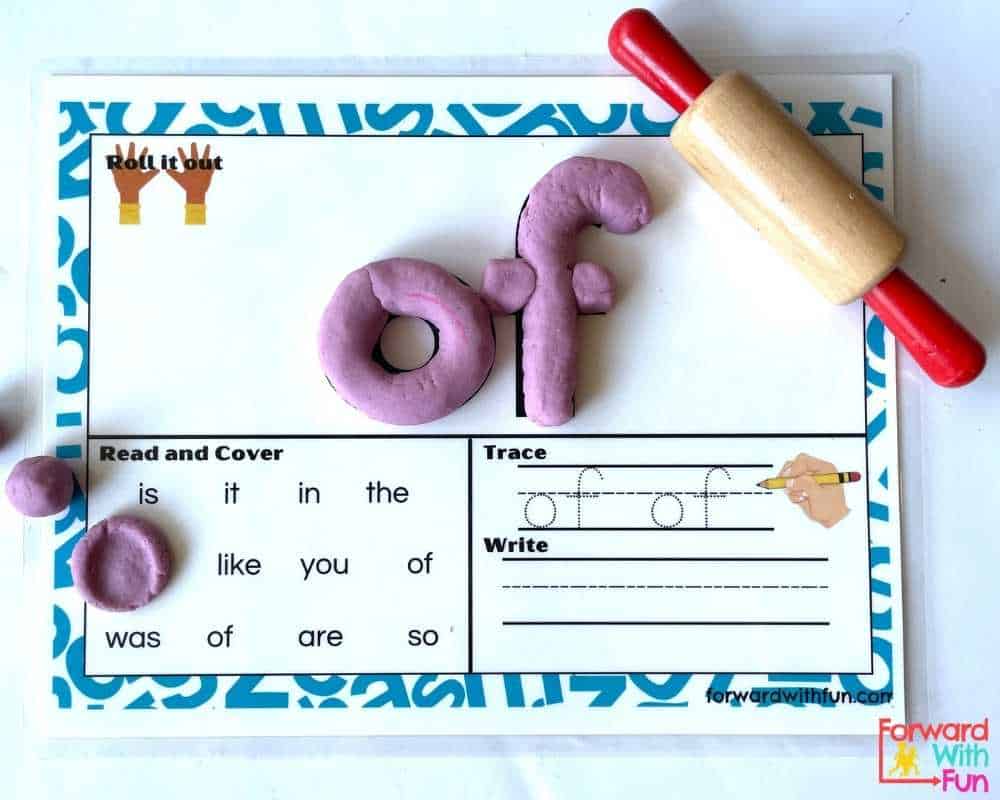
Next kids will read the sight words in the left bottom corner and splat them with playdough.
Make 3 small playdough balls, and have kids smush the ball with their fingers on top of the sight word on the mat! Kids won't need to know how to read all the sight words in this section, only to find the one they're working on. However, seeing all the sight words they've previously worked on, only helps cement their memorization.

The final section has a tracing component, and a writing component. If working with 4 year olds, they can just trace the sight word with their finger. When working with older kids in kindergarten and first grade, they can trace the word with their finger or a dry erase marker. If they're ready to write independently, the final line includes a space to try that, the most difficult step.
In sight word playdough mats, kids are building the word through sensory play, scanning and finding the word with reading skills, tracing the word, and finally writing it. With so many different kinds of interactions, these sight words have a much higher chance of being memorized than with boring, old flashcards!
Check out these alphabet playdough mats, also totally free! In need of number mats? They're free too. ; ) Yes, you read that right.