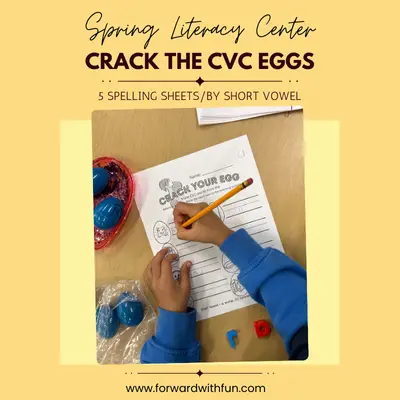
If you’re looking for a fun, hands-on Easter CVC word activity that gets your kindergarten students excited about phonics, this one is always a hit in my classroom! Combining plastic Easter eggs, magnetic letters, and our downloadable recording sheets, this activity gives students meaningful practice with CVC words while keeping learning playful and engaging.
This activity works beautifully for literacy centers, small groups, intervention, or even morning work during the spring when you'll probably have lots of plastic eggs handy. My family doesn't celebrate Easter, but we totally love an egg hunt!
*As an Amazon Associate I may get a small commission if you decide to purchase from my links. Thank you.
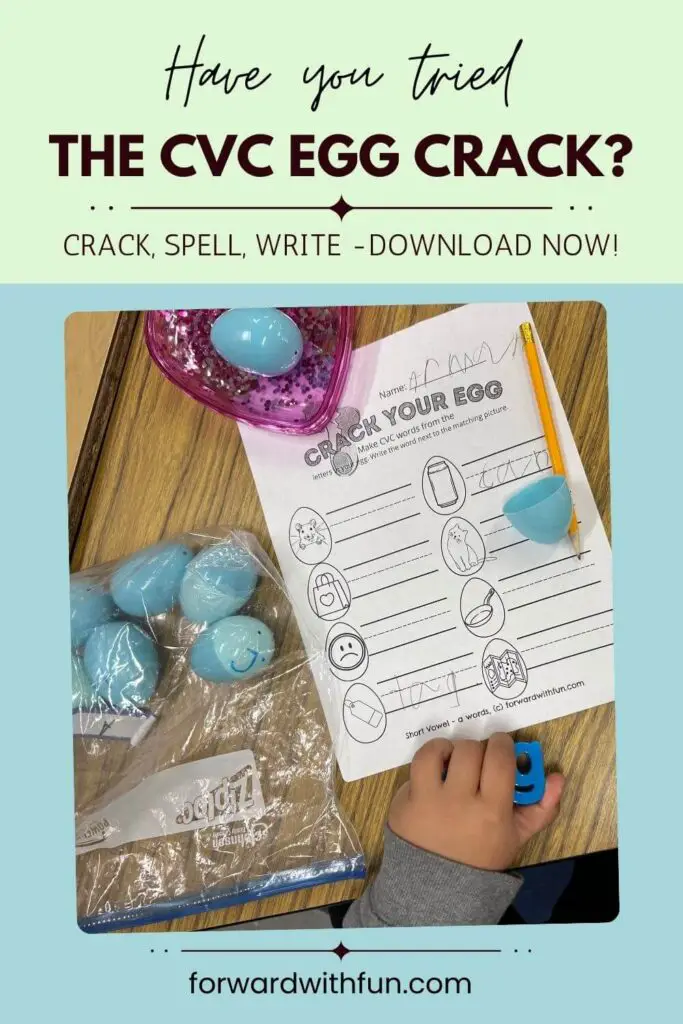
This Easter CVC word activity focuses on building and recording consonant-vowel-consonant (CVC) words using hands-on materials. Each worksheet is sorted by middle vowel sound (short a, e, i, o, or u) and includes 8 picture prompts, each displayed inside an Easter egg shape.
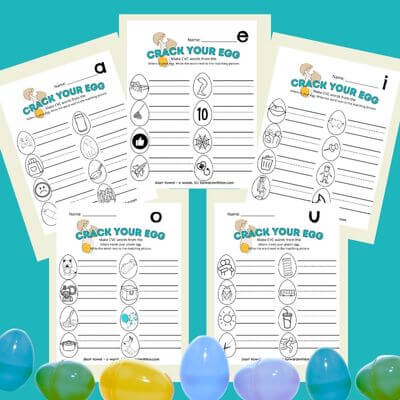
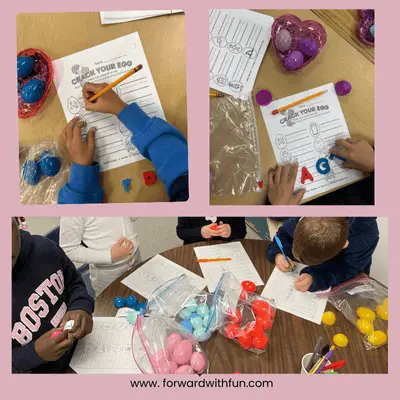
Students “crack” open plastic eggs to find magnetic letters, unscramble them to build a CVC word, and then record the word next to the matching picture on their worksheet.
It’s simple to set up, easy for students to understand, and packed with phonics practice.
To prep this activity, you’ll need:
👉 You can grab the ready-to-use worksheets by scrolling to the bottom of the page now!
Here’s how I explain it to my students:
Because the worksheets are sorted by middle vowel sound, students get extra focused practice with short vowels while working independently. This could also be a great whole group exercise too! Draw numbers or name sticks to make choosing who gets to crack the egg more fair.
As a teacher, I love activities that check multiple boxes—and this one does!
The Easter Egg theme adds excitement, but the real magic is how much meaningful learning is happening while students think they’re just “playing with eggs.” Rather than reading a word off a slip of paper, each child is creating the word -it's beginning, middle, and end. They'll notice patterns like each word has a vowel in the middle!
To keep using your new favorite magnetic letters check out another favorite CVC word activity: CVC Muffin Pan Words!
This Easter CVC word activity is especially supportive for English Language Learners because it:
To support ALL students, I often:
These small supports make a big difference! I have noticed that short vowels "e" and "i" are the toughest for my young English Language Learners, now known as Multilingual Learners. These two sounds in particular often get switched due to their pronunciation in many other languages.
This activity aligns with the following Common Core State Standards for Kindergarten:
RF.K.2 – Phonological Awareness
RF.K.3 – Phonics and Word Recognition
L.K.2 – Conventions of Standard English
If you want this activity ready to go without extra prep, you can find the printable Easter CVC word worksheets here:
They’re perfect for centers, small groups, intervention, or take-home practice—and your students will LOVE cracking eggs while building their reading skills.
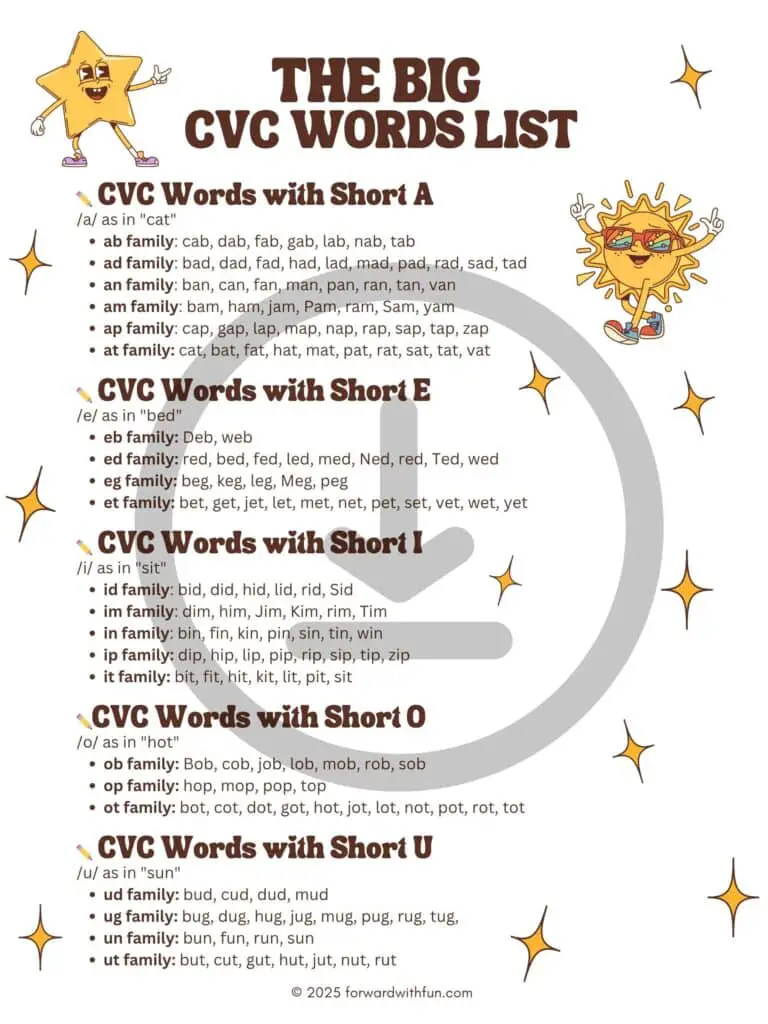
Today I'm sharing another free resource that makes teaching reading in kindergarten simpler and successful: a CVC Words List! This FREE CVC word list can be copies and pasted or if you're looking for the free printable version, scroll down to the end.

CVC Words are a huge part of kindergarten standards. In my classroom I use a ton of hands-on games to promote reading CVC words. I'm known for using unusually fun supplies and strangely silly strategies, so if your little one needs a little more encouragement, check out the following pages all about teaching CVC words:
If you're new to teaching little ones to read, you might be wondering...
CVC stands for Consonant-Vowel-Consonant. These are simple, three-letter words like cat, bed, or hug. They follow a predictable pattern, which makes them perfect for emerging readers. CVC words use short vowel sounds, and every sound in the word can be heard clearly. This makes decoding (sounding out) much easier!
CVC Words are the building blocks for learning how to read, but we often use the same ones over and over again. I hope providing a free and easily printable CVC words list will make it easier for you and your kindergarten reader to practice reading with more and more words.
As a kindergarten teacher, I always make sure that my CVC words are easy to sound out and consistent in pronunciation.
You’ll notice:
So let’s dive into our carefully curated CVC Words List!
/a/ as in "cat"
/e/ as in "bed"
/i/ as in "sit"
/o/ as in "hot"
/u/ as in "sun"
🧺 Use this list for:
Note the reader: There are some words that are not included in the list like knot, mutt, dish, chop that are not technically CVC words but still have three sounds-beginning, middle, and end. These can still be good words to talk about when practicing blending and segmenting words. I chose to leave them out because they included either unusual spellings or digraphs- sh, wh, ch, ph, or th.
CVC words are the stepping stones to reading success. With this organized list of CVC words, you’re helping your kindergartner build a strong foundation in phonics and reading fluency.
It felt like only yesterday I was a parent looking for first day of school story ideas at the library to read to my child! She and I were both so nervous, even though I had taught kindergarten myself. I wished I had a "just right" list- one that would tell me what each story was about to make sure I picked out the perfect book.
Likely, you're here because you've thought about this moment often, and it's for good reason! This essential year will start kids on their educational path that in many ways, shapes the rest of their lives. So it's normal to feel overwhelmed by what this day represents.
One of the best ways to help kids feel safe and understood in this transition is by reading a first day of school story together. These books can ease anxiety, spark conversation, and create a sense of familiarity with what to expect. Below, I’ve rounded up some wonderful first day of school stories that are perfect for kindergarteners—with a short synopsis of each one to help you find the right fit. The "just right" list I'd wished for...made for you.
Whether you're a parent looking to prepare your child or a teacher looking for a perfect first day read aloud, you're in the right place.

*As an Amazon affiliate I may receive a teensy commission if you buy something from one of the links in this post, at no additional cost to you. Thank you.
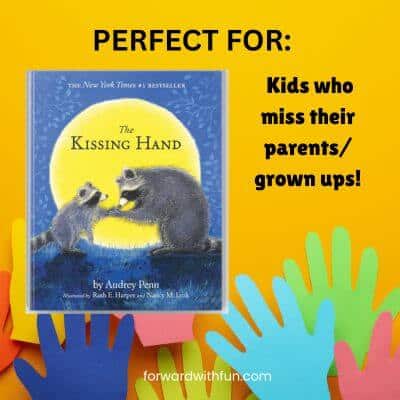
Synopsis: Little raccoon Chester is nervous about going to school, so his mom shares a family secret called the Kissing Hand to reassure him of her love wherever he goes. This touching story is perfect for easing separation anxiety and helping kids feel connected to home.
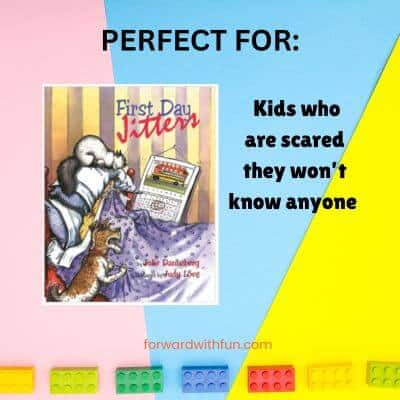
Synopsis: Sarah Jane is reluctant to get out of bed on her first day at a new school. With a fun twist at the end, readers discover that the nervous new student isn't a student at all—she’s the teacher! This book helps normalize those first-day jitters.
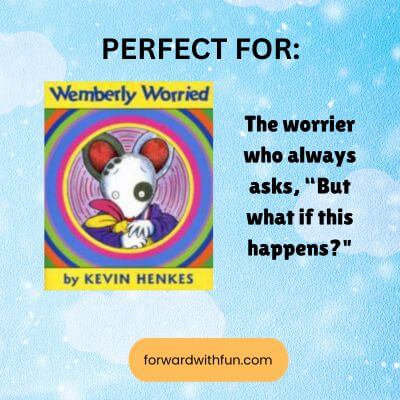
Synopsis: Wemberly is a little mouse who worries about everything—especially the first day of school. When she meets a friend just like her, she learns that school isn’t so scary after all. This story is great for children who tend to overthink new experiences.
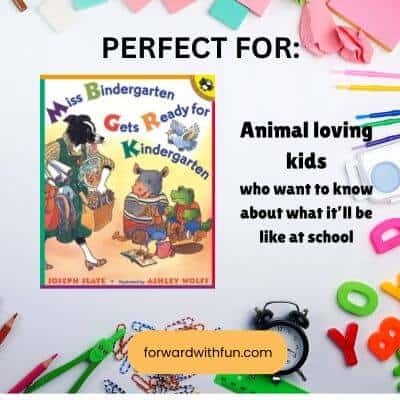
Synopsis: Follow Miss Bindergarten, a clever teacher, as she gets her classroom ready for 26 new animal students—each with a name starting with a different letter of the alphabet. This colorful, rhyming book introduces the idea of classroom structure in a fun, friendly way.
Synopsis: Pete the Cat explores his school with confidence and cool shoes. From the library to the lunchroom, he shows that everything is "all good." This upbeat story encourages kids to embrace new places with curiosity and confidence.

I read this to my TK students on the first day of school and then took them on a school tour/scavenger hunt so they could go to all the places that Pete went to on his first day. The sing-songy refrain in the book helps even the shyest kindergartners read aloud with you, "I'm rockin', in my school shoes! Im rockin', in my school shoes!"
Synopsis: Leo is super worried he isn't ready for kindergarten. Then his new teacher sends him a letter about the KIND in kindergarten. When he arrives at school, his teacher says they're going to write a kindness pledge. They gather ideas while touring the school, and his teacher introduces him to friends who also share examples of kindness.
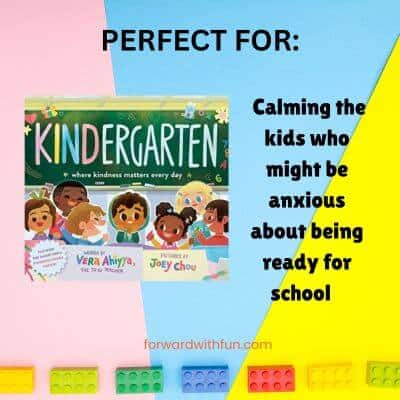
This new (2022) favorite first day of school story for kindergarten really impressed me with its character diversity and originality in focusing on sharing kindness as a focus of kindergarten readiness.
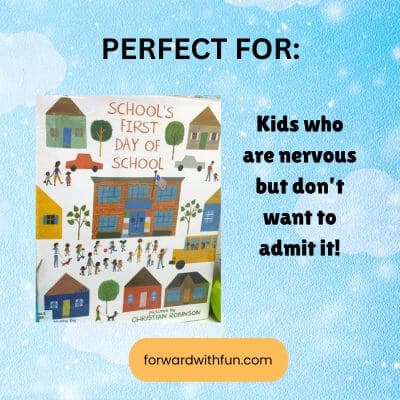
Synopsis: Told from the point of view of the school building itself, this unique story shows that even the school is nervous about the first day. A creative and gentle way to explore first-day anxiety for kids who might be a little nervous but don't want to say it. Also, I love that this story includes the janitor as a care-taking parental figure for the school. That's a special touch! Many kids love it just for the janitor!
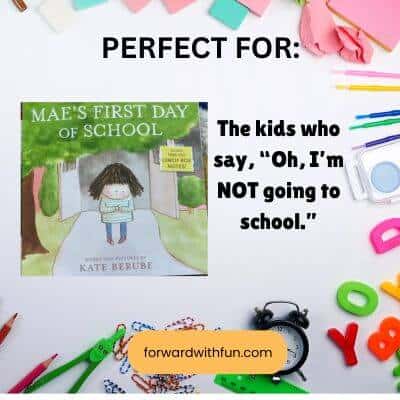
Synopsis: Mae is convinced she’s not going to school. But when she meets Rosie and Ms. Pearl, she realizes she’s not the only one with fears—and that school might not be so bad after all.
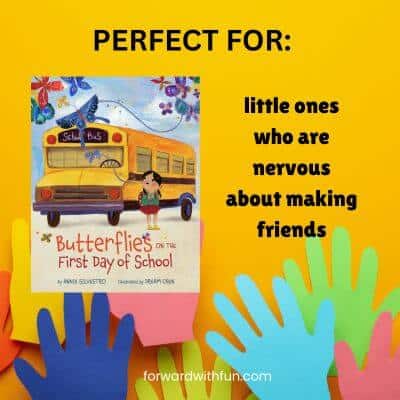
Synopsis: Rosie feels "butterflies" in her stomach about starting school—but they magically fly away as her nerves settle. A charming metaphor that helps kids visualize their anxiety leaving them.
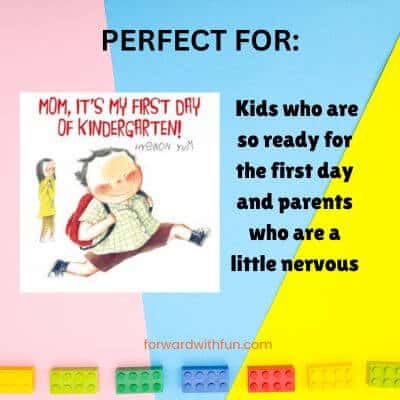
Synopsis: In this role-reversing story, a confident child reassures his nervous mom. Bright illustrations show both sides of the back-to-school experience with heart and humor.
Synopsis: A collection of short, upbeat poems that walk readers through kindergarten milestones—from saying goodbye to parents to field trips to the 100th day. One thing to note is that this book includes a nap time in the kindergarten day! Old school, haha!
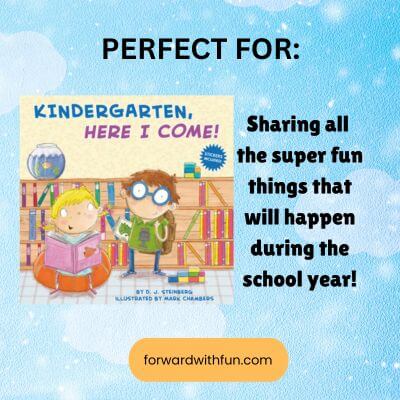
I read this book often to my kids before their first day of kindergarten because it's extra silly and they love the rhyming. It includes a lot of detail about the whole year, not just the first day.
Synopsis: This short but powerful kindergarten first day read aloud can be read for any grade really! The premise is that a family can include those you cherish the most, even if they're not necessarily related to you. Kids spend SO many hours at school... They make memories, share, and grow connections with our school family! Your classroom becomes a special place, like a home, where you can make mistakes, have big wins, and develop friendships and grow.
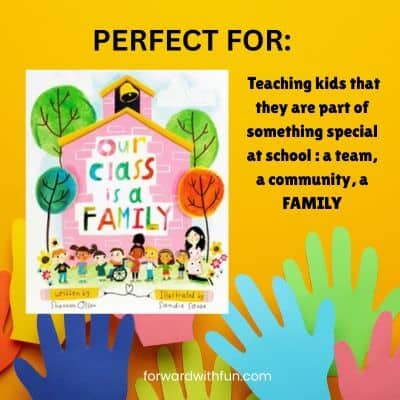
My daughter's first grade teacher read this to her class on the first day of school and continued to refer to back to it throughout the year. The idea that you are LOVED and an essential part of your classroom gives kids immense confidence and a feeling of belonging. This book also does a great job of including diversity and differently abled students in the illustrations.
Reading stories about the first day of kindergarten can:
Pair a book with a calming bedtime routine or read it together over breakfast to create a positive atmosphere around the big day.
Curious about starting kindergarten as a parent? Check out my post on Kindergarten Readiness and/or this one if you are asked to sign up for a Kindergarten Assessment during summer.
The first day of school is the beginning of many new adventures. With a comforting first day of school story, you can help your child walk into kindergarten with a smile, a backpack, and a heart full of courage.
Sometimes kids just jump right in and that is totally great. Other times, it may take time to feel comfortable in a new environment. In these cases, ask your child's teacher about using a transitional object like a stuffy to help them transition from the car to the classroom. I've had students who really needed to hold my hand in line -even in first grade. It's okay to advocate for your child and ask your teacher to help you make their transition a smooth one. Don't be shy! We are all on the same team.
If you have a book you think should be added to this list of first day of school story ideas for kindergarten, please let me know by emailing me at [email protected] or via Pinterest.
In today's digital age, coding is becoming just as important as reading and math. But how do you get kids excited about programming without making it feel like another homework assignment? The key is to make coding playful, hands-on, and pressure-free.
So read on to learn about beginning coding and a fun coding platform for kids!

Here are some fun ways to introduce kids to coding—without overwhelming them or you.
You don’t need a screen to teach the basics of coding.
My favorite example of unplugged coding is Directional Coding with Candy Corn. Directional coding is easy for young children to understand; use the directions of up, down, left, and right to write out how something will move.

Here are a few simple unplugged coding activities you can try at home or in the classroom:
These fun, screen-free activities help kids internalize coding logic in a hands-on, physical way—perfect for active learners or younger children who aren't ready for digital tools yet.
Children love stories and games, so why not use them as an entry point into coding? Platforms like CodeMonkey turn coding into an adventure, allowing kids to solve puzzles and complete challenges as they progress through different levels. It's a fun coding platform for kids that combines gameplay with real coding concepts. They have very beginning levels for kindergarten aged kids and they can level up to advanced techniques into high school.
My secret: Though I run a blog, I am LOST when it comes to text-based coding. I wouldn't even know how to begin teaching it to my kids, though I really want them to know how to code. Because of CodeMonkey, I don't have to teach it! (But honestly, maybe I should start playing because I do spend a fair amount of money each year on coders to fix issues on my site!)
Check out this video to see how engaging and approachable learning to code can be:
If you’ve never done any coding before, don’t worry—you’re not alone! Coding is really just a way of giving instructions to a computer, and there are many different ways to do it. Here are a few common types you might see in kids’ coding programs:
This is one of the simplest ways to start coding. Kids give a character or object basic movement commands like "move forward," "turn left," or "go backward." It teaches sequencing (doing things in the right order) and logical thinking. Think of it like giving directions to a robot!
Instead of typing code, kids connect blocks of code that represent actions or commands. Each block has a specific function, like playing a sound or repeating an action. This helps children learn the structure of coding without needing to type or memorize anything. This is taught to beginning coders via CodeMonkey!
As kids get more confident, they can start writing real code using languages like Python or CoffeeScript (also taught by CodeMonkey). It’s a bit like learning a new language—kids type out commands to make things happen.
By introducing coding as a creative, playful activity, you can help kids build confidence in this ever-growing and much needed skill. The key is to include their interests and let them direct!
Ready to get started? Let play lead the way! Looking for more STEM activities? Check out our most viral post The Floor is Lava STEM Challenge, downloaded 5,000+ times.

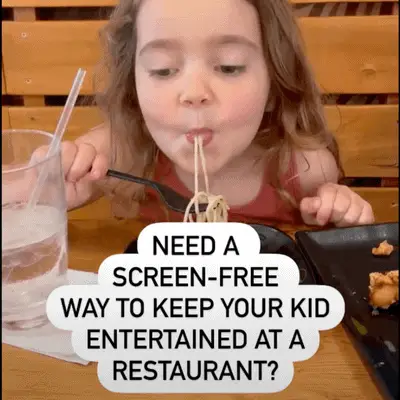
Don't hate me for saying this, but I really hate seeing kids on their tablets at restaurants, which is why I'm sharing this huge list of FUN, screen-free games to play at a restaurant.
I get it—restaurant waits can feel endless for little ones. But the good news is, mealtime can be fun and engaging without a screen. There are definitely times when screens are appropriate, and my kids definitely get their share of screen time, but there are so many important reasons why we should not be using screens at the table...
Children are naturally curious and social. Studies show that excessive screen time "lower(s) cognitive abilities and academic performance in later years. Language development is also affected by screen time, as it diminishes the quantity and quality of interactions between children and caregivers."
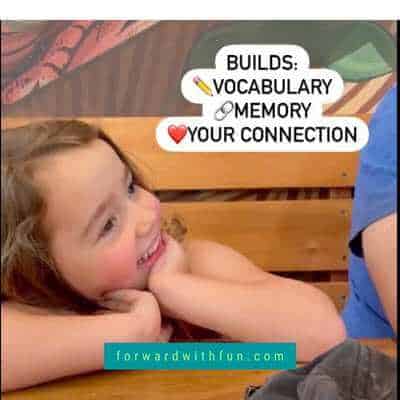
Giving them screen-free alternatives helps to:
If kids are using assistive technology, that is by ALL MEANS essential, and not the kind of "screens" I'm talking about! Again, no shade for the screens at the table; we are all kinda addicted to our phones, but there are some great games to play to make the time spent into quality time together.
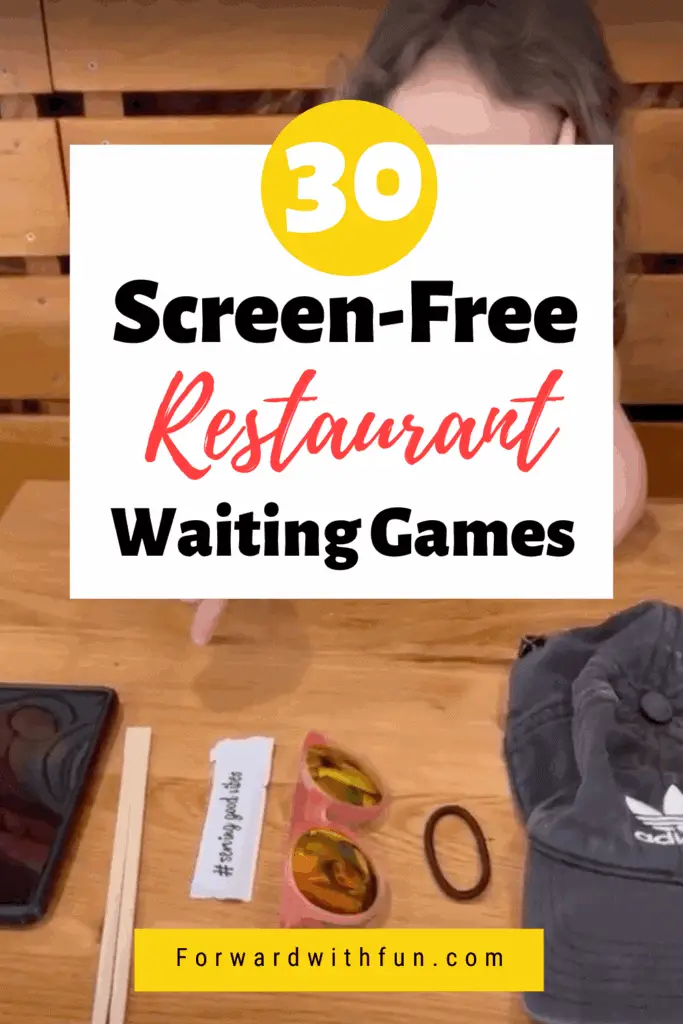
Let’s dive into 30 screen-free and FUN games for kids and adults to enjoy at a restaurant.
1. What's Missing? My kids' favorite game that went crazy viral on Pinterest with over 10,000 saves and millions of views.
2. Would You Rather?
Take turns asking silly or serious "Would you rather" questions. It's a great conversation starter!
3. 20 Questions
One person thinks of something, and others have 20 yes/no questions to figure it out.
4. The Alphabet Game
Choose a category (food, animals, movies), and go around the table naming something in alphabetical order.
4. I Spy
A classic! One player says, “I spy with my little eye…” and gives a color or feature for others to guess.
6. Name That Tune (Hummed Version)
Hum a song and let others guess what it is. Keep it age-appropriate!
7. Tabletop Charades
Act out clues using only hand gestures and facial expressions, while seated.
8. Category Clap Game
Go around the table clapping and naming things in a category (e.g., animals). Miss a beat? You’re out!
9. 2 Truths and a Lie
Great icebreaker—each person shares three statements about themselves, and others guess which one is false.
10. Build-a-Story
One person starts a story with one sentence. Each person adds to it in turns.
11. One Word at a Time
Go around the table telling a story—but each person only adds one word at a time.
12. What If…
Pose imaginative questions: “What if animals could talk?” or “What if pizza grew on trees?”
13. Emoji Face Game
Pick an emoji and try to recreate the face. Have everyone guess which emoji it is.
14. Sound Mimic
Make an animal or object sound—others guess what it is.
15. Menu Designers
Kids invent a new restaurant and describe their dream menu.
16. Fingers Up
Our new favorite: everyone has either 1 finger up or 0 fingers up, under the table. The first person guesses how many fingers are up total, then everyone reveals in 3, 2, 1. If they were right they get a point. On round 2, the next person guesses. You can't change your finger after they guess!
17. Spoon Balancing
Try balancing a spoon on your nose for as long as possible. Hilarious for kids!
18. Draw My Monster
One person describes a monster (number of eyes, legs, etc.), others draw it on a napkin.
19. Rainbow Order
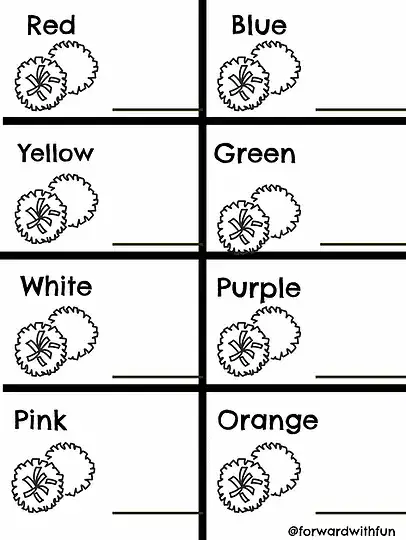
Go around the table and name something you see that is red, then orange, yellow, green, blue, and purple. Youngest goes first. You cannot name something that has already been said.
20. Napkin Origami
Fold napkins into fun shapes.
21. Count the… Game
Count how many red chairs, lights, or plates you can see from your seat.
22. Restaurant Bingo
Create a quick bingo card with common items (menu, waiter, glass of water, etc.) and see who spots them first.
23. Menu Hunt
Who can find the weirdest item or longest word on the menu? Most expensive/cheapest thing on the menu?
24. Games like Rock, Paper, Scissors. I've got a whole list of similar ones!
25. Pattern Making
You know your little one wants to play with the sugar packets. Start a pattern and have them complete and extend it! (Bonus for early math skills!)
26. Gratitude Round
Each person shares one thing they’re thankful for that day.
27. Rose/Thorn
Everyone shares the high point and low point of their day. A great way to build social emotional skills!
28. Who knows you best?
Pick a family member and guess their favorite food, color, hobby, etc. Get to know each other better! Award points and see who knows who best.
29. Memory Match (Verbal)
Describe something you remember from a past trip, and others guess where you were.
30. Compliment Circle
Everyone goes around saying something positive about each person at the table, including themselves! This builds confidence and positive self talk!
Even with great games, a little preparation goes a long way:
It might be a shift to focus less on phones/tablets and more on the world right in front of us, but I promise it's worth it. At first kids might be resistant, but once they start playing these silly games, they're bound to ask to play each time they're out. With these fun, interactive games to play at a restaurant, kids and adults will connect, laugh, and build lifelong memories. Plus, it's a healthy swap out you can feel really good about.
Keywords: games to play at a restaurant, screen-free restaurant games, family games at dinner, restaurant games for kids, keep kids entertained at restaurants
If you're a teacher looking for a consistent, positive way to manage student behavior, the CHAMPS classroom management system may be the game-changer you’ve been searching for. Developed by behavior specialists Dr. Randy Sprick and Jessica Sprick, CHAMPS is a proactive and practical classroom management model rooted in Positive Behavior Support (PBS) principles.
Whether you're a veteran teacher or just starting your journey, CHAMPS provides the structure, clarity, and consistency students need to thrive—especially in early elementary classrooms.
Plus, download a FREE game changing classroom resource: my K-2 CHAMPS classroom management icons to provide a visual for each expectation during the day.

*As an amazon affiliate, I may make a teensy commission if you choose to purchase through the links in this post. Thanks in advance!
CHAMPS is an acronym that outlines clear expectations for student behavior during various classroom activities. Students get visual and explicit instructions of what expectations are before each activity so that they know exactly what to do to ensure success.
CHAMPS stands for:
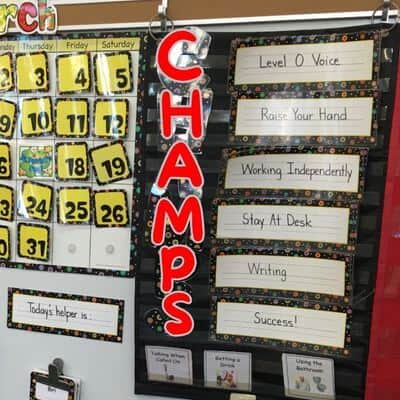
At the front of your classroom, you'll have your CHAMPS expectations board- written vertically just like an acrostic poem. Here is an example from a third grade classroom:
Before each activity, the teacher will go over each letter/expectation to clearly outline exactly how students can get to S aka SUCCESS. Though the other letters change, S always stays the same and = success.
For K-2, or even as young as preschool, kids will need visuals to help them meet expectations. Here is an example from a 1st grade classroom using CHAMPS as a large part of their classroom management plan.
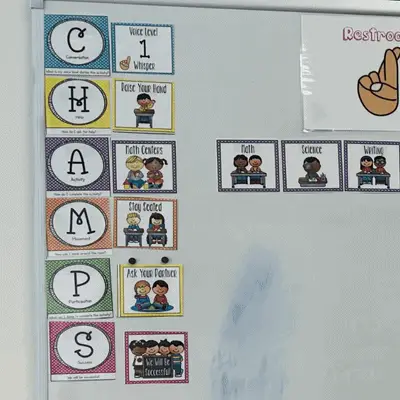
By pre-teaching these expectations for every type of activity—from independent work to group centers or lining up for recess—teachers can prevent many common behavior issues before they even arise.
At first, it may seem tedious to go over the expectations for something as simple as lining up, but students flourish when they're given expectations BEFOREHAND. Kids don't know how to meet your expectations of "quiet working" or "table team project." Expectations vary between grades and individual teachers. So show them exactly what you want! They will rise to the occasion. Over time you'll spend less and less time going over expectations, because students will know them SO WELL.
And I'll help you get started with free printable CHAMPS icons for your classroom at the bottom of this post.
CHAMPS is built on the foundation of Positive Behavior Support (PBS). PBS is a research-based framework that emphasizes teaching, modeling, and reinforcing positive behaviors rather than punishing negative ones. PBS strategies are effective across grade levels, but they are particularly transformative in K–2 classrooms. Why? Because young students are still learning how to function in structured social environments.
Here’s how PBS, and by extension CHAMPS, helps rid classrooms of unwanted behaviors:
By using a PBS approach like CHAMPS, teachers create a classroom culture that focuses on success, engagement, and emotional safety—all critical for early childhood development. To learn more about teaching social and emotional skills to young students, check out this post.
STORY TIME: From 2010-2014, I worked at a wonderful school called WISH Charter. One of the tenants of the school was for each classroom to have a CHAMPS board at the front of their room. At first, I thought it would be overkill to outline expectations before every single activity. However, I truly was converted when I saw the difference it made in how my students behaved.
All students benefited from explicit instructions. Generally, kids want to succeed! I rarely ever had to redirect my kindergartners during tasks; I would just point to the CHAMPS expectations and they knew what they were expected to do. This was transformative for some of my more challenging students who needed reminders. Instead of calling out their names and chastising them, I would redirect them quietly by pointing to the expectations, and they knew!
To help you get started, I’ve created a FREE downloadable CHAMPS classroom management visual icons specifically designed for Kindergarten through 2nd Grade. This easily works for older grades as well. Though many of my upper primary colleagues would just write the expectations instead of use the visuals.
This easy-to-use resource includes pictures for each CHAMPS classroom management category: Conversation, Help, Activity, Movement, and Participation.
To use this resource you'll need:
Whether you're setting up a new classroom or revamping your current behavior plan, this resource is great to use from day one, so children know how to have success in each part of their day.
👉 [Download your free CHAMPS Classroom Management Toolkit for K–2 here]
Final Thoughts
CHAMPS classroom management is more than just a system—it’s a mindset shift that places emphasis on clarity, consistency, and compassion. By setting clear expectations and teaching students how to meet them, you’re not just managing behavior—you’re building a positive, productive learning environment where every child can succeed.
If you're ready to create a more structured and supportive classroom, give CHAMPS a try—and don’t forget to grab your free download!
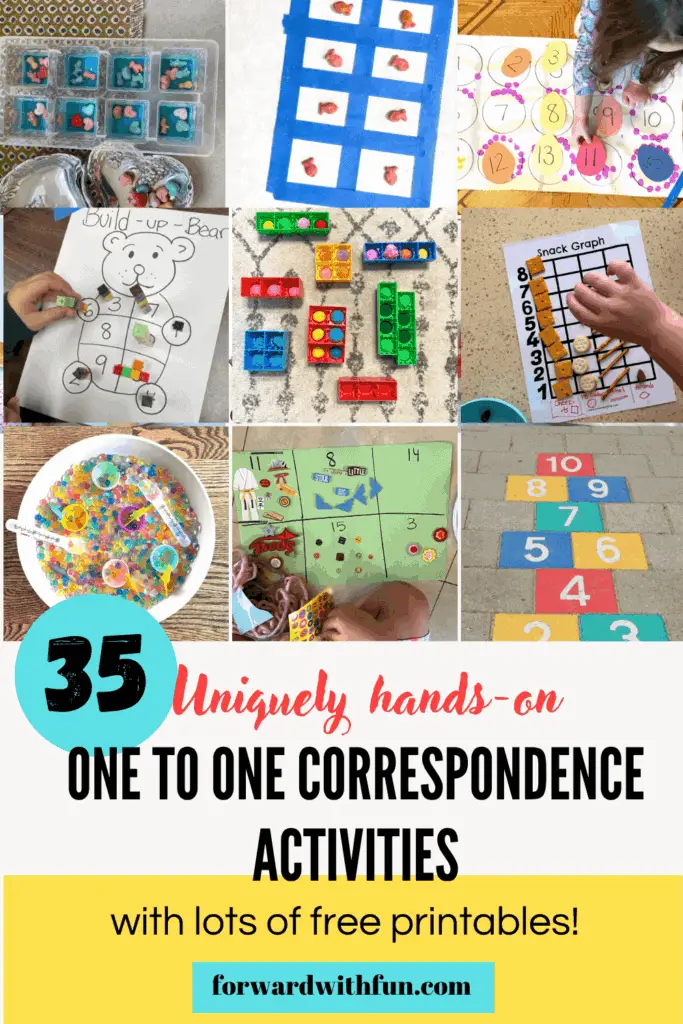
Looking for creative ways to teach one to one correspondence to your little learners? You're in the right place! In this post, we'll explore what one-to-one correspondence is and how you can make learning this beginning math skill both fun and effective with 35 low prep and ridiculously fun activities.
Plus, I unintentionally included SO MANY FREEBIES in the post, so keep scrolling and download them all (6 in total)!
*As an Amazon affiliate, I may get a small commission for purchases made through links in this post, most likely pennies ; )
One-to-one correspondence, also known as 1:1 correspondence or one to one correspondence, is the foundational math skill where children understand that a number represents a specific quantity. It means the ability to count accurately! If you've asked your child to count 20 legos, and they're counting way too fast as they point to the objects, they likely need to practice one to one correspondence.
Before they can be expected to have mastered one to one correspondence though, children must know how to rote count...which means counting out loud and saying the numbers in order. If your child is still working on saying the correct numbers in order, these epic rote counting activities will be sure to build those skills while also being fun!
Teaching one-to-one correspondence is crucial because it:
Usually this 1:1 correspondence develops between the ages of 2 to 5. In preschool, children are expected to be able to count up to 5 and then 10 objects accurately. By kindergarten the expectation is 20 objects, but hopefully more. In first grade, children should be able to count 100 items accurately. However, developmental variations are normal.
I made these for my students, and now your students. They're simple and fabulous.

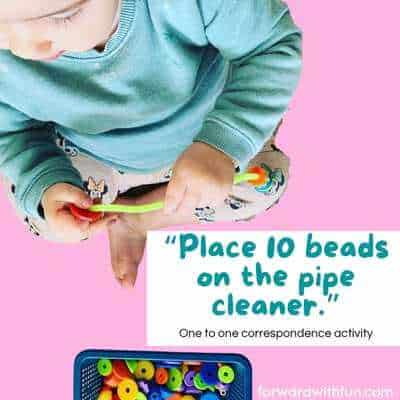
Kids count beads as they string them on a pipe cleaner. See how many can fit?
Stick one sticker on each numbered spot. Kids are obsessed with stickers, so use that to your advantage. This one to one correspondence activity is easy to make harder or easier for your small groups.
My students love Build a Bear so I thought to do a little play on words with that to practice one to one correspondence. Just like the sticker activity, it takes 15 seconds to prep, but kids use connecting blocks to "build up" their bear. ; )

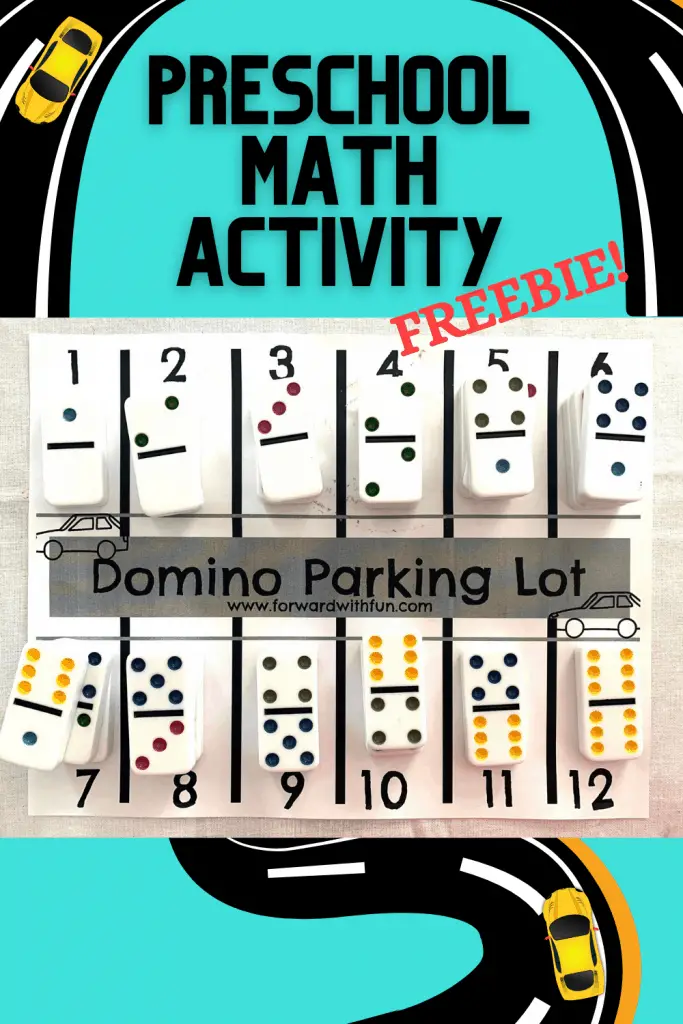
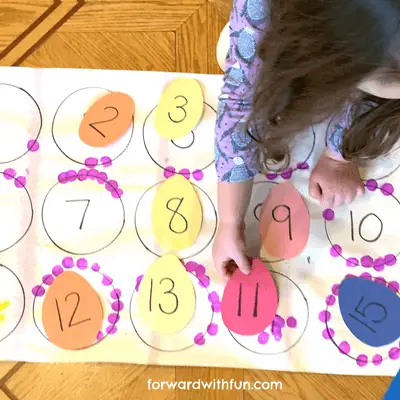
This is such a clever, low prep activity for kids who love cars. Pretend each little domino is a car and needs to be parked in the correct number parking spot. Kids will be counting the little dots with 1:1 correspondence and using imaginative play!
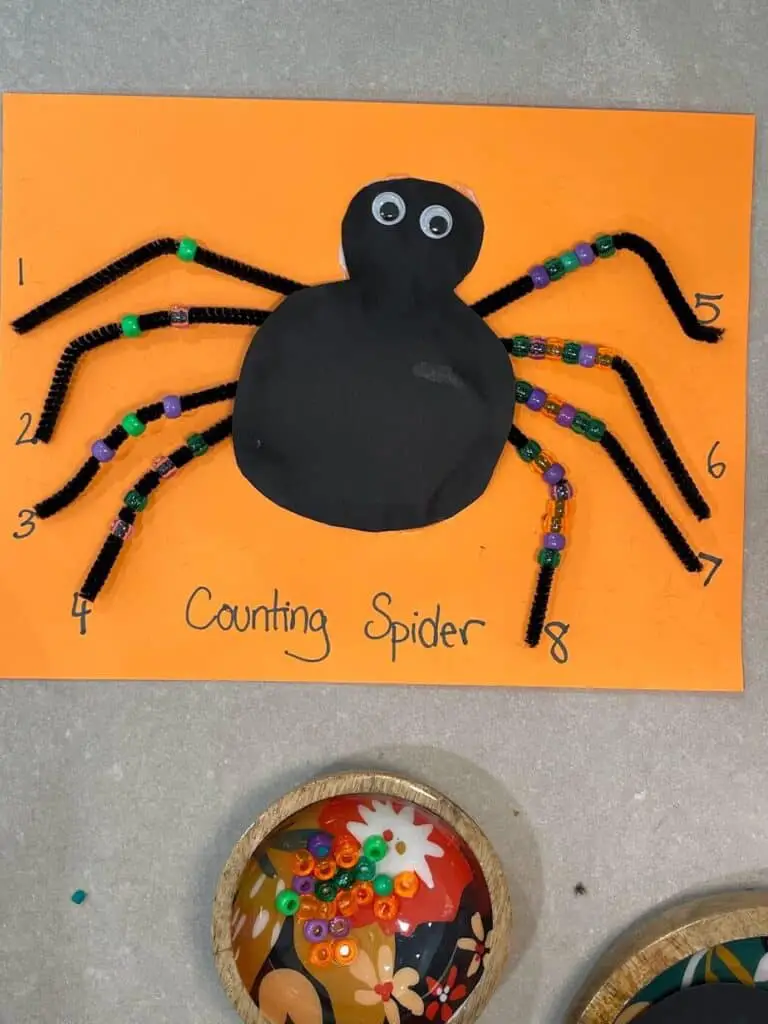
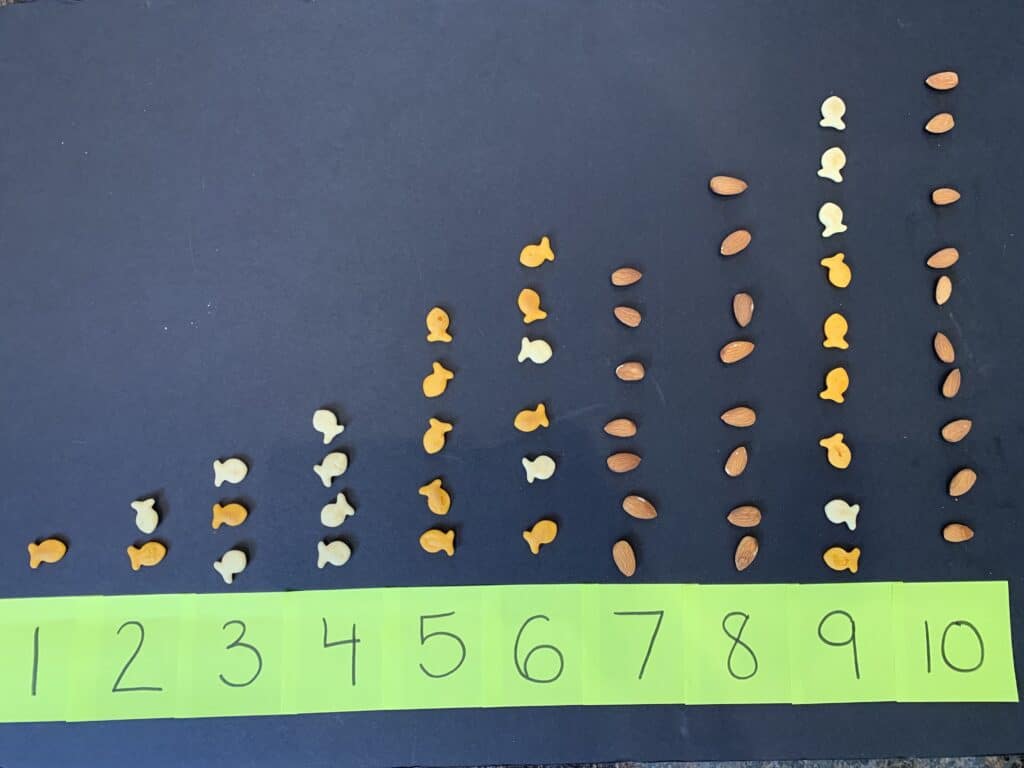
I had my kindergarteners do this one around Halloween. They match the number of beads to the number near the spiders leg. You can easily differentiate this activity with higher numbers for more advanced students!
Take turns calling out a number and then clap, stomp, or snap that many times. You can go around in a circle having one child pick the number, and one child pick the action. For example "18 jumps!" To reinforce one to one correspondence, challenge everyone to stay on the beat as you model for them, because younger kids may jump super fast and number match up their movements with the actual counting.
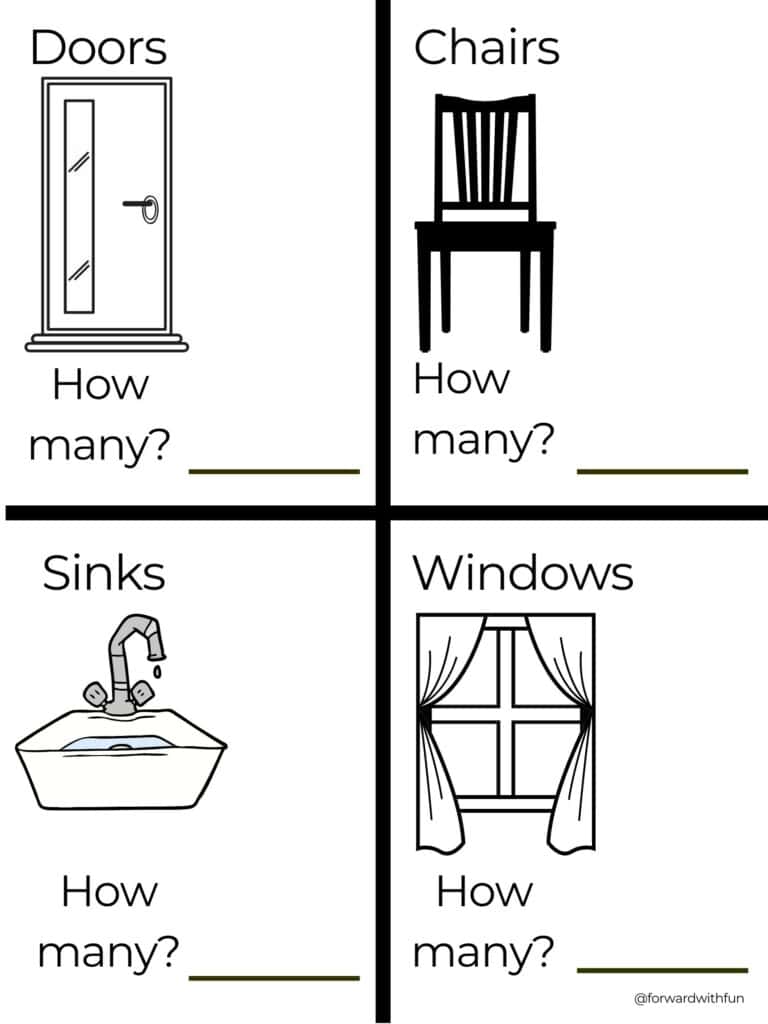
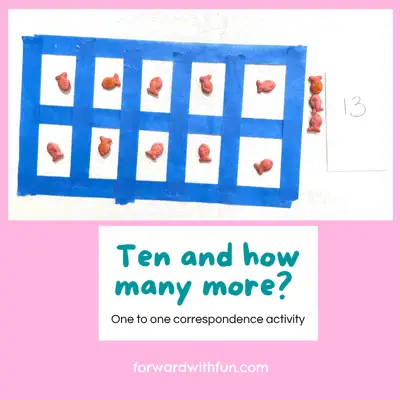
Go on a one to one correspondence scavenger hunt around the room or the house. Count how many doors, chairs, sinks, and windows you have. Click on the picture to take you to our free download!
A classic kindergarten activity is to count out 100 of a specific object. I assigned my kindergartners this task, and they all had such great ideas of what to bring in. One child memorably printed out a large photo of my head and strung on 100 blonde pieces of yarn. The closest I've ever become to being blonde, haha.
Okay, stick with me here. This is probably would be better done outside, but kids love pouring water. It's true. For this braver-than-most activities, you label a bunch of different containers with numbers, then have children pour that number of spoons/squirts/whatever you choose to match the number. It's sensory, fine motor, and shows that even liquid has quantities (science)!
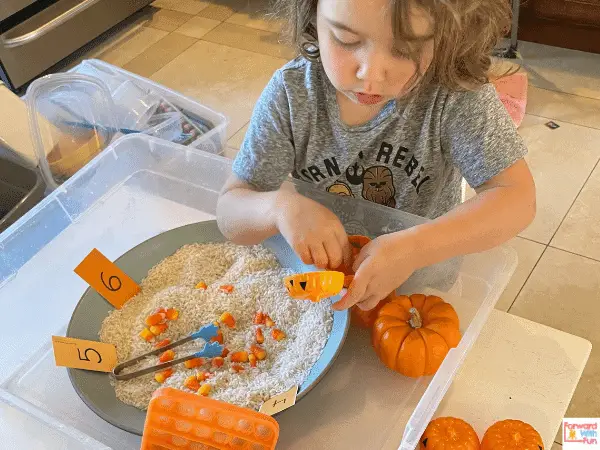
I know here I am again with my wild ideas, but my 2.5 year old was obsessed with her Halloween candy, so I stuck it all together in a bowl, threw in some numbers, and had her put that many in the pumpkin. This makes an excellent math center. (For more excellent preschool level Halloween activities, check out this post).
Got a fly swatter and post-it notes? Write the numbers your students should count to and have them practice hitting each number that many times. Incorportating movement with learning makes it way more memorable, but it also makes children count more slowly, reinforcing the concept that each number correspondence with one movement!
This was a HUGE hit for snack time and honestly, for all my kindergarteners. It does involve some prep, but like the swatting game, kids LIVE for the opportunity to be physically.
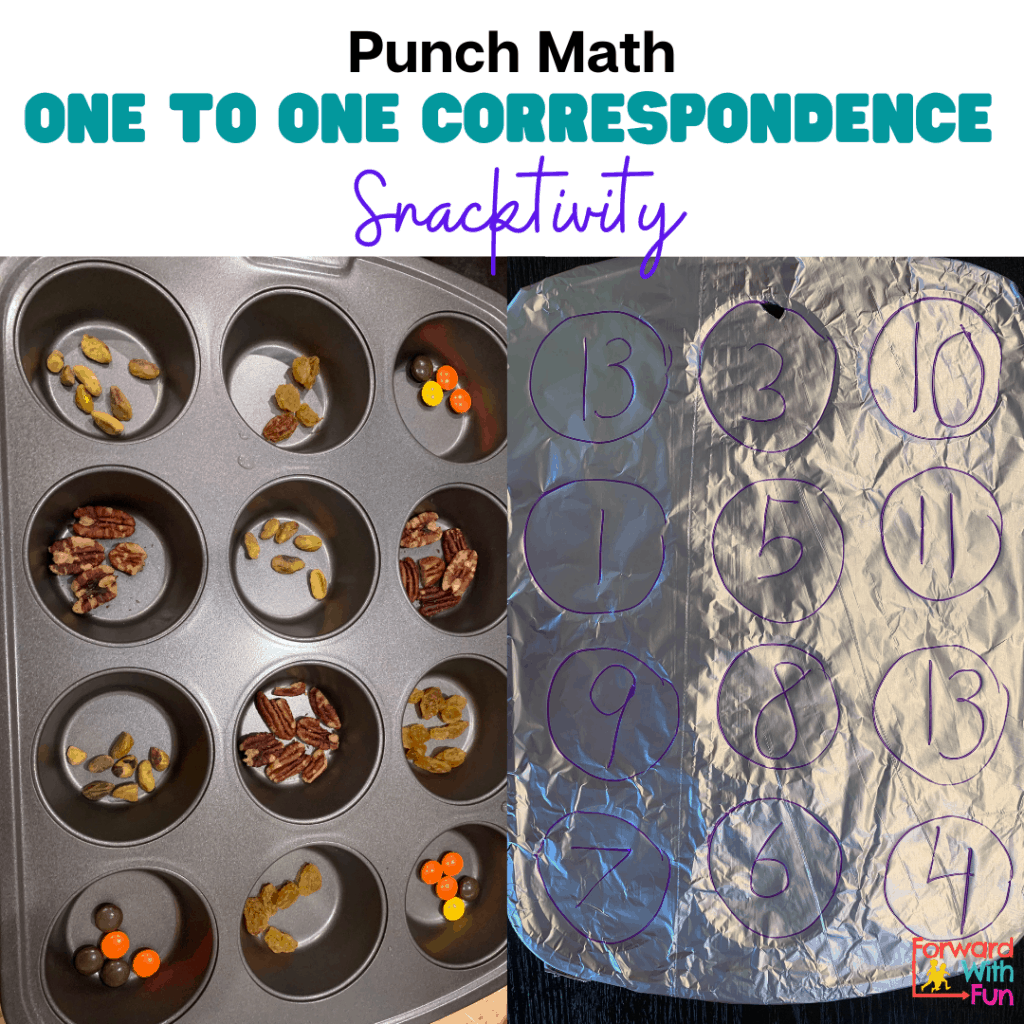
Make your own board game or seriously, play any board game. The rule I always say to my students is "touch 1, count 1." This is really important when playing board games, and kids will call each other out if they go too many spaces. Playing board games is a covert way to teach one to one correspondence.

This activity teaches your child their phone number-an important safety skill-while also practicing one to one correspondence. Write your number down on a large piece of paper, then have kids affix stickers/objects based on each number. Have them check their work to reinforce the one to one correspondence.
I feel like every family and preschool I know has Mega Bloks, and usually they're used for building. But turn them upside down and they'll make a great counting tool, teaching one to one correspondence.
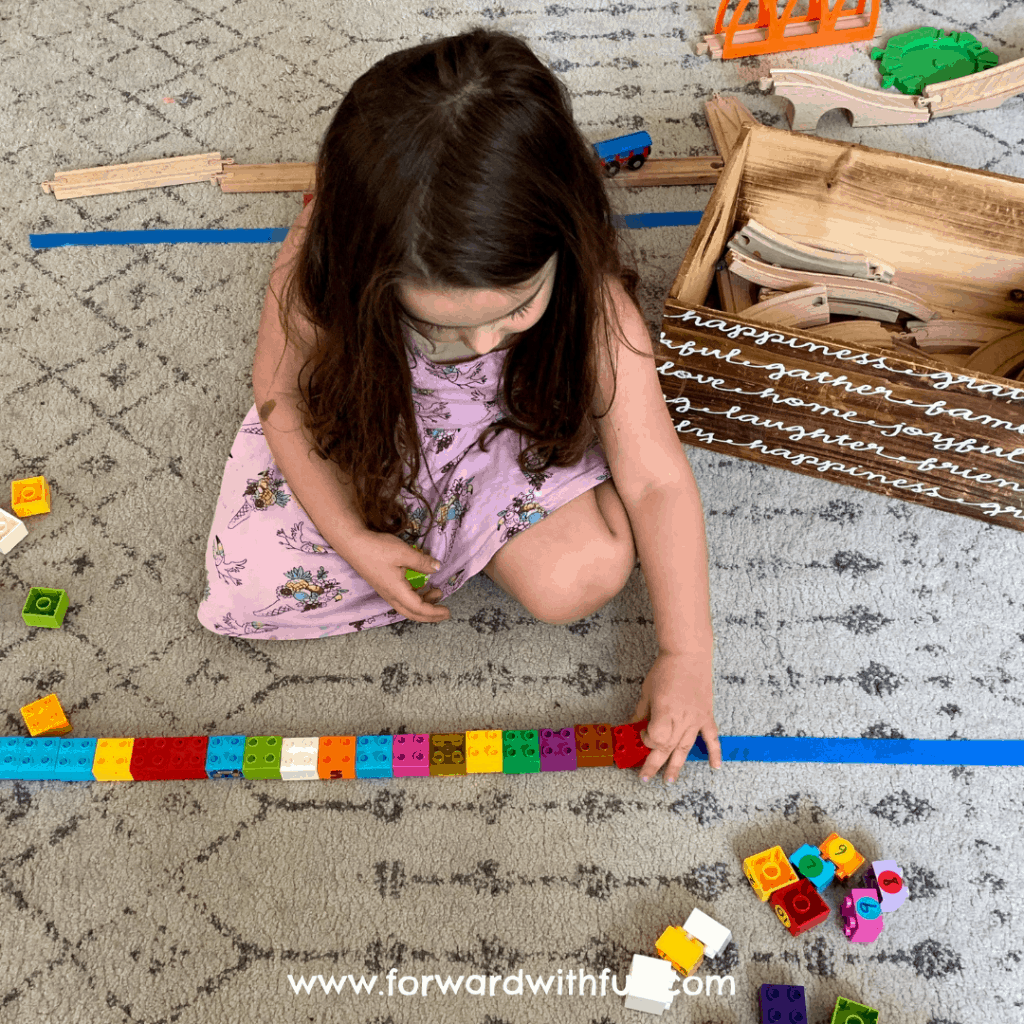
Place two pieces of tape on the ground at a distance from one another. These can be very long if done in a classroom. Have your students count how many steps it takes to get from one piece to the other, then how many hops, jumps, skips, leaps, whatever they can think of. Students are learning one-to-one correspondence by pairing the numbers with each movement, all while improving their gross motor skills!
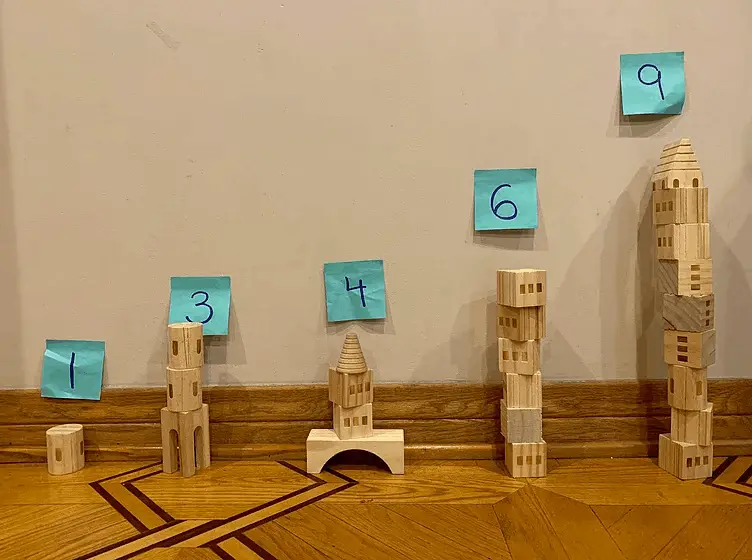
Another super fun counting activity that makes a great math center. Either children build their towers up to a specific number OR they build them up to a specific height and then count the number of blocks. Also, this can be done with any building material you have one hand.
Is anything better than a snack? This is one of the earliest counting activities I did with my children, and it was always easily done during snack time. Kids love to know how many snacks they have, and every time they do a recount, they're checking that they counted with one-to-one correspondence.
Did you know that before kids learn to measure in inches or centimeters, they're taught to measure in objects? How tall are you in Duplos? Bears? Unifix cubes? It's important to know that while kids are measuring, they must pick one kind of uniformly sized object to measure themselves. As they move each of the objects and keep track of their number, they're working on accuracy while counting.
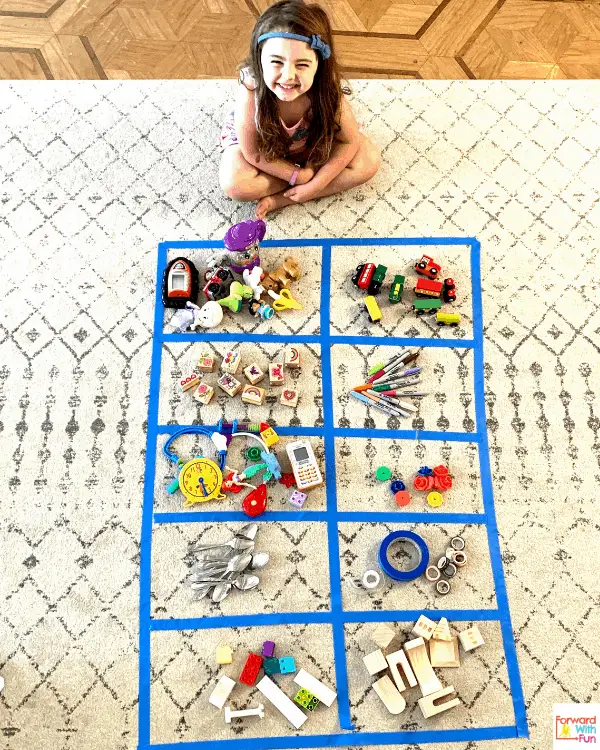
These kind of one to one correspondence activities encourage students to work with large quanitities. In order to keep their counting accurate, they'll need to develop strategies to organize their collections. To dive deeper into counting collections check out this post.
Using a ten frame can really help students keep track of their counting and practice counting on from the number ten towards numbers in the teens. In the recommended strategies for students struggling with one to one correspondence, I suggested ordering objects in straight lines, and a ten frame does this for you automatically. I make my own ten frames for snack time counting, but you can easily draw them or print them.
An easy transition game, have one kid pick an animal and one kid pick a number between 1-20. Squawk like a parrot 11 times! Moo like a cow 14 times! Kids love pretending, and this is a simple way to practice chorally counting with one to one correpondence.
This is so simple; pair up students with something easy to toss and catch. My favorite thing to use in the classroom is this set of bean bags, because it's 99% sure no one will get hurt. Have partners keep track of how many times they can toss and catch their team's bean bag before it falls. Move closer together to get higher numbers!
Choose a challenging number to be the number of the day, a concept popular on Sesame Street! Kids will draw, collect, and stack a bunch of versions of that number to become experts on their number of the day. Each time they practice counting to that number, they are learning one to one correspondence. Bonus: they can check their friends work for extra practice!

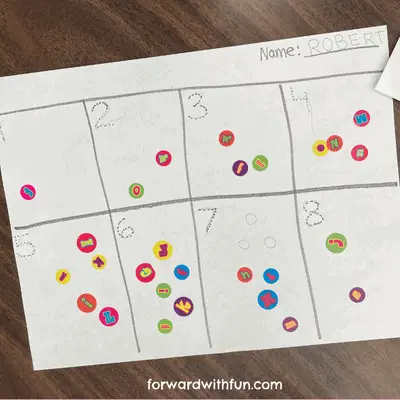
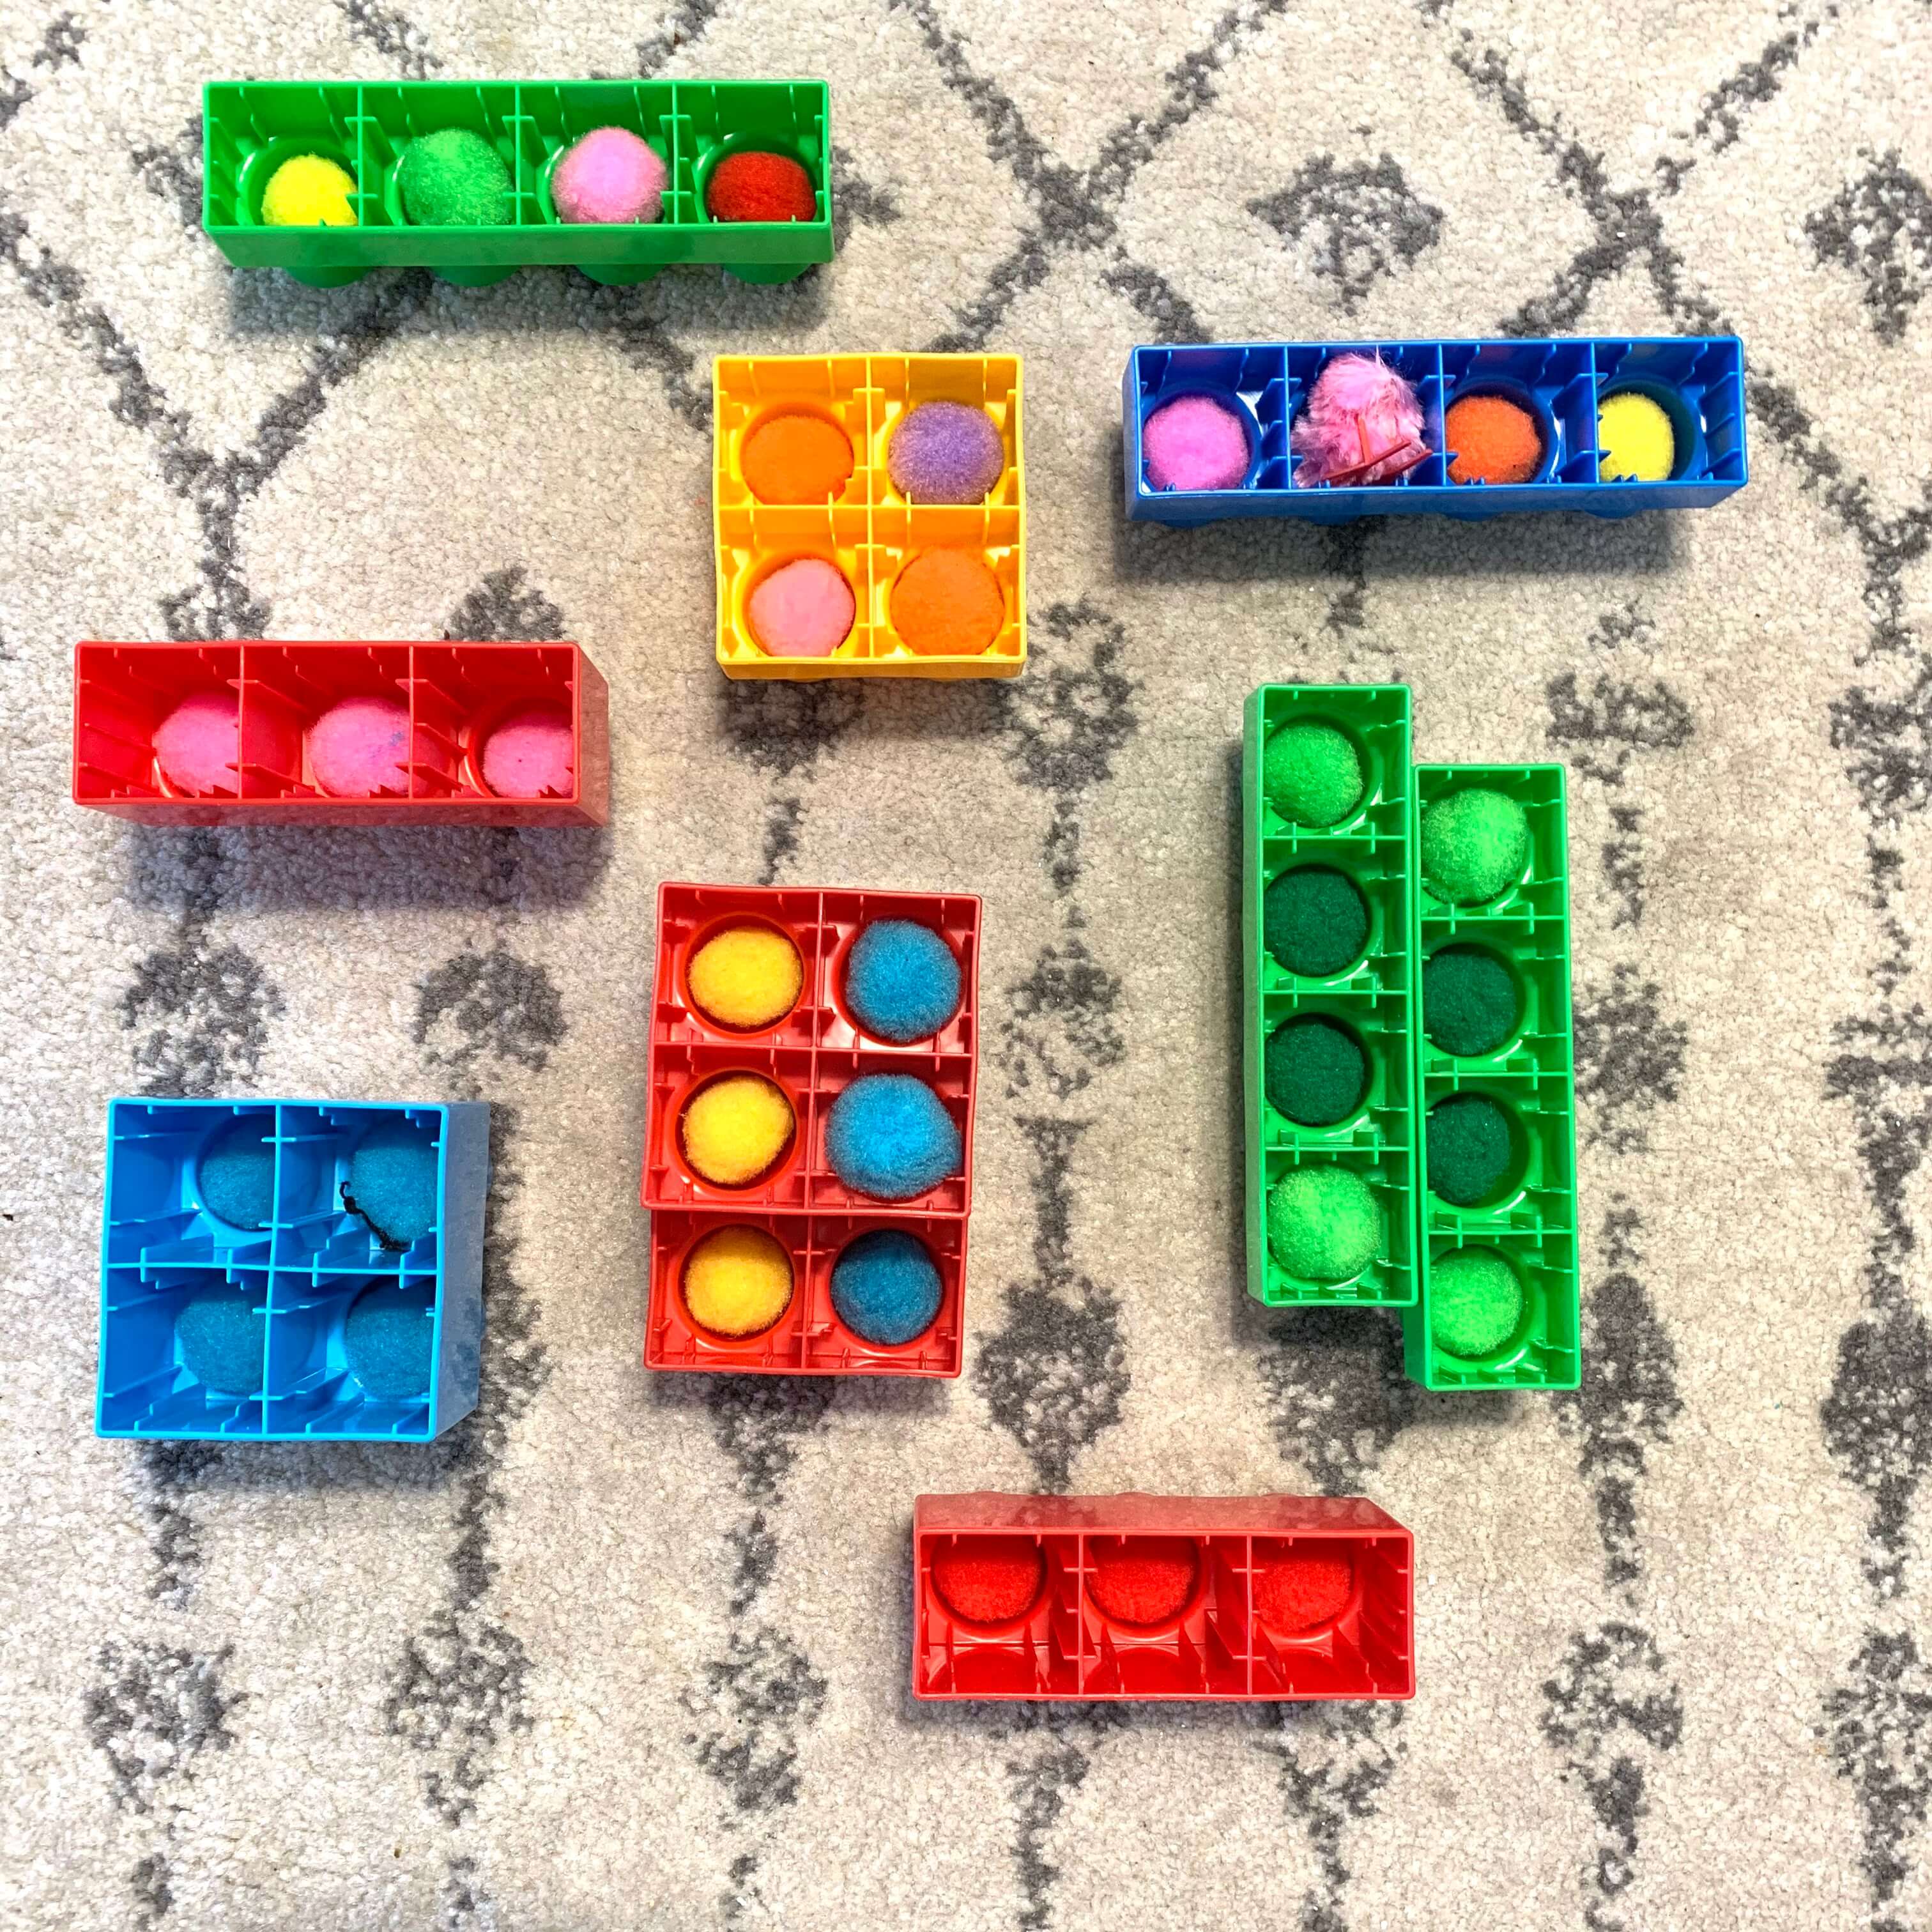
You can choose to do these activities with any kind of colorful objects. My favorite is pom poms, but when I do this with my classroom, I have used colorful candies like candied hearts, skittles, M & M's. Kids love to sort the objects given to them in a bag, a scoop, a box, anything. Have them count and record the number on the freebie sheet. Don't have that color? Record a zero.
This activity is similar to the one before but instead of recording the numbers, kids will be learning one to one correspondence as they place snacks in their graph. How high did each snack reach? See the corresponding number? That helps them match the quantity to the numeral! Click the photo for a blank pdf version.

Pick any size container and any kind of sensory filler. For a list of our 50 favorite sensory bin fillers click here. How many scoops will it take to fill the container? My favorite sensory scooping filler is dyed rice.
I know you bought a ton of these right after COVID right? Pop it fidget toys were all the rage around 2021, and they're great for so many learning activities. Counting along with popping the bubbles on this fidget toy really reinforces one to one correspondence because it auditory (one pop sound for each number) and tactile (one push for each number). This helps kids slow down their counting to match the quantity which is the goal!

Have each child bring a flower with identifiable petals from home. At a math exploration center, have them count the petals on each flower and record them on a clipboard. Children will love to see what all the flowers they picked look like together in a beautiful bouquet. Maybe they can even add up all the petals to find the total!
I think every classroom I've been to has these sweet little bingo daubers. I love to use those to have children create art but also for math. Have them design a number board then stamp each number the right number of times.
This game just keeps giving and giving. I have used hopscotch for number identification, addition, subtraction and so much more. Challenge children to play hopscotch but instead of hopping once in each box, have them hop the number in each square.
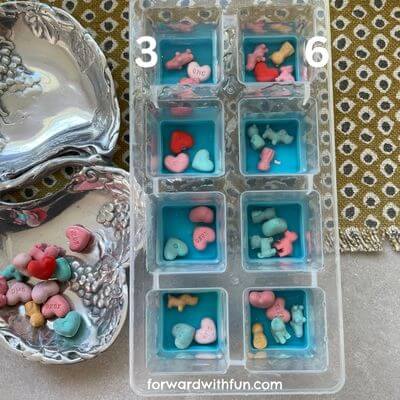
Kitchen items that I use for teaching all the time: ice cube trays and muffin pans. For one to one correspondence activities, I use dollar tree ice trays, write numbers on the sides with dry erase markers, and have kids sort little fun items like marble, tiny erasers, bouncy balls, water beads, etc.
This popular game is something my students cheer for! Set up a 30 second timer they all can see. Explain that kids will have a certain amount of time to create a group of exactly the number you call out. Any groups without the correct number of students will be out. Make sure to call out even and odd numbers! You'll see kids counting and chaotic fun ensue.
For this activity you will need two dice for each child. Kids roll their two dice, count up the dots, and then either cover the seashell with that number or color it. I laminate these to keep as an independent center kids can choose to do. Click the photo for the pdf version.

These activities are just the tip of the iceberg when it comes to beginning math skills. There is so much natural learning that happens as we observe our environment. Enjoy those opportunities to count with accuracy in everyday life: the supermarket, as you're driving, in the classroom, and everywhere you go to find a child who is engaged with the world around them and knows how to apply math to their everyday lives.
If you've enjoyed these freebies and ideas, please PIN or Follow me on PINTEREST so that I can continue to create and share free learning resources for young learners.
Is your kiddo ready for more? The next step is learning to count 10's and ones with place value activities and even more freebies.
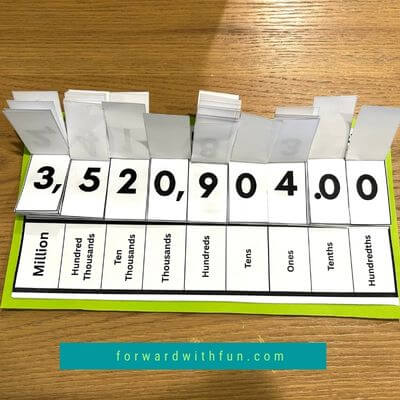
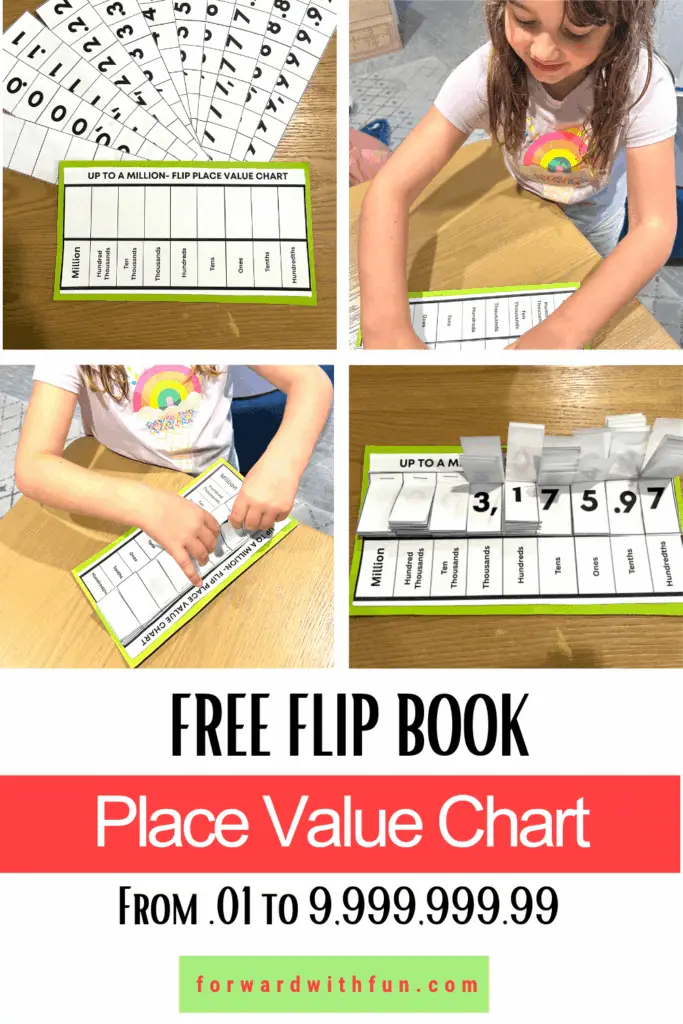
Our free place value chart flip book style printable is an engaging, hands-on way to help your students understand place value—from millions all the way down to decimal hundredths! Perfect for classrooms and home learning, this resource helps young learners build, read, and understand large and small numbers with ease.
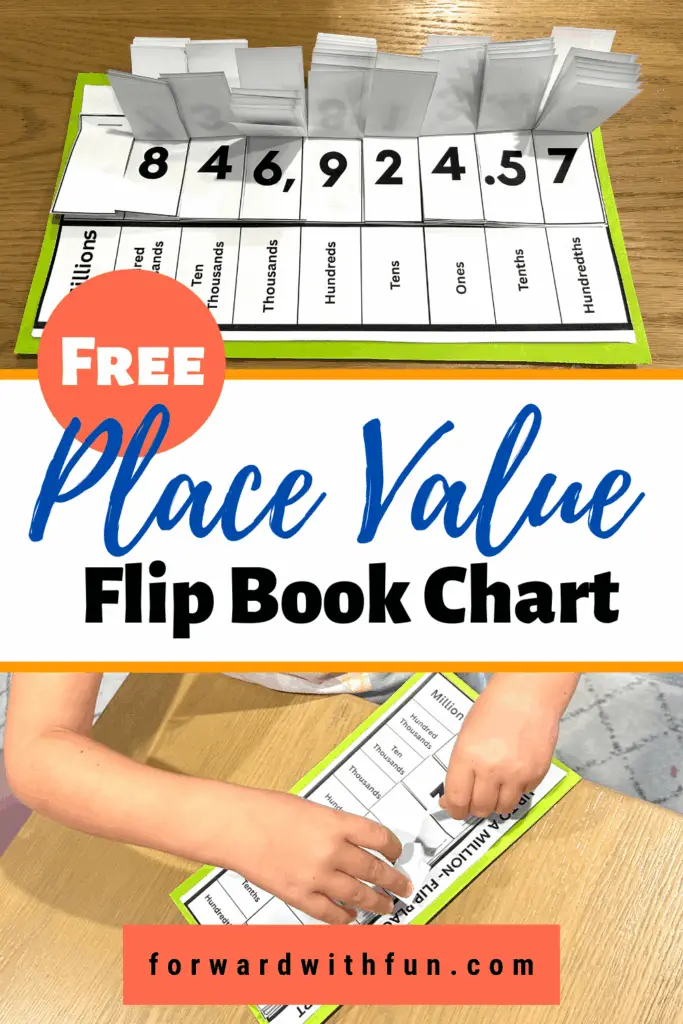
Whether you're a teacher searching for an interactive math center activity or a parent supporting your child's math journey, this flip book format place value chart is a must-have.
This place value chart covers:
Each flap is clearly labeled and easy to read, allowing students to flip through and build numbers in a fun, tactile way. Kids can even make their own flip books.
Easy and quick to make and customizable! If you want to include whole numbers only, you can just cut off the right two sections. If you want smaller numbers, just remove left most sections. There is an option for each section to be blank as well, so kids can explore numbers from single digits up to complicated millions with decimals!
Updated: The flip book now says "millions" instead of million in the first place value column.
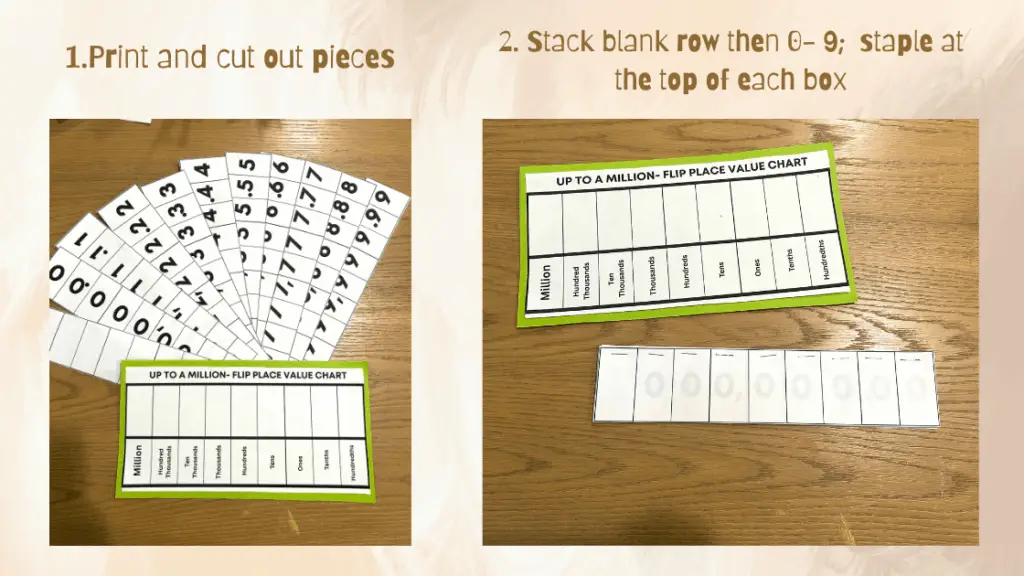
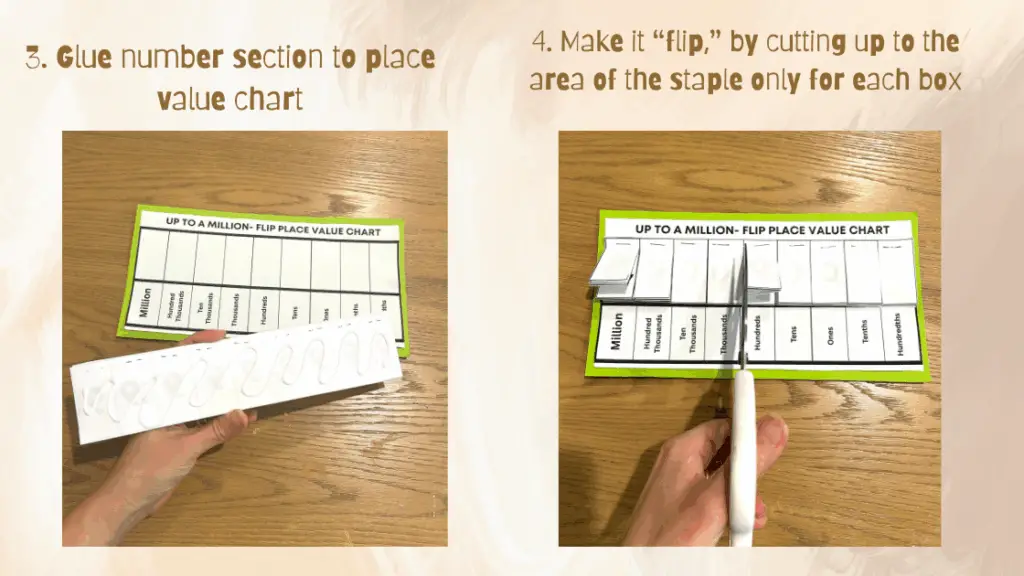
Putting together your place value chart is simple. Here’s how:
Materials Needed:
Step-by-Step Instructions followed by condensed photos:
Here are five teacher-approved math games that reinforce place value understanding:
For some other incredibly entertaining place value games check out THIS POST.
Big numbers are so nebulous for little kids. You'll say, what's a big number and they'll say a trillion and not understand how to connect the spoken numbers with written digits. This flip book allows students to practice auditory-to-visual translation, which boosts both comprehension and confidence.
Students often struggle with large numbers or decimals because they rarely get to see or manipulate them. This chart makes those abstract ideas tangible. When I taught kindergarten, kids were fascinated by huge numbers, but they didn't know the order of them after hundreds. It's so clear on the chart that after hundreds come thousands, ten thousands, and so forth.
Because students can flip and build numbers on their own, this tool promotes independent practice—perfect for math centers or homework support. The place value chart can be used in partnership with many other school activities all the way up to 6th grade.
Teachers and parents can extend the value of the flip book beyond just games:
Understanding place value is foundational for every math concept—from addition to decimals to multiplication. When students can confidently build and deconstruct numbers, they’re better equipped for long-term success in math.
This flip book place value chart brings that understanding to life in a colorful, accessible, and hands-on way. And best of all—it’s free!
Want more place value fun? Check out the SUPER STEM Place Value Stacking Cups Activity.
Grab your free printable flip book place value chart and give your students the confidence to master numbers—big and small.
Keyword focus: place value chart, free printable place value chart, flip book place value chart, place value games for kids, how to teach place value, place value printable
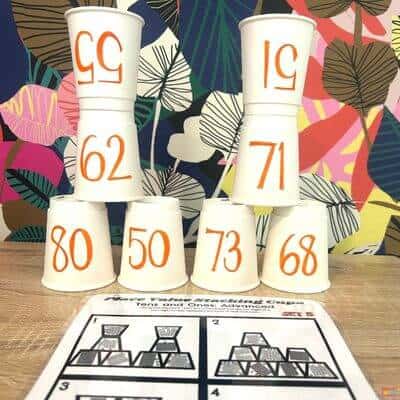
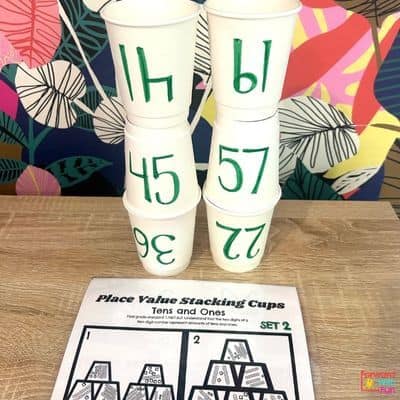
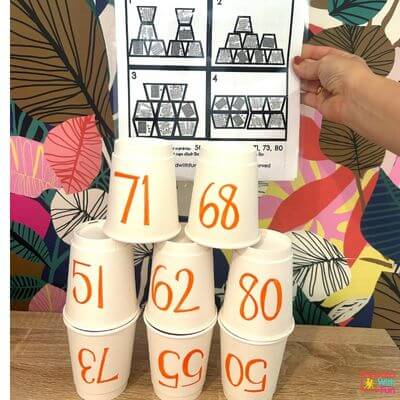
If you’re searching for engaging and hands-on base ten activities for your first grade classroom, you’ll love our Place Value Stacking Cups. This interactive activity uses number-labeled cups and base ten block visuals to help students understand tens and ones in a way that’s both visual and tactile. Teaching place value doesn’t have to be boring — in fact, it can be stacked with fun!
Be sure to check out 20 Most Popular Place Value Games and Printables after you grab these stacking cups!
*As an amazon affiliate I may receive a teensy commission if you buy something from one of the links in this post, at no additional cost to you. Thank you.
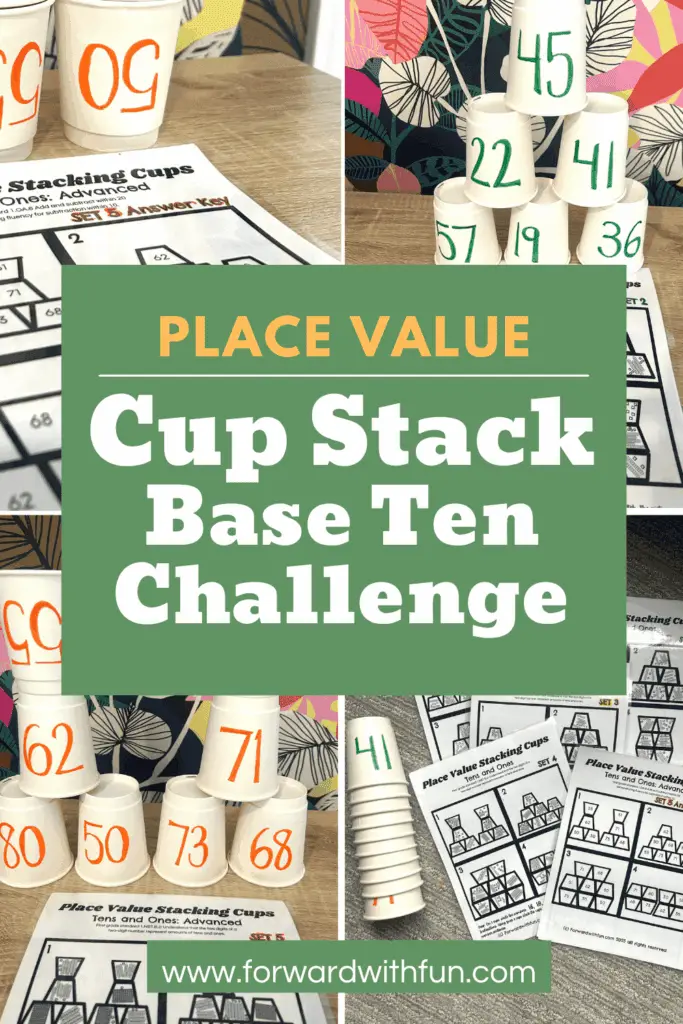
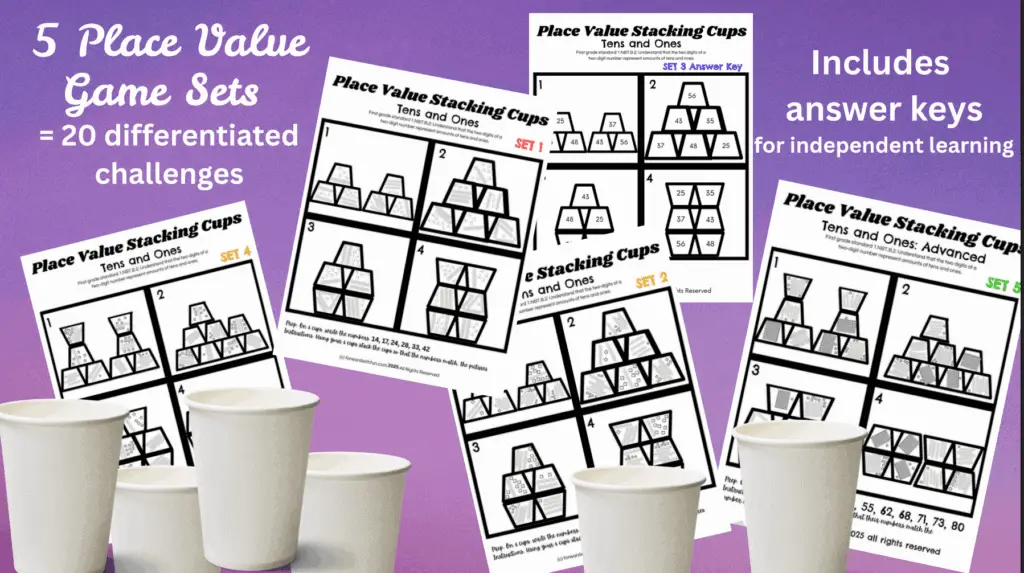
Place Value Stacking Cups are a classroom activity designed to build foundational number sense. Students are given a set of paper cups labeled with different two-digit numbers. Using printable task cards with base ten block illustrations (representing tens and ones), students match the correct number to the image — then stack the corresponding cup in the correct position to match the picture.
I recommend using these cups to meet 1st grade math standard: 1.NBT.B.2: Understand that the two digits of a two-digit number represent amounts of tens and ones and subsequent place value standards. The cups can also be used with kindergarten and early second grade.
This activity not only reinforces counting and number identification but also strengthens your students’ understanding of the base ten system. And let’s face it, anything involving stacking cups is an instant win in the classroom!
Simple setup, powerful learning.
Base ten activities are essential for developing number sense in the early grades, but they don’t have to be repetitive or worksheet-heavy. Our Place Value Stacking Cups bring a new level of excitement to place value practice and make math centers something your students look forward to.
Ready to stack up the learning? Grab your Place Value Stacking Cups below! Bundle to save.
If your students love Place Value Stacking Cups, don’t stop there. We’ve created a whole series of cup stacking resources that turn skill practice into exciting, interactive play:
Each one is designed with the same hands-on, stackable format that makes learning stick. Fun fact: the addition and subtraction sets use the SAME CUPS. So the prep is halved!